
.svg)
Understanding Shopify Blog Settings
Shopify's built-in blogging functionality offers a plethora of settings that empower e-commerce brands to create a dynamic and engaging blog. To get started, you need to access your Shopify admin dashboard, where you can manage your store's blog content, settings, and overall appearance. In this section, we will discuss the fundamental aspects of Shopify blog settings and help you navigate the process of creating and managing blogs.
1.1 Accessing and Managing Blogs in Shopify Admin
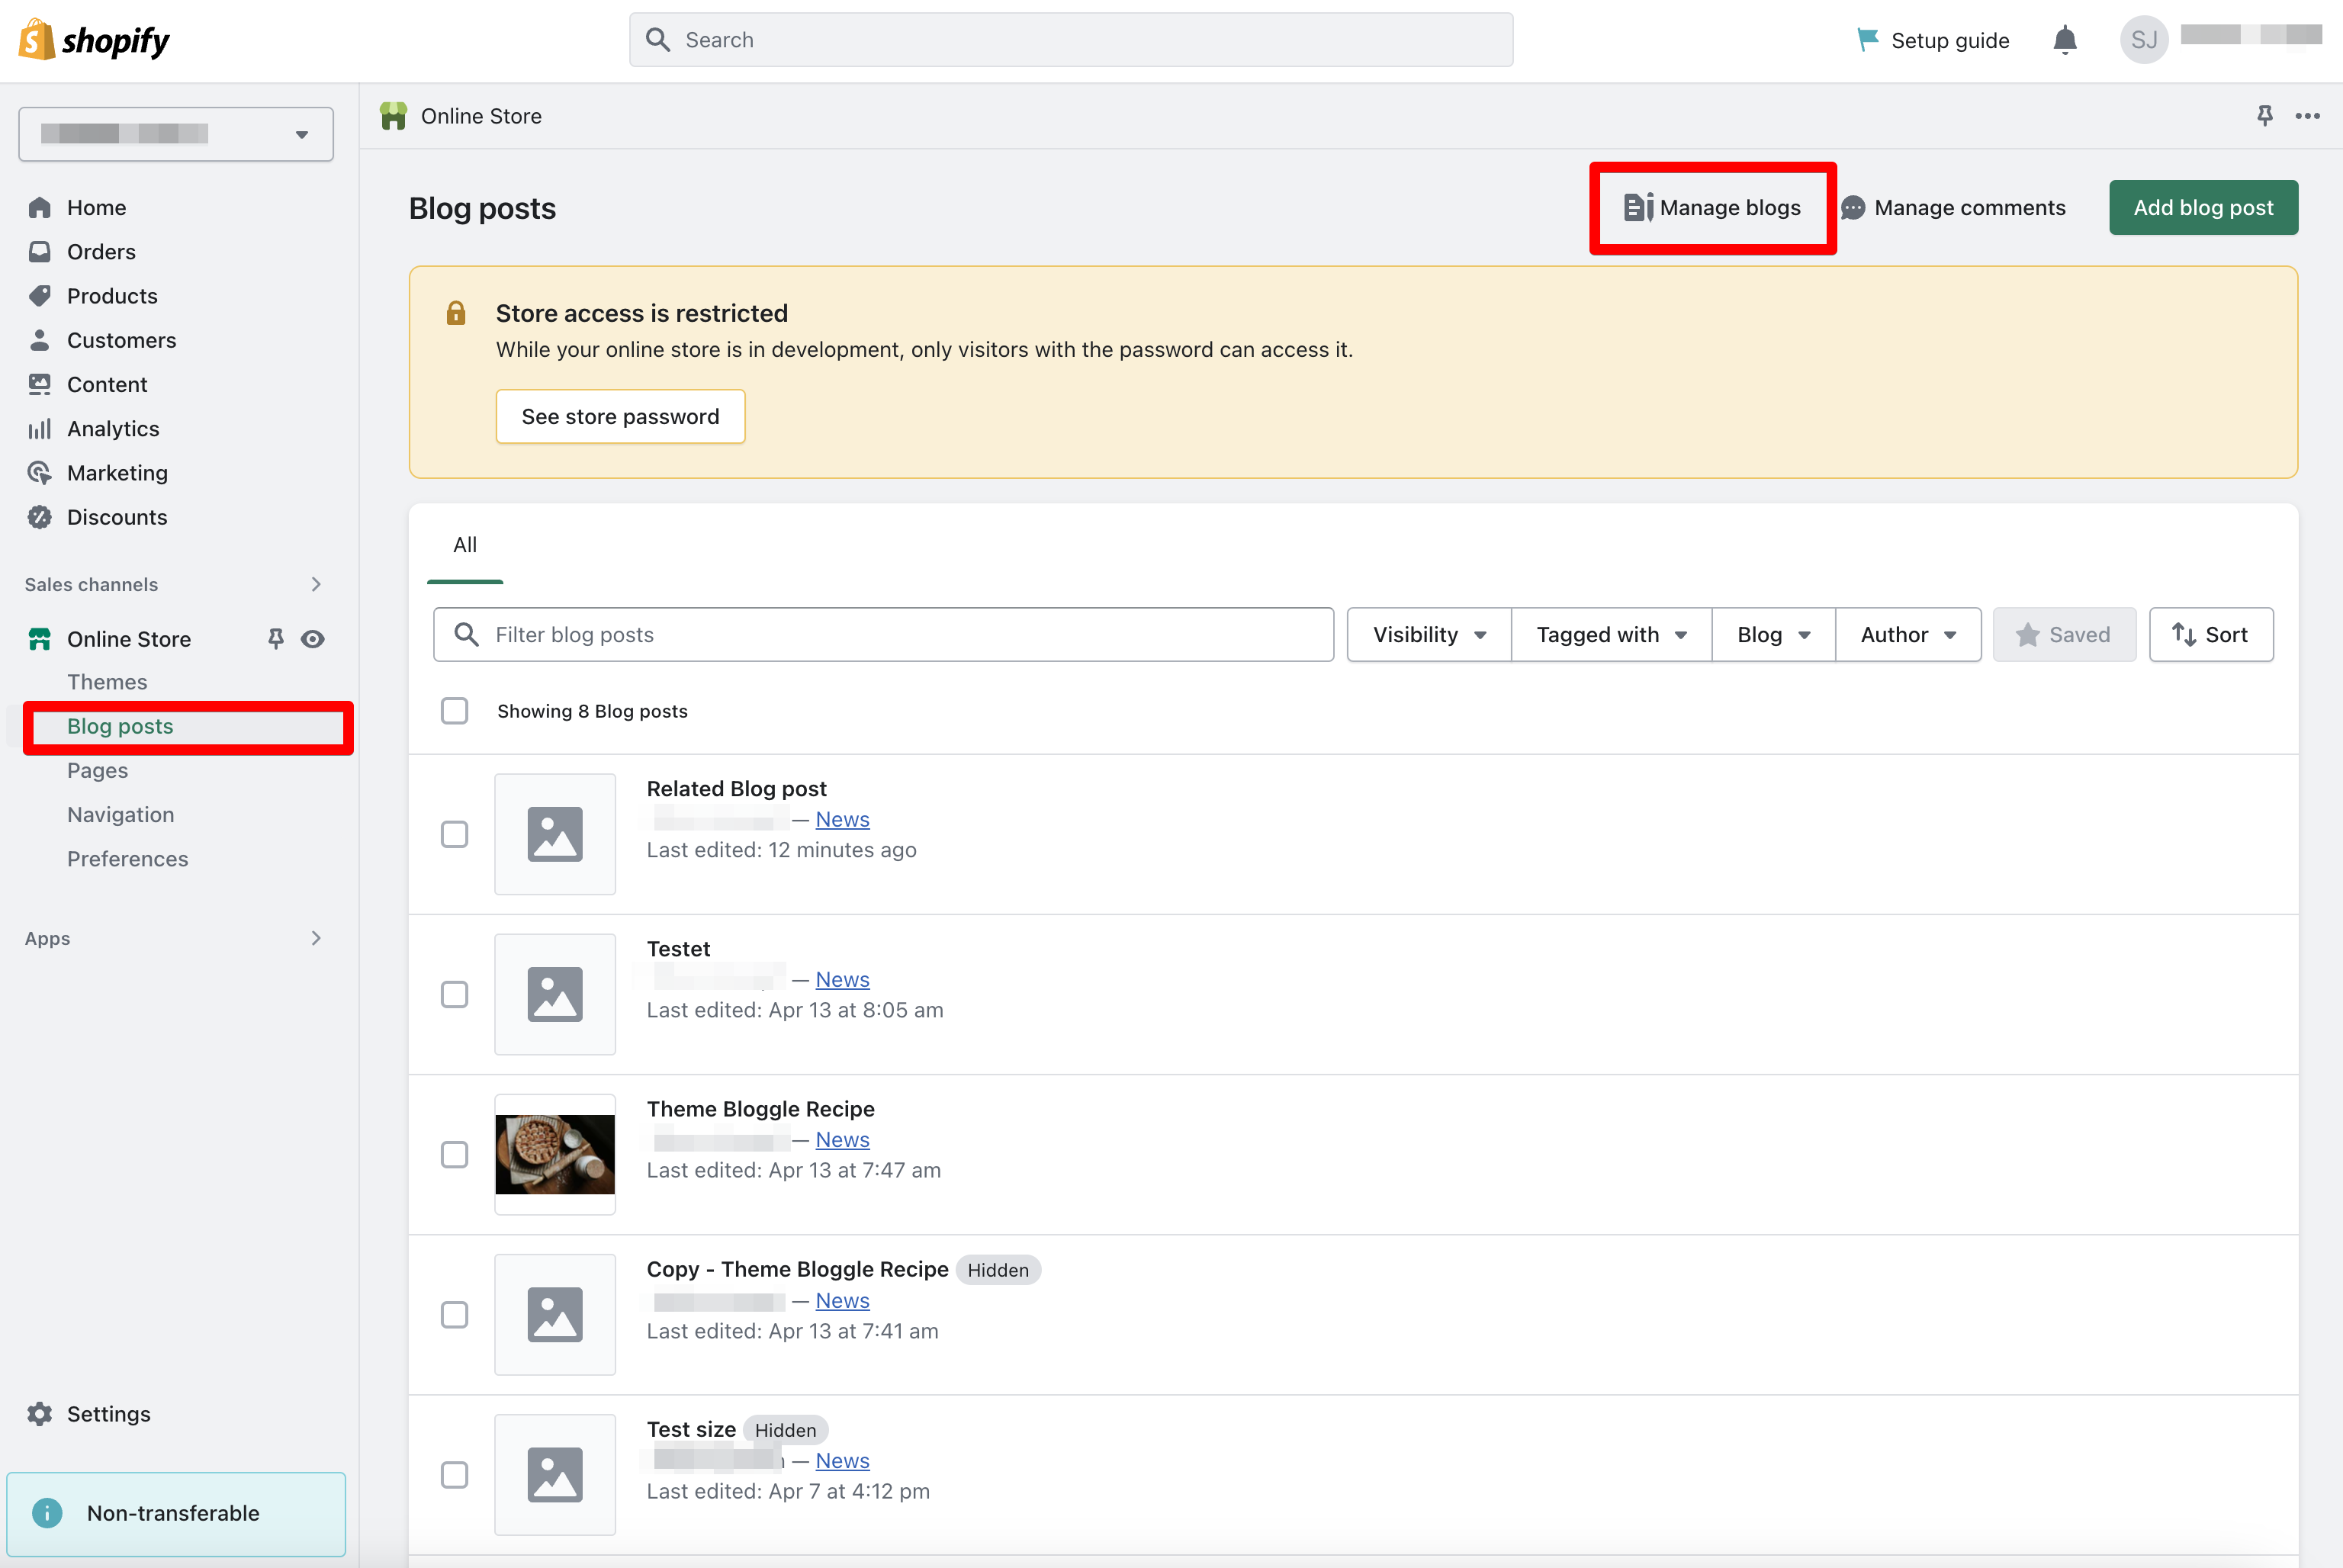
To access the blog settings, log in to your Shopify admin account and navigate to the "Online Store" section in the left-hand sidebar. Click on "Blog Posts," and you'll find the "Manage Blogs" button in the top-right corner. This area is where you can create new blogs, edit existing ones, and configure your blog settings.
1.2 Creating a New Blog in Shopify
To create a new blog, click on the "Add Blog" button in the "Manage Blogs" section. You'll need to provide a blog name, which will be used as the blog URL and in the page title. The name should be descriptive, unique, and include relevant keywords for better search engine visibility.
1.3 Configuring Blog Settings
After creating your blog, and your blog post you can configure various settings to enhance its functionality and appearance. Some essential settings include:
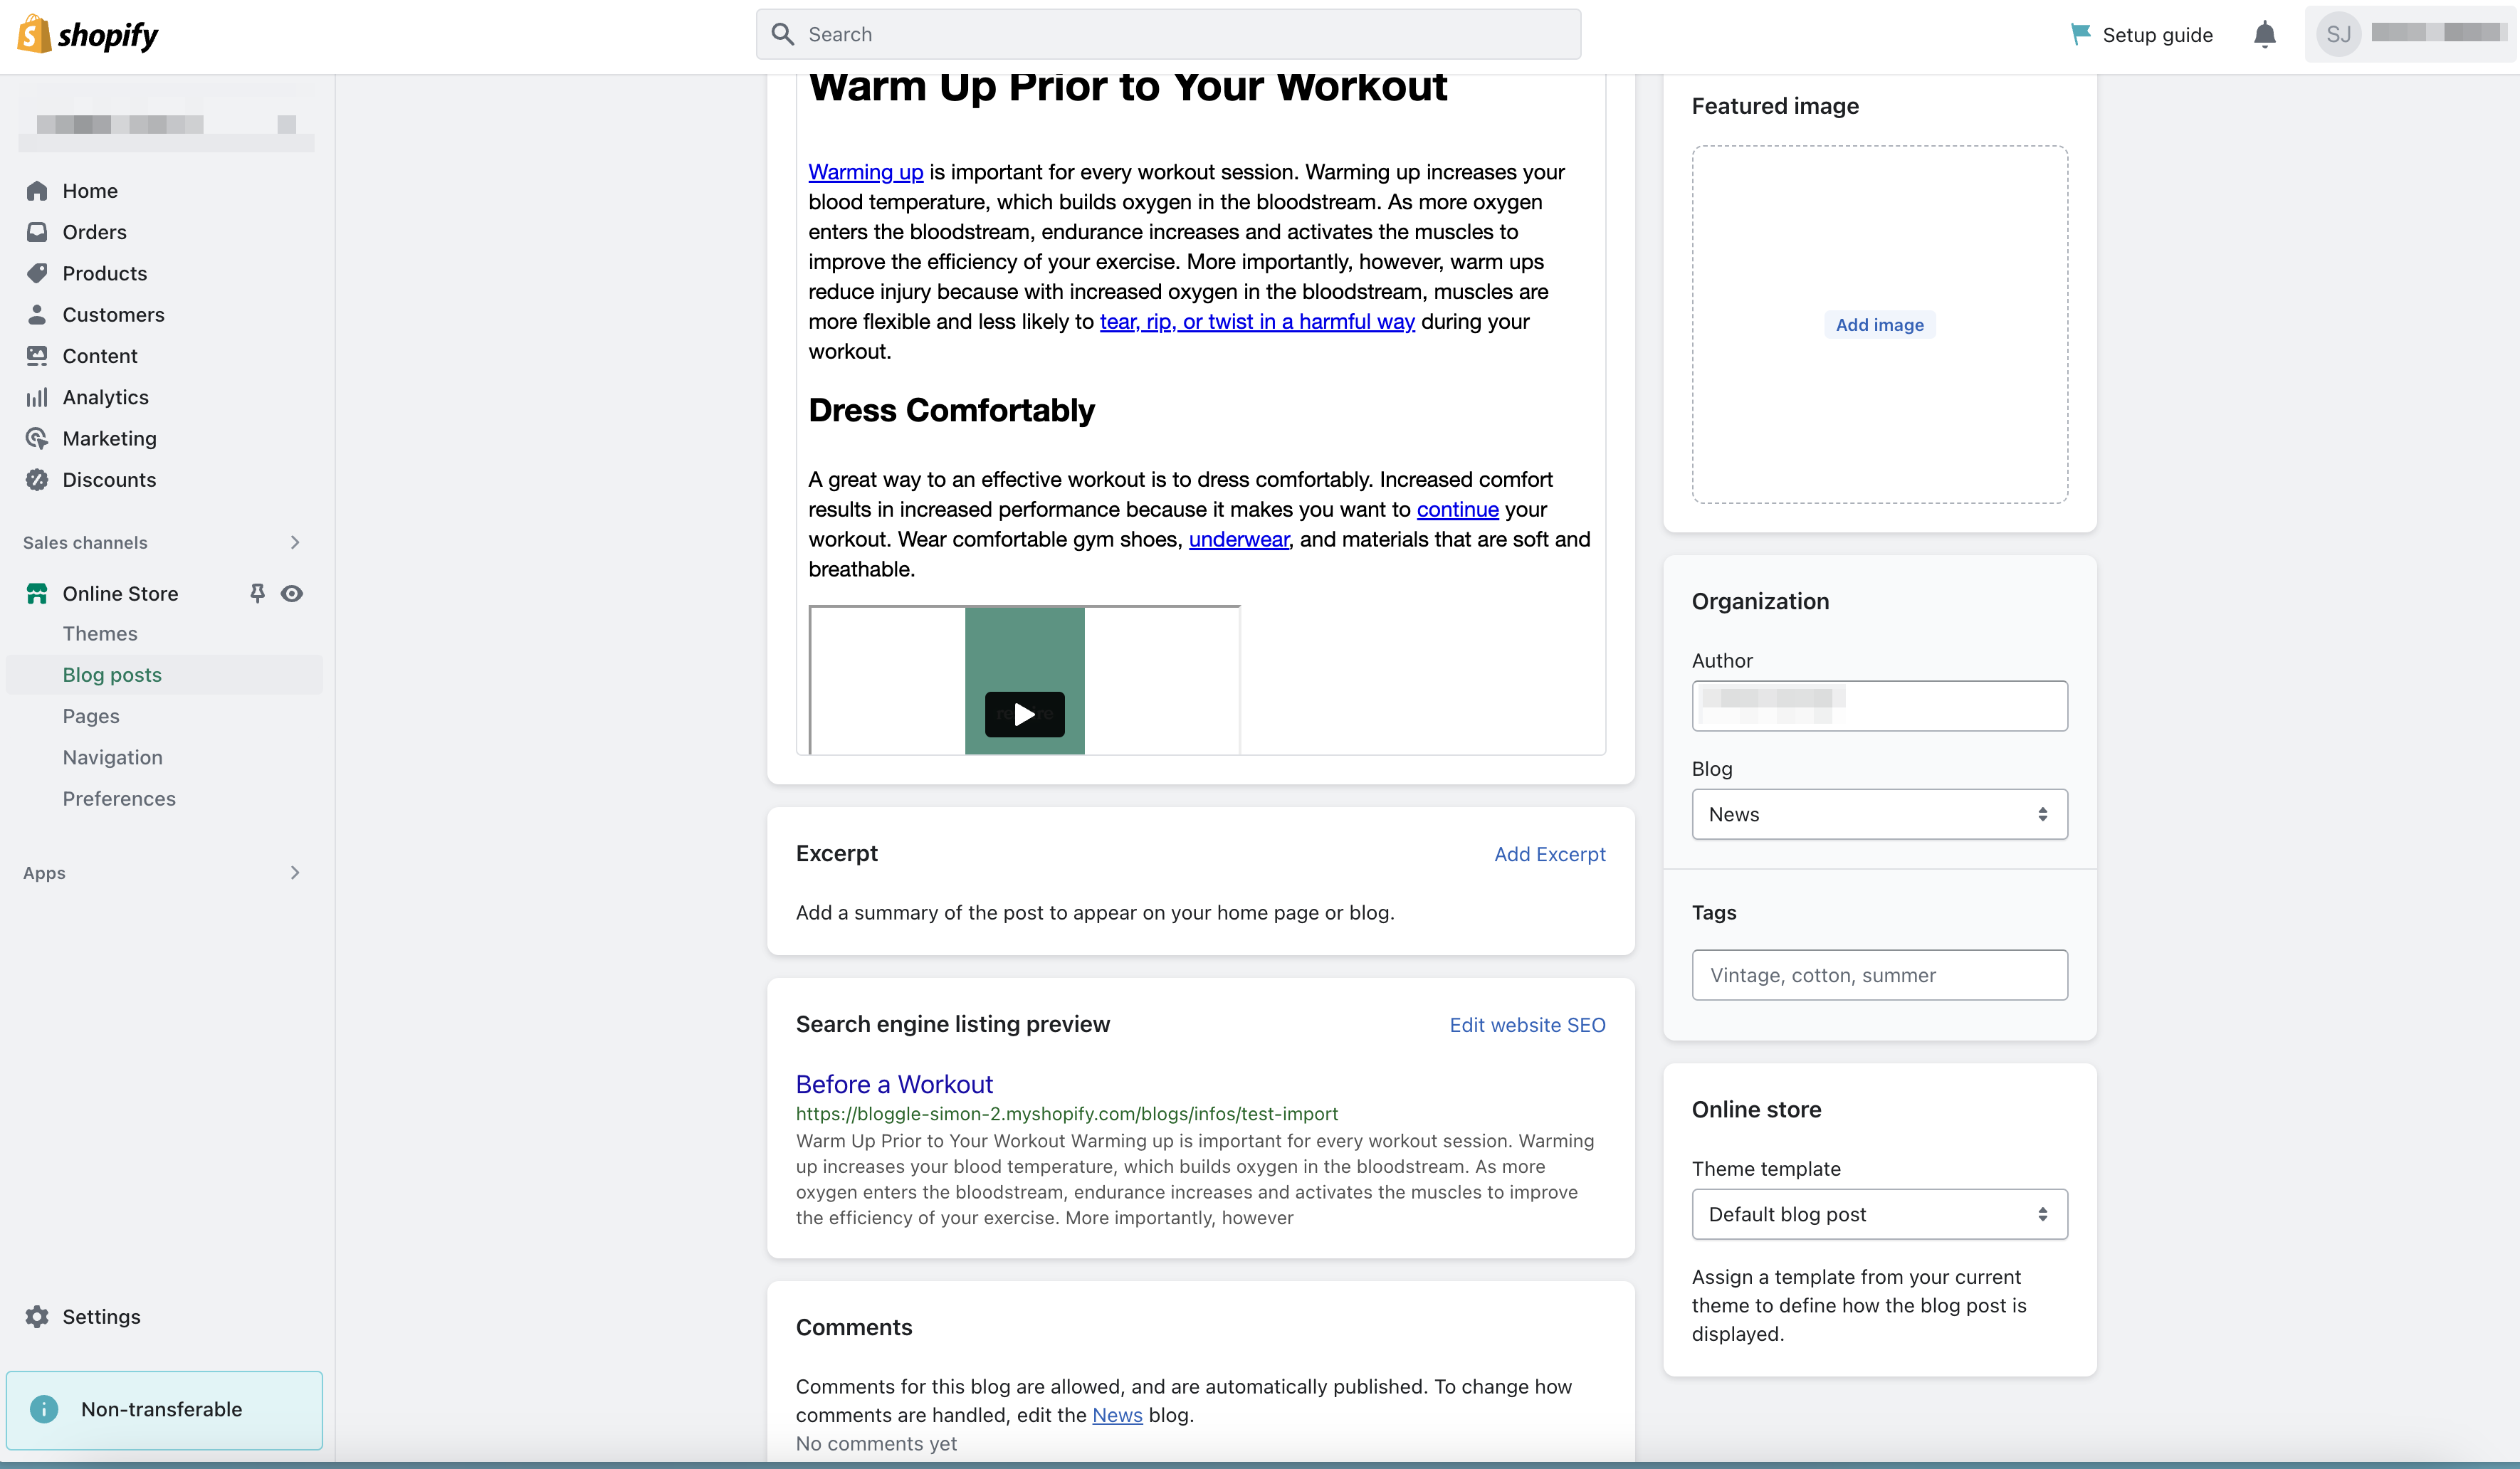
- Template: Choose a Shopify theme to define the look and feel of your blog. You can customize the theme using the theme editor to match your brand's aesthetics and values.
- Featured Image: Add a visually appealing featured image to represent your blog on the homepage and in search engine results.
- Meta Description: Write a concise and engaging meta description that summarizes your blog's content. This description will be displayed in search engine results and can influence click-through rates.
Customizing Your Shopify Blog for an Optimized User Experience
A well-structured and visually appealing blog can significantly enhance your online store's user experience. In this section, we'll delve into the customization options available in Shopify to help you create a blog that resonates with your ideal target audience and reflects your brand values.
2.1 Selecting and Customizing a Shopify Theme
Your chosen Shopify theme will determine the layout, design, and overall appearance of your blog. To select and customize a theme, navigate to the "Online Store" section in your Shopify admin dashboard and click on "Themes." You can browse through the available themes in the Shopify Theme Store and choose one that aligns with your brand's aesthetics.
Once you've selected a theme, you can customize it using the built-in theme editor. Here, you can modify colors, fonts, and other design elements, as well as add or remove sections and features to create a unique and engaging blog experience for your readers.
2.2 Adding Multimedia Content
Including multimedia content, such as images, videos, and infographics, can significantly improve your blog's user experience by breaking up text and providing visual interest. When creating a new blog post, you can add images and videos by clicking on the "Insert Image" or "Insert Video" icons in the blog post editor. Additionally, you can use HTML to embed other types of multimedia content, such as audio files and interactive elements.
2.3 Organizing Blog Content with Headings and Tags
Headings and tags are essential for organizing your blog content and making it easily navigable for your readers. Using headings (H1, H2, H3, etc.) throughout your blog posts helps break up the content into manageable sections, improving readability and making it easier for search engines to understand the structure of your content.
Tags, on the other hand, are used to categorize and group related blog posts. To add tags to a blog post, simply enter relevant keywords in the "Tags" field within the blog post editor. Once you've added tags, you can create a tag cloud or tag list in your blog's sidebar, allowing readers to quickly find content related to their interests.
Optimizing Blog Post Settings with Bloggle: SEO, Sidebar, and Metadata
Bloggle offers advanced settings to help you optimize your blog posts for search engines, enhance the user experience, and improve the overall performance of your blog. In this section, we'll discuss Bloggle's blog post settings, including SEO settings, sidebar configurations, and metadata management.
4.5 Configuring SEO Settings in Bloggle
Bloggle provides an intuitive interface for managing your blog post's SEO settings, ensuring your content is optimized for search engines. Key SEO settings available in Bloggle include:
- SEO Title: Customize the meta title for each blog post, incorporating relevant keywords for improved search engine visibility. Ensure your titles are concise and accurately describe the content of your blog post.
- SEO Description: Craft engaging meta descriptions that summarize the content of your blog posts. Incorporate relevant keywords and aim for a length of 150-160 characters to optimize your descriptions for search engine results.
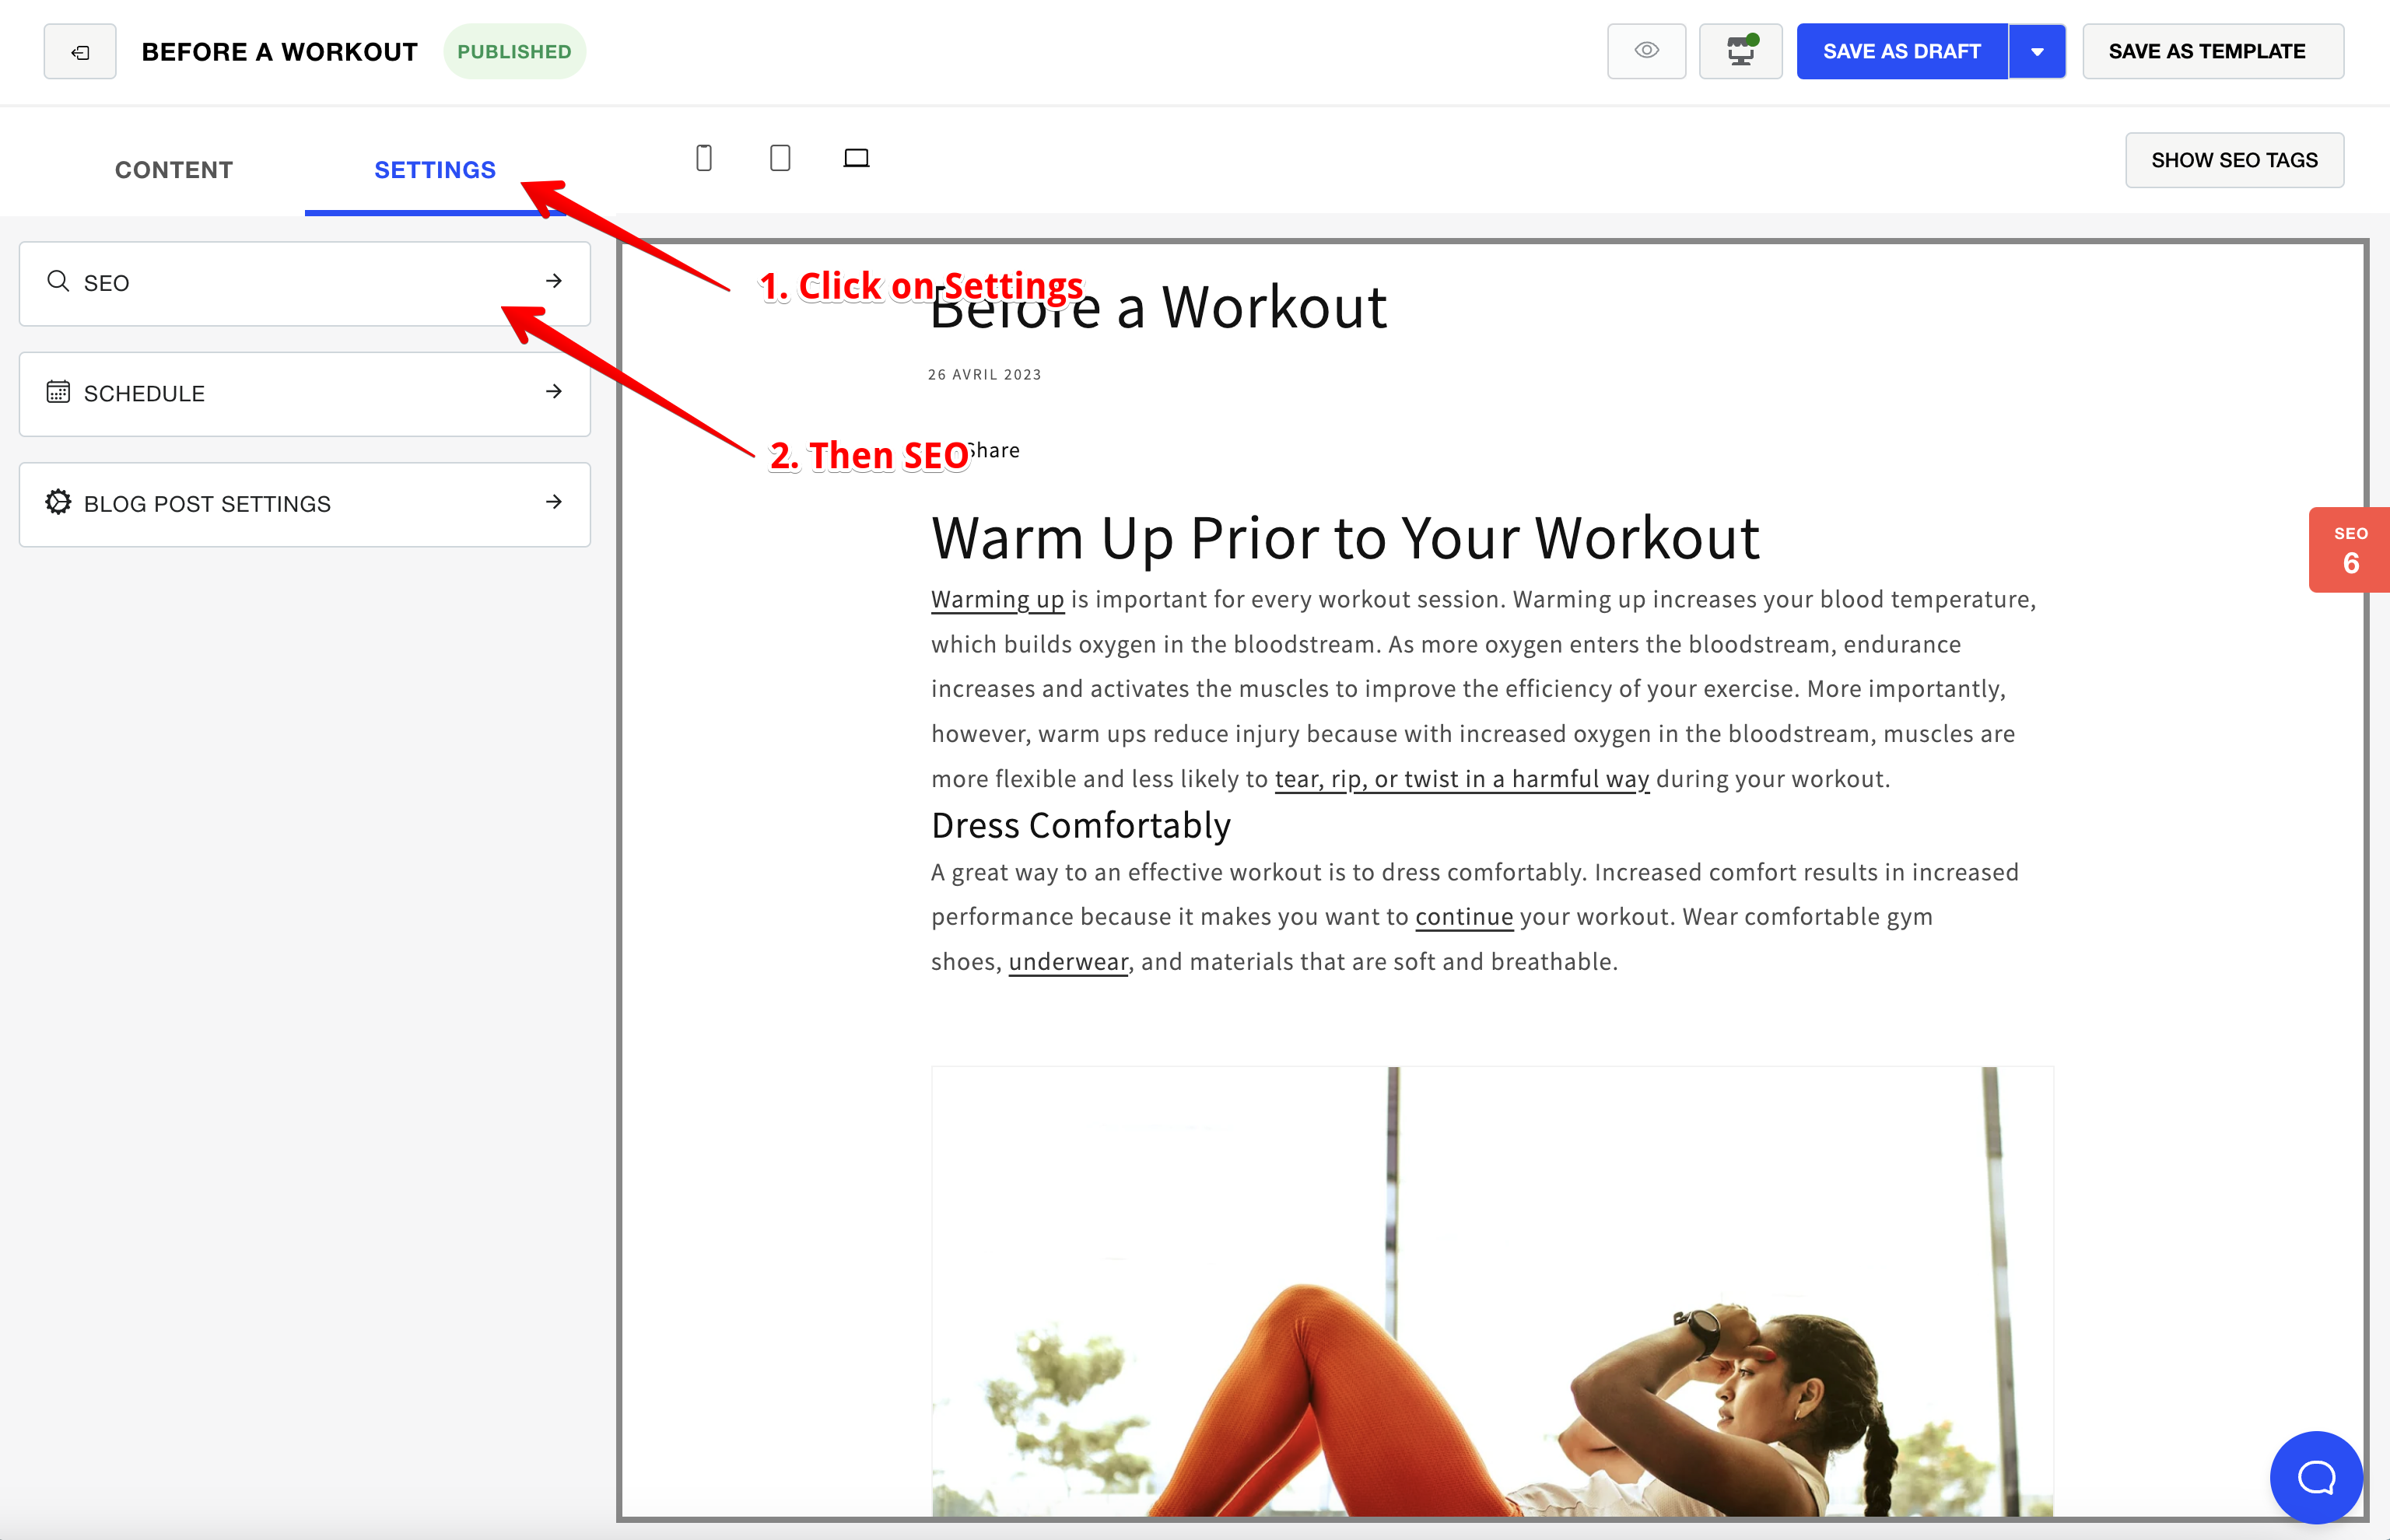
To access these SEO settings, navigate to your "Blog Post" editor within the Bloggle app, click on settings then SEO.
4.6 Customizing Sidebar with Product Links
If you use the blog post template, Bloggle allows you to configure your blog's sidebar to display relevant products alongside your content, encouraging readers to explore your online store. To add product links to your sidebar, follow these steps:
1. Navigate to the "Settings" tab within the Bloggle editor on you blog post.
2. Click on "Sidebar Product"

3. Select if you want to search the product by Title or SKU
4. Select the "Product" you want to display.
4.7 Managing Featured Images, Titles, and Meta Descriptions
Bloggle makes it easy to manage your blog post's featured images, titles, template, excerpt, author and tags, ensuring your content is visually appealing and optimized for search engines. To manage these settings, follow these steps:
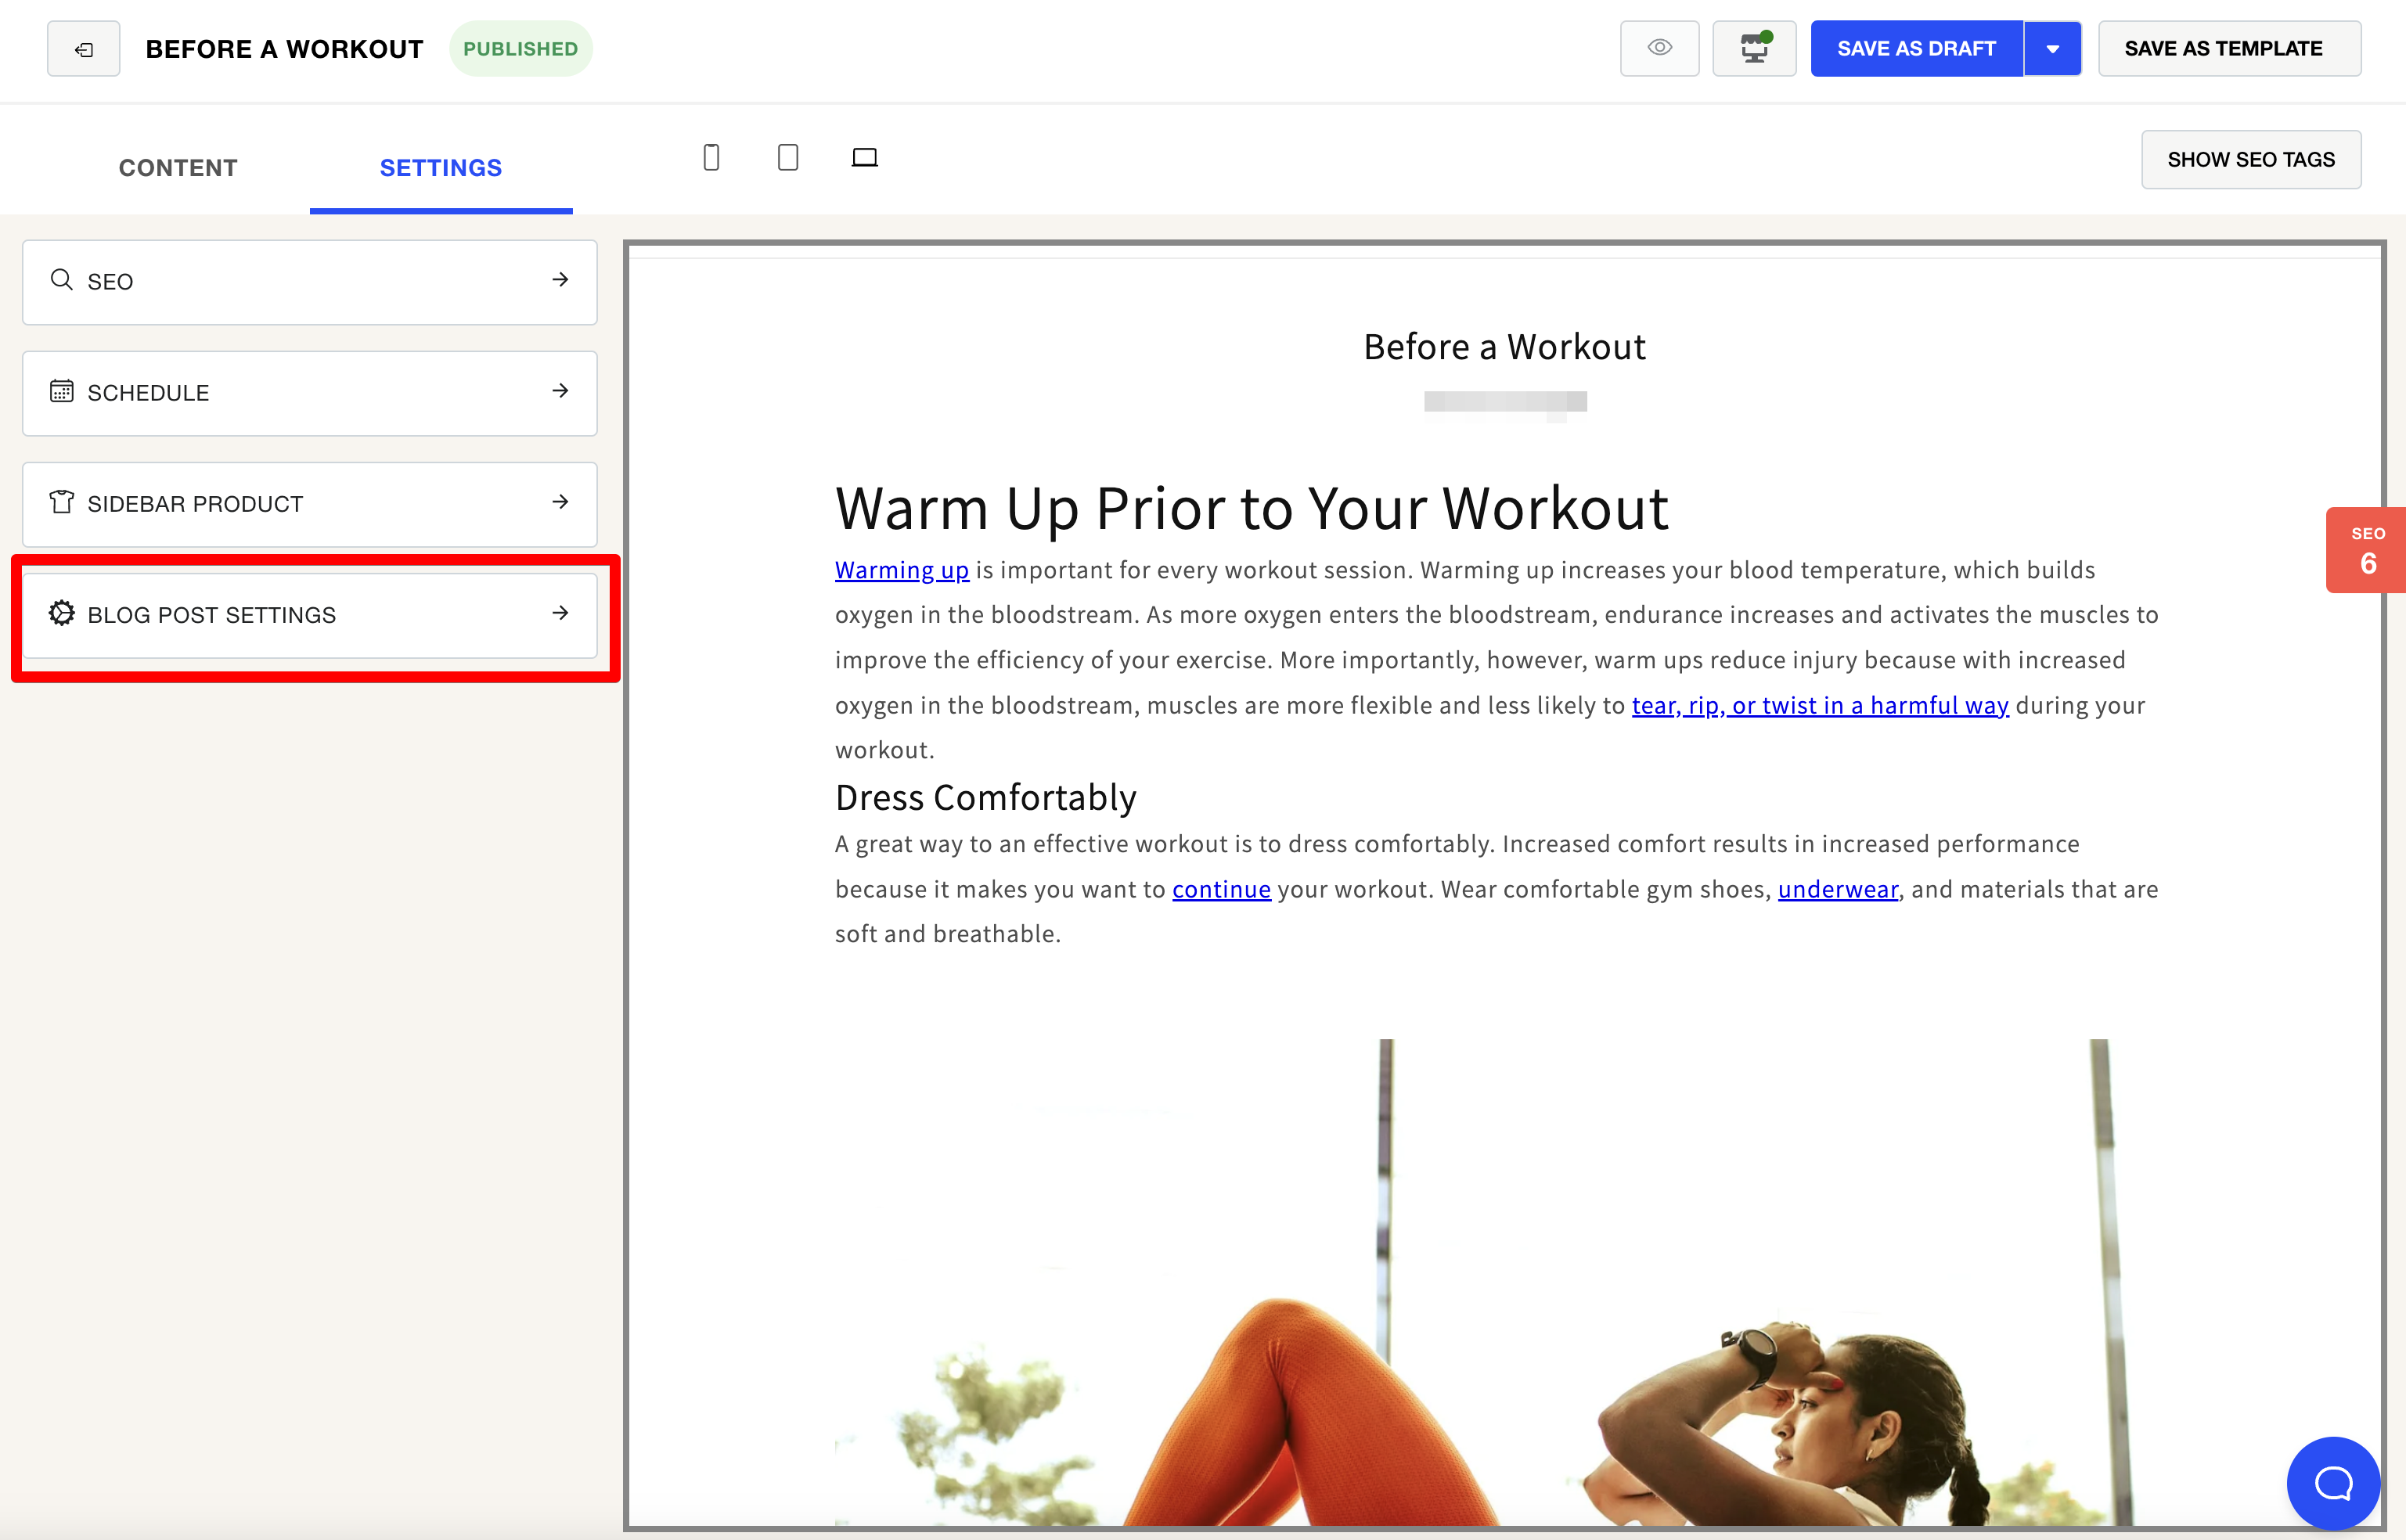
1. Navigate to your "Blog Post" editor within the Bloggle app.
2. To add or change the featured image, go to settings > Blog Post settings.
3. Edit the blog post title, summary and publication date, ensuring it accurately represents the content and includes relevant keywords for SEO.

4. Edit the author, the blog and the template of your article

5. At last you can add a featured image
By optimizing your blog post settings with Bloggle, you can ensure your content is search engine friendly, visually appealing, and offers a seamless user experience. This ultimately leads to increased engagement, improved search engine rankings, and a more successful content marketing strategy for your e-commerce store.


.svg)
