
.svg)
The impact of blogging on the success of ecommerce businesses is undeniable.
By blogging on Shopify, you can establish credibility in your niche, get more traffic, build a community around your brand, catch leads early in the sales funnel and engage with customers who share your interests and passions.
Blogging on Shopify can be an exhausting task given all your existing responsibilities of running a store.
Despite that, it's a tried and tested strategy that helps convert visitors into loyal customers and boosts overall sales.
Today, I'll show you how to create and run a successful blog on Shopify. I'll also introduce you to Bloggle, a blog builder made for creating beautiful blogs that read well and rank high.

Why trust us?
- We're the creators of Bloggle, a dynamic Shopify blog builder available on the Shopify App Store that fills the gaps in native Shopify blogging capabilities.
- We're a global force: 2000+ merchants across 60 countries have trusted us to amplify their voices.
- Your peers adore us: We have a stellar 4.9/5 rating on the app store.
- We've already empowered 55,000+ blogs written using our versatile app.
Under our guidance, users have reported up to a 10x boost in Search Engine Optimization (SEO) organic traffic and revenue.
Why should you consider Shopify for blogging?
Blogging on Shopify is essential to improving your shop visibility. Well-thought-out blogs drive organic traffic, build a community, and increase conversions.
Direct sales from blog posts can happen, but the real value of blogging is in using valuable content to grow your mailing list, retarget qualified leads, and enhance brand awareness.
Here’s what a good Shopify blog can do for you:
#1 Boost your SEO
Over 28% of the people click on the first Google result, with the numbers in steep decline as we are nearing the end of the first page.
SEO (Search Engine Optimization) is the process of improving your website so that it ranks higher on search engine results pages, mainly Google. Blogging is a big part of SEO and can greatly boost organic traffic to your Shopify store.
By creating helpful blog posts, you make it easier for Google to find and rank your site. When your blog shows up higher in search results, more people visit your site, and that leads to more sales. That should be the real goal of your blogging strategy.
#2 Catch leads early in the sales funnel
You should create content that’s engaging, informative and serves as a magnet for potential customers, catching them early in the sales funnel. By blogging on Shopify, you can create content that can captivate readers’ attention and spark more interest in your products.
This reduces the friction typically experienced when transitioning from content to commerce, creating a smoother customer journey.
Using blogs to convince potential customers they’re making a good purchase is one of the best strategies you can employ on your Shopify website.
BONUS PRO TIP
A great way to make money from your blog is to build a list of readers and then send them products that solve the problems they were searching for when they found your blog.
#3 Increase sales
Promoting products through your blog directly is another way to increase sales. This step is a natural continuation of catching leads early in the sales funnel.
By integrating product promotions within your blog posts, you make it easy for readers to transition from learning about a product to making a purchase.
After you draw customers into the various sections of your sales funnel and move them toward conversion, you can also optimize the sales funnel better, by analyzing your buyers’ journey, and an interlinked Shopify blog is one of the best sources for that.
#4 Drive community engagement
Blogging creates opportunities for building a community that will continuously engage with your store.
Engaging content invites readers to interact with your brand, whether through comments, social sharing, or participating in discussions.
This level of interaction builds a community around your brand, which creates returning customers and raises your conversion overall.
#5 Create brand awareness
Through consistent and quality blogging on Shopify, you can establish your brand's voice and carve out a distinct identity.
#6 Build relevant backlinks
Quality content on your Shopify blogs can attract backlinks from other websites, which is a vital SEO factor.
Backlinks drive traffic to your site and improve the authority and credibility of your website.
#7 Boost your mailing list
Monetize your Shopify blog by embedding newsletter signup forms directly within your posts. This allows you to capture the contact information of readers who are interested in your content.
Once signed up, you can enter these readers into specific email flows, offering them free resources that are relevant to the articles they've shown interest in.
Does Shopify have a blog feature?
Yes, Shopify does have a blog feature, and you can absolutely blog on Shopify.
However, the native blog is basic: templates are limited, SEO controls are light, URL patterns are fixed (e.g., /blogs/ paths), and built-in analytics are shallow compared to specialized blogging tools. If you need advanced SEO (richer snippets, tighter permalink control, content scoring), pair Shopify with a specialized blog builder to unlock those capabilities.
As a former Shopify agency owner, I've worked with many clients transitioning from platforms like WooCommerce and WordPress to Shopify.
While Shopify excels in many areas and typically outperforms WooCommerce, one common feedback I received was about the limitations of Shopify's native blogging feature. Many find it less user-friendly compared to the robust options offered by WordPress.
Driving organic traffic is the biggest and most natural force of online visibility, and a well-formatted and aesthetically pleasing blog is the industry standard for all successful ecommerce brands.
To truly stand out and boost your SEO, you need more than just the basics. That’s why I created Bloggle. With Bloggle, you can easily transform your Shopify blog into a powerful tool that attracts visitors and turns them into loyal customers.
Bloggle is effective, simple and fun to use. Say goodbye to the mundane and make blogging an effortless, enjoyable part of growing your business.
What are Shopify’s native blog feature limitations?
You may have noticed that you can create blog posts on Shopify, but it does come with limitations.
Compared to dedicated CMS platforms like WordPress, Shopify’s native blog feature has some constraints that could affect how you execute your content marketing strategy.
#1 Minimal customization
One of the primary constraints lies in customization. Shopify's native blog templates present limited design options, which are not sufficient for brands striving to establish a distinctive visual identity.
This lack of flexibility can hinder businesses whose content strategy leans heavily on unique and captivating visual presentations, which includes almost every business in e-commerce.
#2 Limited SEO features
While Shopify provides foundational SEO tools, it falls short of offering the features that specialized blogging platforms need.
Essential elements such as detailed content analysis, advanced meta-tagging, and comprehensive SEO optimization recommendations are notably less potent on Shopify.
This gap in functionality can be a stumbling block for businesses dedicated to refining their SEO strategies to achieve peak search engine visibility.
#3 Poor content management
Shopify's blogging tool shows its limitations from a CMS standpoint.
Although the platform allows for basic organizing, categorizing, and scheduling of blog posts, it lacks the advanced content management and analytics tools that platforms such as Bloggleprovide.
This poses a significant challenge for businesses that need additional content management options, such as scheduling their posts and organizing content in a special way.
#4 Key native limitations
Permalinks & snippets: Less control over URL structure and rich‐result markup, which can cap CTR gains from enhanced snippets.
Analytics depth: Basic post metrics; for cohort views, scroll depth, content groups, and multi-touch insights you’ll need GA4 + a content-focused tool.
Design flexibility: Tighter templates and fewer layout blocks make it harder to ship conversion-ready, brand-specific posts without a builder.
Editorial ops: Limited taxonomy controls and internal-linking helpers slow down cluster builds.
The solution? Bloggle.
Recognizing these limitations, I created Bloggle - a Shopify blog builder solution for creating beautiful blogs that read well and rank high. With endless design options and built-in SEO guidance, blogging has never been simpler or more effective.
Create amazing blogs. Without limits.
Start with your own theme, layout, or choose from our conversion-focused designs. Enjoy a wide array of layout options, designs, and blocks, all tailored to make your blog stand out.
Unlimited design possibilities
Use your theme’s buttons, styles, and fonts to craft blogs that are uniquely yours.
The app is just AMAZING! Everything I ever wanted for our blog and SEO is here... and their support team is just ANOTHER LEVEL!
Love working on Bloggle! Excellent tool to make your blog very clean, eye-appealing, and 100% SEO oriented. Very intuitive to use.

Easy drag-and-drop editor made for bloggers
Our intuitive editor is built for ease and speed, allowing you to move sections and rearrange content effortlessly. No tech skills required.
User-friendly navigation
So simple, even a non-techie can use it with ease.
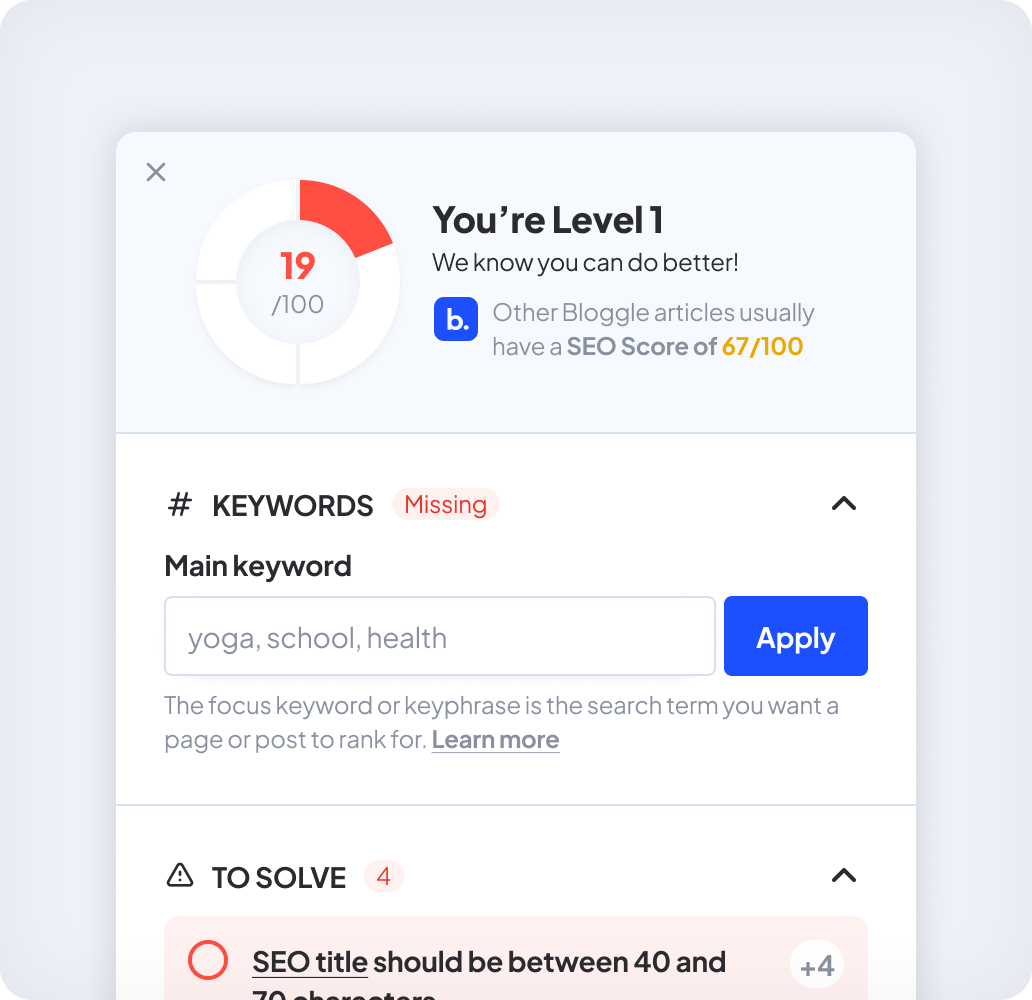
Your new SEO coach is here
Optimize your blog for search engines with our built-in SEO scoring tool. Designed for beginners, it offers step-by-step guidance to improve your blog's visibility and organic traffic—no headaches, just results.
Just follow the coach, enhance your blog, and get better at SEO over time.
How to start blogging on Shopify (+Example)
How to start a blog on Shopify? The answer to that question begins with a clear SEO strategy and understanding of your content objectives.
One thing I've noticed is that brands struggling with SEO often miss two crucial considerations:
- keyword selection based on the reader's intent and
- aligning strategies with their business specifics.
Fast cluster plan (copy-paste)
- Pick a pillar (e.g., “Shopify blogging guide”).
- Draft 5–10 support posts (how-tos, comparisons, examples).
- Link each support post → pillar; add 2–3 lateral links between supports.
On-page checklist
- One H1 with the target keyword; scannable H2/H3s covering intent.
- Use the main keyword in title, H1, first 100 words; add 2–3 natural variants.
- Optimize images (descriptive filenames + alt text tied to the topic).
- Add 3–5 internal links per ~1,000 words and 1–2 credible external citations.
- Write a benefit-led meta title (≤60 chars) and meta description (120–155 chars).
- Headline testing: draft 5–10 options; deploy the top 2 and rotate based on CTR.
Keyword research is foundational
Firstly, when selecting keywords, categorize them into three parts of the sales funnel: top, middle, and bottom.
Tools such as Google Keyword Planner, Ahrefs, or SEMrush can help identify relevant keywords with high search volume but moderate to low competition, making it easier to rank in search engine results pages (SERPs).
From my experience, it’s more effective to start with bottom-of-the-funnel keywords. For example, if I’m selling supplements, targeting a keyword like “what is the best marine collagen-based supplement” with 100 searches per month is better than targeting “what is marine collagen?” with 500 searches.
The reason is straightforward: those 100 searches are from people looking to buy, not just browsing for information.
Business context before content creation
Secondly, consider the business context before jumping into content creation.
If you’re a multi-brand retailer selling beauty products, begin with an inventory of your products and brands. Create a Google sheet to prioritize items based on competitive pricing, stock availability, or higher profit margins.
This preparation guides which brands or products to boost through SEO. For example, if you have the most competitive price or unlimited stock for Brand A, even if it has only 200 global searches, it’s worth focusing your efforts there instead of on Brand B, which might have 1,000 searches but where your competitive edge is less significant.
Always align your content strategy with these insights to ensure that your SEO efforts contribute directly to increased sales and profitability, rather than just traffic.
Example: Starting a Shopify Blog for a Watch Store
With keywords identified and a deep understanding of your audience, it's time to brainstorm content ideas and topics.
For a watch Shopify store, topics could range from how to maintain your watch to explaining what watches celebrities are wearing, depending on what aligns with your brand and audience interests.
Here are a few content ideas that could appeal to potential customers:
Creating great content is just the first step, promoting it is crucial to ensure it reaches your target audience.
Useyour social media channels, an email newsletter, and even paid advertising to drive traffic to your blog.
How to add blogs to Shopify with Bloggle
Adding a blog to Shopify with Bloggle is fairly straightforward.
- Install the Bloggle app from the Shopify app store. Search for “Bloggle” and “Bloggle complete blog builder”.
- When you install it, go to your Shopify admin, and from the menu on the left-hand side click on “Apps” and then choose “Bloggle complete blog builder”.
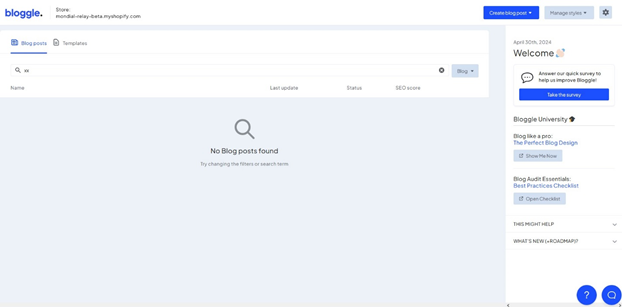
You will see this screen:
4. Click on “Create a blog post”.
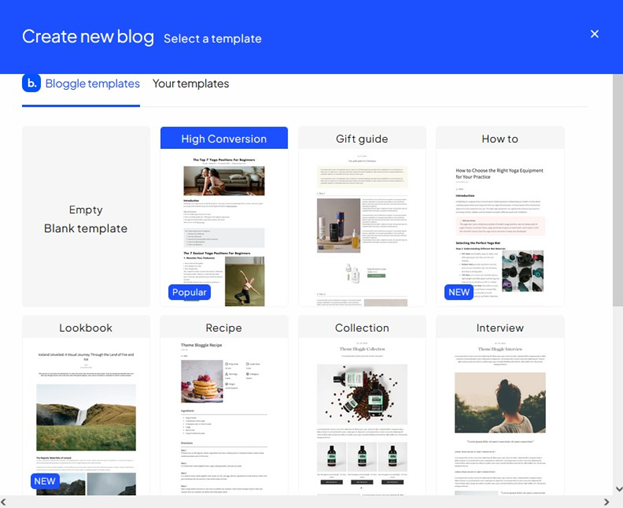
5. After that, you can select a template that is premade by Bloggle, or choose one of your templates. This option is very helpful, especially to new Shopify users and the ones that don’t have too much time to optimize their Shopify blog.
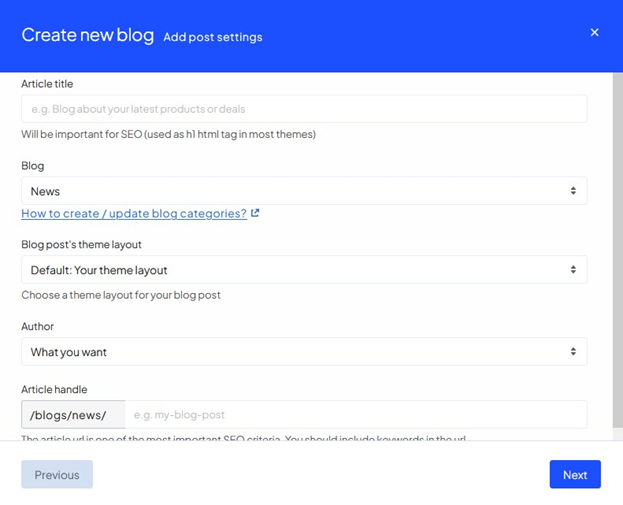
6. After selecting the template, you will need to name your blog and put additional info about it before going into the blog building section:
7. After clicking “Next”, you can finally start creating your blog:

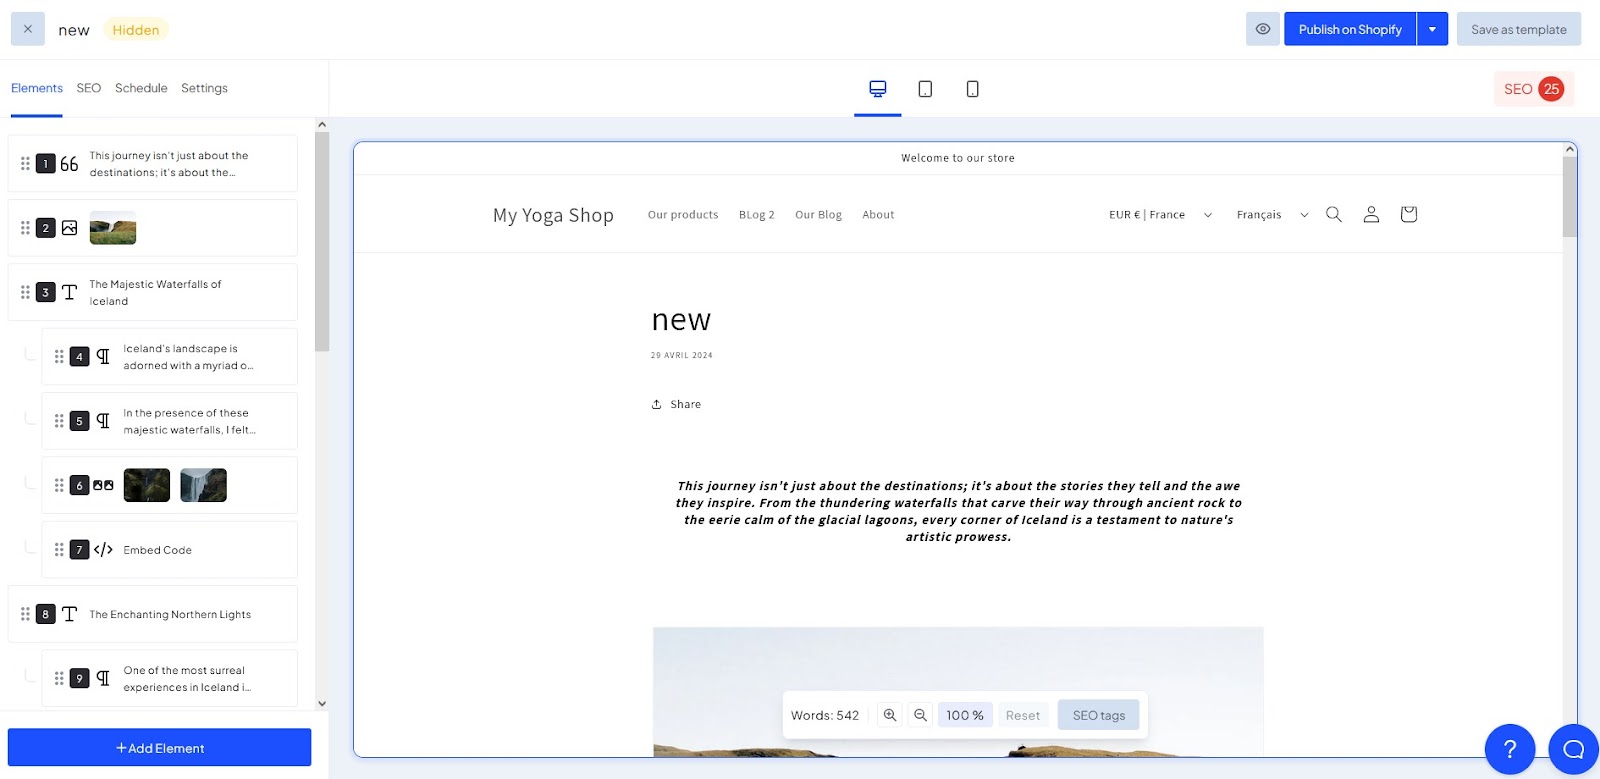
Another cool feature that Bloggle offers to their users is having AI writing the content for them. However, it is still better to create your unique content than relying completely on the AI.
8. After clicking “Create article” the blog building page will appear:
Ship it + surface it: Publish in Bloggle, then add the blog to Main and Footer menus. Link your best posts from product/collection pages where relevant to pass authority and drive qualified sessions.
Reinforce clusters: Use Bloggle’s categories/tags consistently (mirror pillar themes), enable Related posts, and drop breadcrumb trails to improve crawl paths and UX.
Conversion assists: Embed product blocks and sticky CTAs; add a newsletter block to capture TOFU/MOFU readers.
As you can see, Bloggle blog builder has many more options than the default Shopify blog builder.
You can check out your SEO score directly, and choose pre-made elements to include in your blog post, and the formatting of the blog post is much more straightforward.
With Bloggle, you can add products to your blog post, you can easily optimize titles and meta descriptions, sort blog posts, add the table of contents, add a sidebar, CTA, tags, categories, and videos.
Of course, all these things are boosting your blog visibility and conversion rate.
How to add a blog with Shopify admin?
Shopify's design philosophy carries over into its blogging platform, making it accessible and easy to navigate.
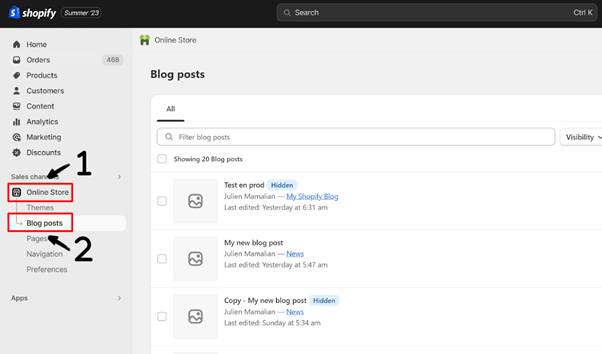
- Log into your Shopify admin panel.
- Navigate to Online Store > Blog Posts.
- Click on "Add Blog." (This will create blog posts)

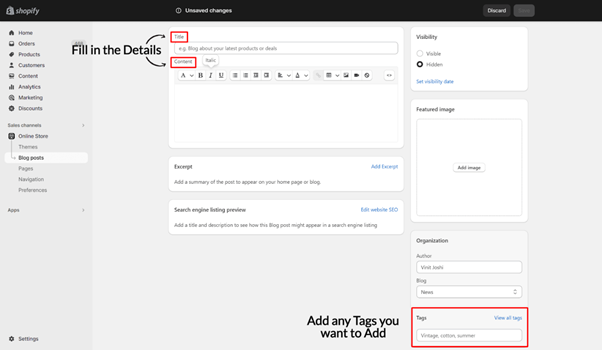
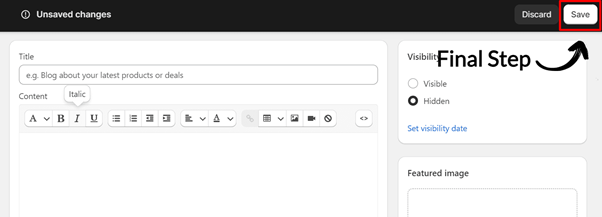
- Fill in the title, content, and any tags you wish to add.
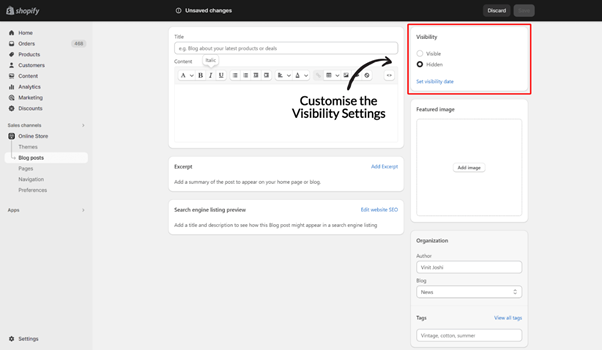
- Customize the visibility settings according to your needs.
- Hit "Save" or "Publish," and voila! Your post is live.
Make it discoverable: Online Store → Navigation → Main menu → Add menu item → Link: Blogs → choose your blog → Save. Repeat for the Footer menu to capture bottom-of-page traffic.
Stay consistent: In the post editor, set Visibility → Set visibility date to batch work and publish weekly.
Organize posts: In Organization, assign each article to your custom blog (not just the default “News”) to keep clusters clean.
Why you should use Bloggle for your Shopify blog
Bloggle is a specialized solution that I created initially for my clients at my Shopify agency. Faced with the lack of effective blogging tools that truly met brand needs on Shopify, Bloggle was born out of necessity.
I created this tool for my clients, to help them enhance their SEO and increase their ROI from content strategies.
Our code is optimized to improve site speed, enhancing your search engine rankings. We also understand the inconvenience of updating old blog posts whenever a product is edited. Bloggle handles this automatically.
We offer over 10 layout options that you can set up in just a few clicks, simplifying the process of making a blog post.
Bloggle also has a built-in responsive design because 54% of your visitors will come from Mobile.
I created this tool to help my clients who couldn't find an effective solution elsewhere, and it proved successful. If you're a Shopify brand looking to enhance your SEO and increase the ROI of your strategy, I recommend trying Bloggle. It's risk-free with a 14-day free trial available.
Close the Shopify blog native gaps with Bloggle:
• Design freedom: drag-and-drop sections, reusable templates, product/gallery blocks → conversion-ready layouts in minutes.
• Built-in SEO coaching: real-time content/scannability checks, meta prompts, and image alt reminders help posts rank faster.
• Cluster support: category pages, TOC blocks, related posts, and easy internal-link modules to reinforce topic authority.
• E-E-A-T signals: author bios with headshots, credentials, and links to expert pages; auto-generated category hubs improve crawlability.
Shopify blog examples to inspire you 🌟
As I already mentioned, Shopify blogs have restrictions regarding the options you can use. Most Shopify blogs use the free Dawn theme, which is the default for the store. With Bloggle, there are numerous Shopify blog themes you can use that convert and look beautiful.
Here’s our selection of the best Shopify blogs examples you can draw inspiration from:
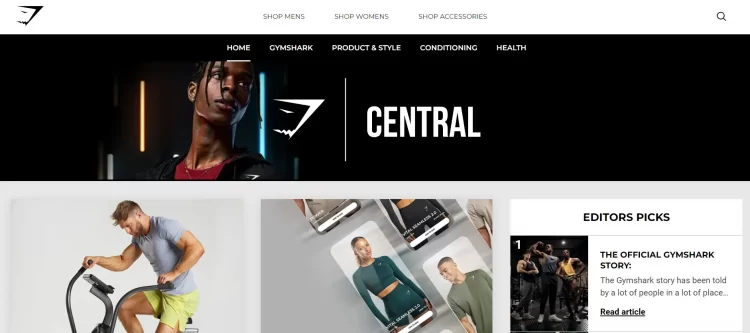
Gymshark
Gymshark focuses on fitness, workout tips, and athlete stories. They have built a strong community around its brand, and its blog plays a significant role in their strategy. There are many featured blog posts that keep readers engaged and motivated:
- Workout plans
- Athlete interviews
- Fitness challenges
Gymshark can help fitness enthusiasts independently of readers’ interest in their Shopify store. However, they use the blog to subtly promote their workout apparel, and the blog helps them convert readers into customers.
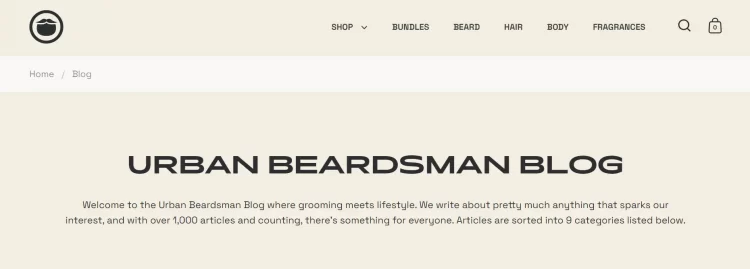
Beardbrand
Beardbrand writes about beard care, grooming tips, and lifestyle content for men. This blog focuses on everything beard-related:
- Grooming tips
- Product recommendations
- Broader lifestyle content
The blog successfully positions the brand as an authority in men's grooming, fostering a loyal customer base. Giving tips and tricks to men converts them into customers as well, because Beardbrand cleverly uses their products in blog posts about beard-grooming.
The Farmers Dog
The Farmers Dog is a unique blog about pets, pet health, and nutrition.
It is very rare to find a blog that pays such attention to pets. The appeal of this shop is in the feeling that the store owner really cares about animals and the expertise they are showing about the topics they cover is mind-blowing. They are writing about:
- Pet food
- Pet care
- Pet training
The Farmers Dog tries to position themselves as the authority in this niche and I think they succeeded.
The products they sell are not heavily showcased in each of the blog posts on the website, but there is no need for that.
This blog concept builds trust and even affection because the bond of the owner with their pet is strong. Therefore, everyone who writes about pets with such care and knowledge is certainly offering great pet products as well.

We also covered the best Shopify blog examples before, so check out our longer guide on this subject.
Overall, be unique, but still analyze the most successful examples of your competitors and draw ideas from their content.
FAQ
Can you really blog on Shopify?
Absolutely, you can blog on Shopify! It's not just a storefront; it's also a platform where you can establish a blog that serves as a community hub, an informative resource, and a branding tool
How do I actually start blogging on Shopify?
If you're scratching your head about how to start a blog on Shopify, don't worry. Shopify makes it simple. Go to your admin panel, select 'Online Store,' and then go into 'Blog Posts.' Click on 'Add Blog,' and you're off to the races.
Is Shopify suitable for dedicated blogging?
Shopify is restricted in its blogging features, so you should consider using Bloggle, as the ultimate blog builder for Shopify.
Do Shopify blogs rank on Google?
Yes. Shopify blogs can rank when pages align with search intent, follow solid on-page SEO (clear headings, descriptive image alts, helpful outbound references), and use internal links to cluster content. Many stores add a specialized blog builder to gain richer snippets, better layout control, and content scoring.
How do I add my blog to the menu?
Online Store → Navigation → choose Main menu → Add menu item → Link: Blogs → select your blog → Save. Repeat for the Footer menu to improve discovery.
Blogging on Shopify doesn’t have to be limited
Blogging on Shopify is straightforward, and you can start in minutes, but Shopify doesn’t give you enough options to shine and make your store stand out from the crowd.
The native Shopify blog lacks customization and SEO options that are needed for enterprise businesses.
There are many apps in the Shopify store that aim to strengthen the weak points of Shopify's native blog feature, but none compare to Bloggle.
Now free for 14 days—try it and see the difference for yourself.


.svg)
