Providing a well organized blog is essential to increase the time spent reading your articles. A good blog posts categorization is critical to achieve your blogs results:
- Customers can use the navigation bar to quickly switch between blog categories based on their interests.
- Categorized content is also good for SEO. You can use blog categories to establish a content hierarchy for your blog.

Our legitimacy to write about Shopify blogging:
- We created Bloggle, a Shopify app, to bypass the blog native limitations.
- Our app is used by 2,000+ stores in 60 countries.
- We are rated 4.9/5 on the app store.
- Our users created +55,000 live blogs.
- Many saw a 10x rise in blog SEO traffic and revenue with our guidance on improved UX.
Considering the Shopify native limitations, installing an app like Bloggle can change your blog's results.
In this article, I will guide you on how to add blog categories on Shopify. The process is simple and requires no technical knowledge. Let's go!

Can you add blog categories in Shopify?
The short answer is yes. But the way to do it is not immediately obvious.
The way Shopify does it is by letting you create multiple blogs. Each blog is treated as its own category, and you can assign individual blog posts to any of your blogs. The default category is called News, but you can change the title to anything you want. You can also style your primary blog by customizing your Shopify theme, or by using an app like Bloggle (more on that later).
In Shopify, each Blog functions like a blog ‘category’ for posts. This is different from Collections (which organize products for shoppers) and Product Categories (Shopify’s internal product taxonomy). For content, think: Blog = article category. For products, think: Collection/Product Category = shopping/navigation & reporting.
Clear blog categories help visitors scan topics faster and reduce pogo-sticking, usability research consistently shows structured navigation improves findability and engagement.
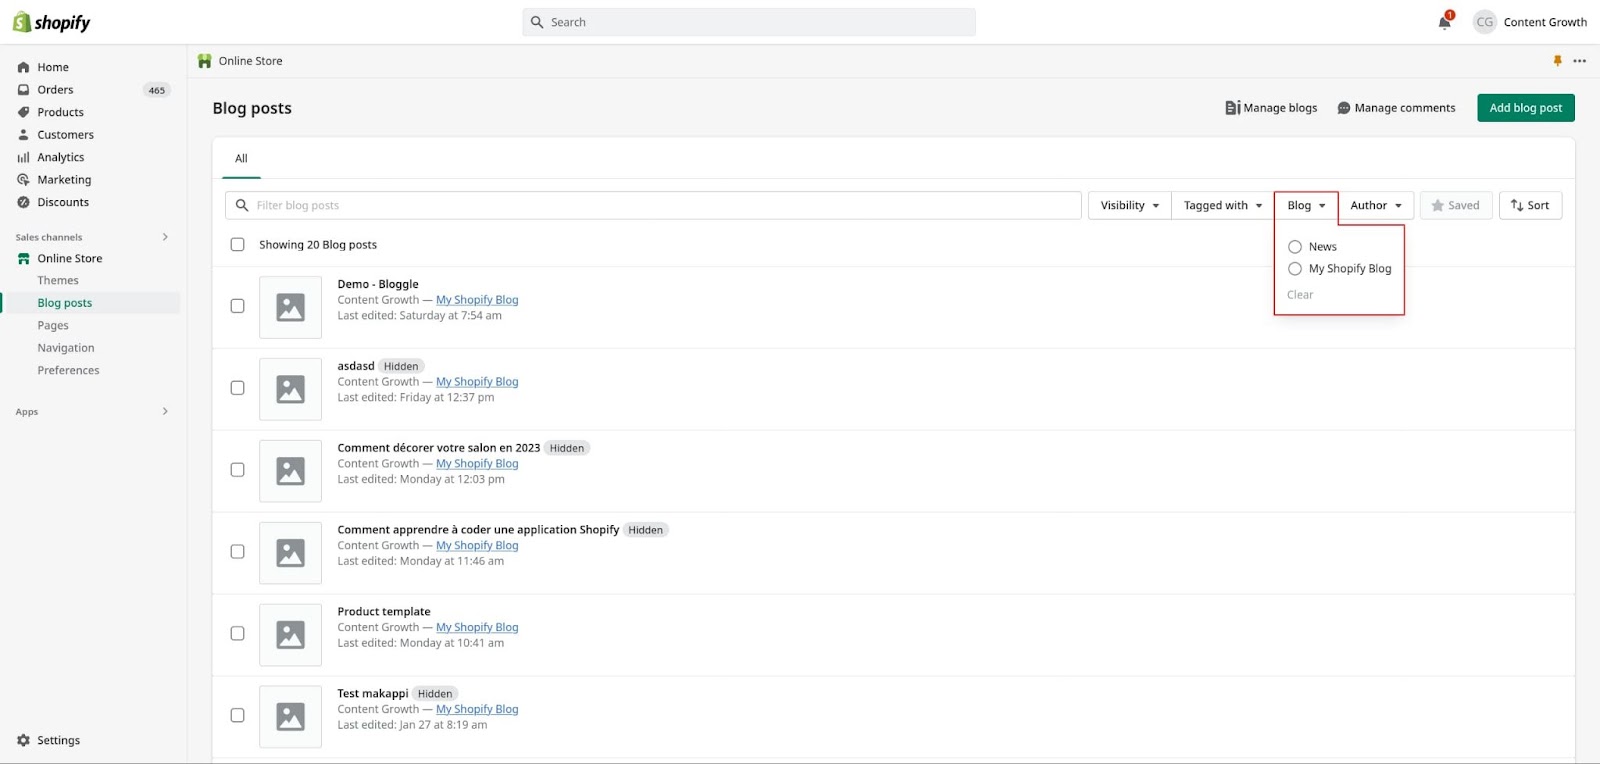
Categories make it easier to manage your blog. You can sort and filter your posts based on blog category from the Blog posts page on your Shopify dashboard.
How to create a blog category in Shopify
Let’s create a blog category, step by step.
- Log in to Shopify.
- Navigate to Sales channels > Online Store > Blog posts.
- Click Manage blogs.
- Click Add blog.
- Fill out the required parameters:
- Title – the name of the category.
- Page title – the name search engines will display.
- Description – description of the category.
- URL and handle – the URL structure for the blog. You can leave this as is.
- Select Themes template from the drop-down menu under Online store.
- Note: If you want to customize the layout of your blog with Bloggle, select Bloggle as the theme template. More on this later.
- Click Save.
Before you move on, optimize the new blog (category) page for SEO:
- Page title: Keep ≤ 60 characters. Example: Recipes & Tutorials – {Brand} Blog.
- Meta description: Aim for ~155 characters with primary modifier. Example: Browse our recipes, tips, and tutorials to get more from {Product}. Updated weekly.
- URL handle: Use a clean, short slug (e.g.,
/blogs/recipes). If you rename the handle later, Shopify sets up a redirect, avoid frequent changes.
Make it discoverable: Online Store → Navigation → Main menu → Add menu item → Link → Blogs → [Your Blog] → Save. Place it in the top-level menu for maximum visibility.
Keep a simple category set (5–7 tops) and document slugs to avoid duplicate or near-duplicate categories.
The category we’ve created is now available for selection for future blog posts.
How to add blog posts to categories
There are two ways to add blog posts to categories: with the native editor, and with the Bloggle Shopify app.
Shopify
To set the blog post category using the default editor, do the following:
- Navigate to Sales channels > Online Store > Blog posts.
- Click Add blog post.
- Add content to your post and customize SEO settings if desired.
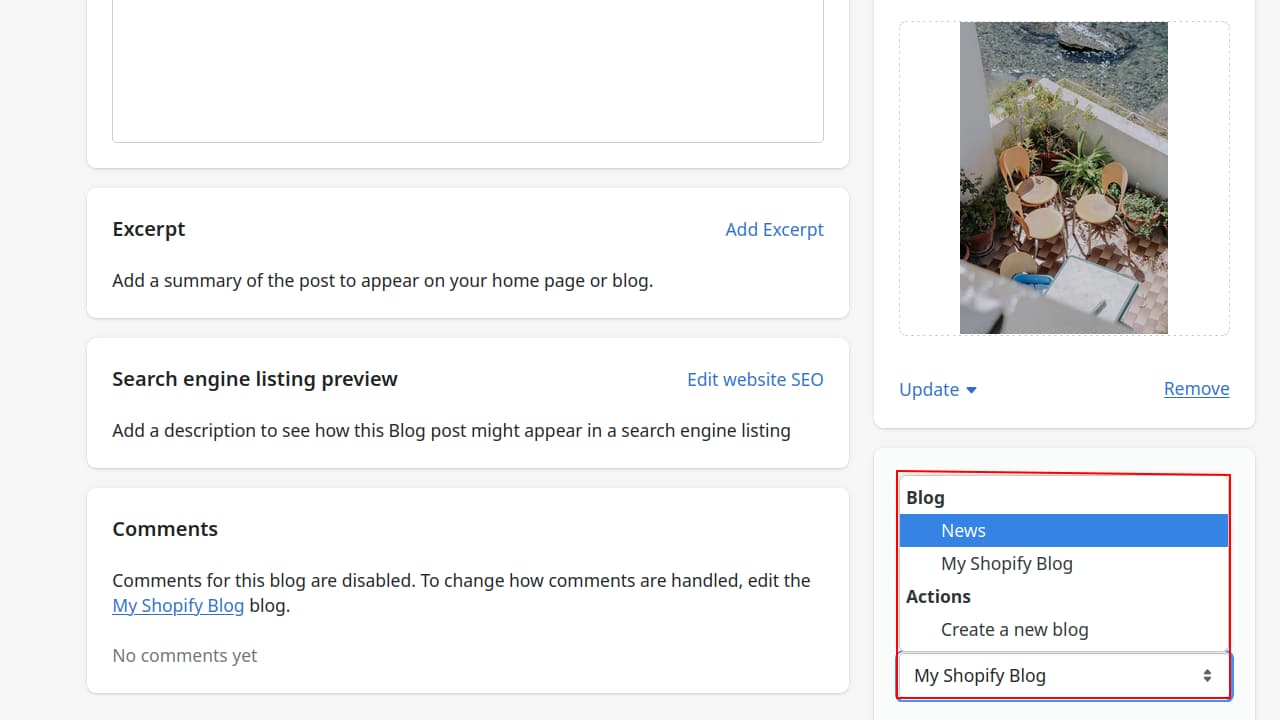
- Select the desired category from the Blog drop-down menu to the right.
- Set visibility to visible if you want to publish the post immediately.
- Click Save.
Use a consistent mapping so posts don’t get split across categories:
- News: product updates & launches
- Guides: how-tos/tutorials
- Stories: case studies & interviews
Link related posts across categories (e.g., ‘Related: Getting started with {Feature}’) to strengthen topical clusters.
Before publishing:
- Blog drop-down shows the correct category,
- Visibility is set to Visible,
- Receiving blog (category) page has a unique title/meta.
Strong internal linking helps search engines discover and prioritize your new posts faster (confirmed across multiple large-scale SEO studies).
Bloggle
To set the blog post category using Bloggle, do the following:
- Click Apps from your Shopify dashboard.
- Select Bloggle from the list of installed apps.
- Click the Create new blog button from Bloggle’s dashboard.
- Start with a new blank post, or select a template.
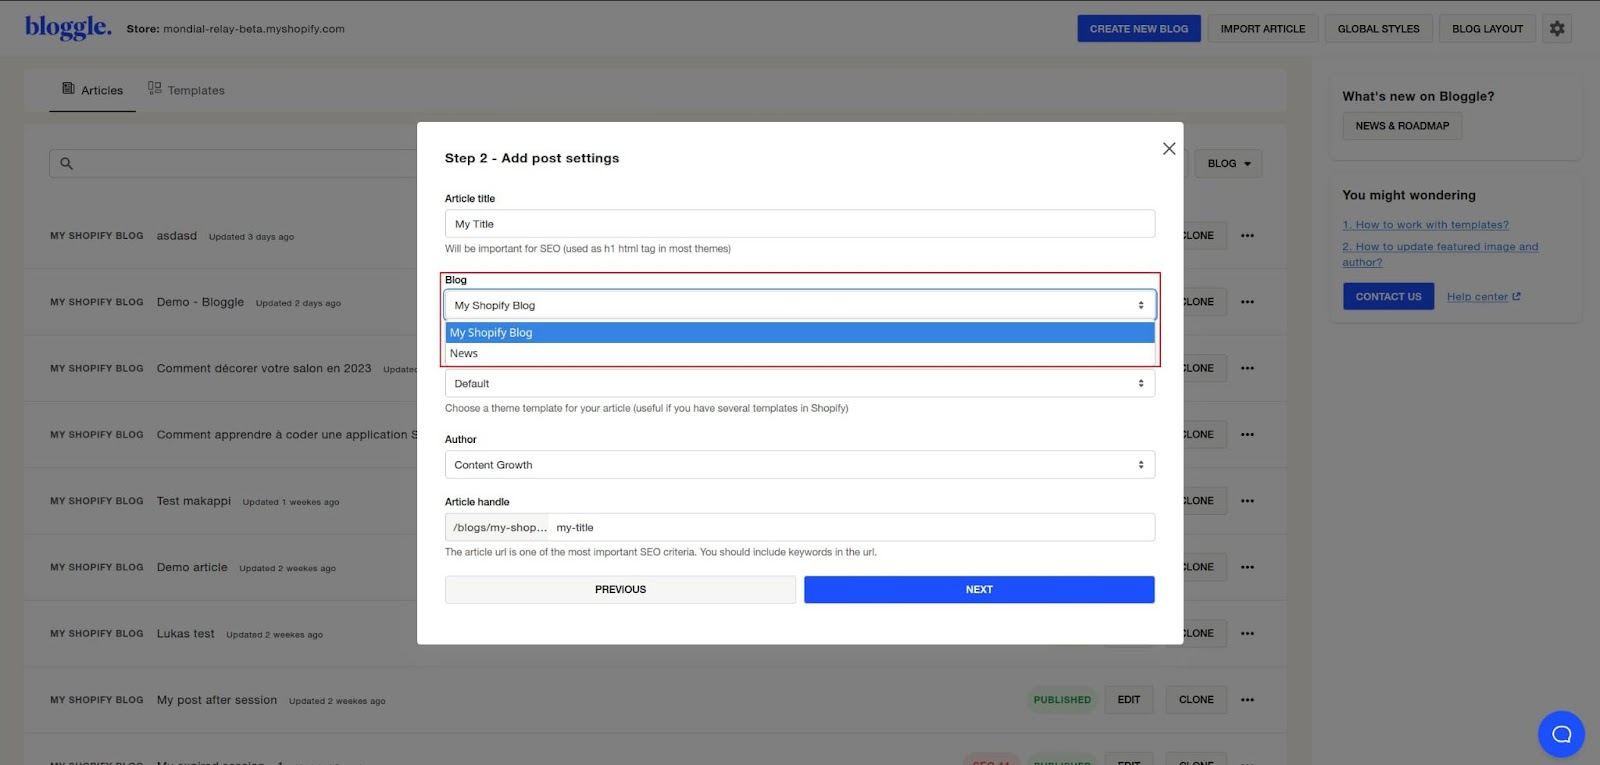
- On the post settings page, select the blog category from the Blog drop-down menu.
- Provide other post details and click Next.
- Choose between Manual or AI-generated content and click Create article.
You can find blog posts from each category using the search bar in Bloggle’s dashboard.
.png)
Alternative: How to categorize posts with tags
An alternative way to categorize blog posts is with Shopify tags.
The main difference between tags and categories is that tags aren't displayed to customers. They are a tool for organizing your Shopify content, including products, blog posts, orders, etc. Tags from one section (i.e. products) are not copied to other sections (i.e. blog posts), so you can have a different set of tags for each section.
You can add tags to your posts using the Tags section from the Add blog posts page:

You can also add tags via Bloggle:
- Open a post for editing.
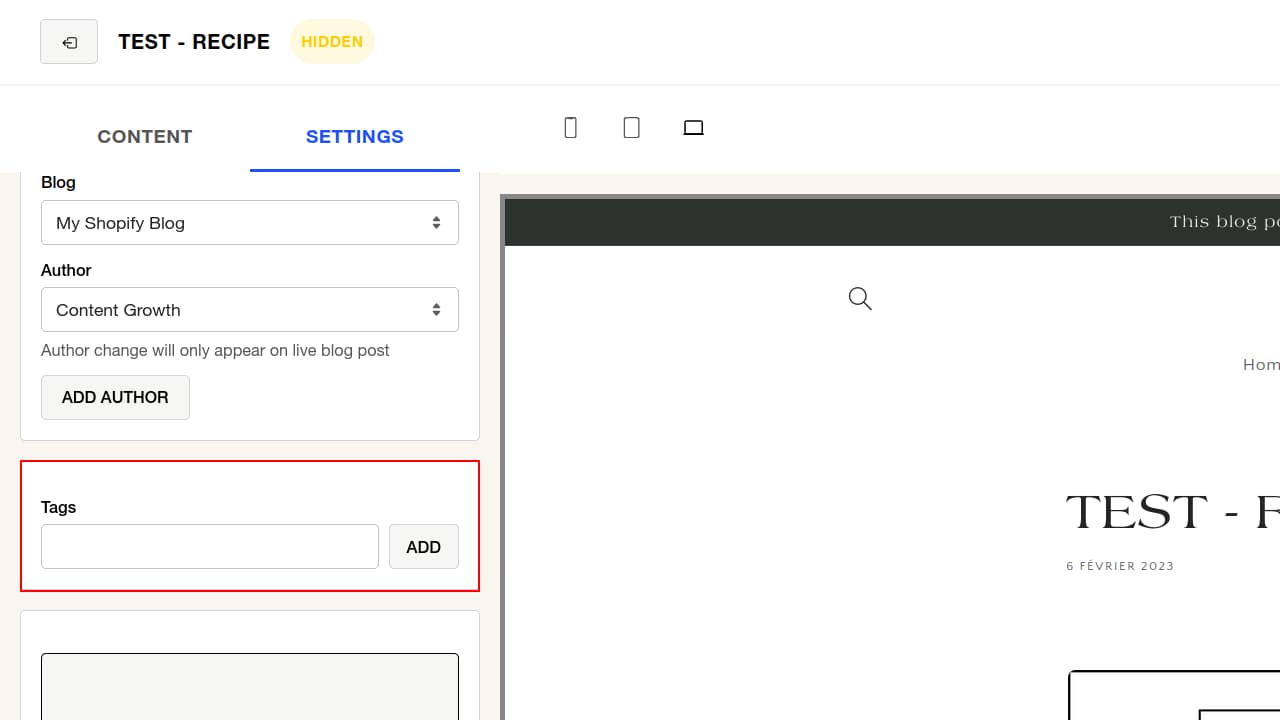
- Switch to the Settings tab.
- Click Blog post settings.
- Provide tags in the Tags field and click Add.
Tags make it much easier to manage your Shopify blog content. You can filter and sort posts from Shopifty’s Blog posts page, or from Bloggle’s main dashboard.
Use tags for sub-topics/filters within a single blog (e.g., Beginner, Advanced); use separate blogs for clearly different intents (e.g., News vs Tutorials).
Expose tags as filters in a sidebar/search panel (e.g., Beginner (12), Advanced (7)) so readers can drill down without leaving the category.
Maintain a simple tag taxonomy (avoid synonyms and one-off tags). Tags allow letters, numbers, and hyphens; cap at 250 per post, document approved tags to prevent bloat.
More on blog post tags
Blog post tags have the following properties:
- They have a limit of 255 characters.
- You can only use letters, numbers, and hyphens.
- Letters with accents and other symbols can exclude search results.
- They are not case-sensitive. Cosmetics and cosmetics are treated as the same tag.
- You can apply up to 250 tags to each blog post.
How to edit your blog category layout
Another way to customize your Shopify blog is by editing its category layout.
It’s cumbersome if you’re using the default Shopify editor, and the available customization options depend on your Shopify theme. Alternatively, you can use Bloggle’s Layout feature to quickly create and customize layouts.

How to customize blog layout with Bloggle
Bloggle provides a range of settings for customizing your blog layout. To access them:
- Click Apps from your Shopify dashboard.
- Select Bloggle from the list of installed apps.
- Click the Blog layout button from the Bloggle dashboard page.
Here are the options you can customize:
- You can click mobile, tablet, or desktop icons to switch between different views.
- Title & Header lets you customize title style and position.
- Navigation & Search lets you create a custom navigation menu, manually or automatically.
- Articles lets you control how articles are arranged for display on different devices.
- Labels lets you set buttons and empty blog labels.
- Custom CSS lets you import custom CSS code.
- Settings lets you define your blog’s width.
Tips:
Surface a Category list with article counts (e.g., Guides (24)). Readers scan breadth quickly and it signals freshness.
On mobile, keep categories tappable and collapsible, ensure the list sits above the fold, and enable lazy-loading for thumbnails to protect Core Web Vitals.
Popular in {Category}: Highlight 3–5 cornerstone posts at the top of each category page to pass authority and guide readers.
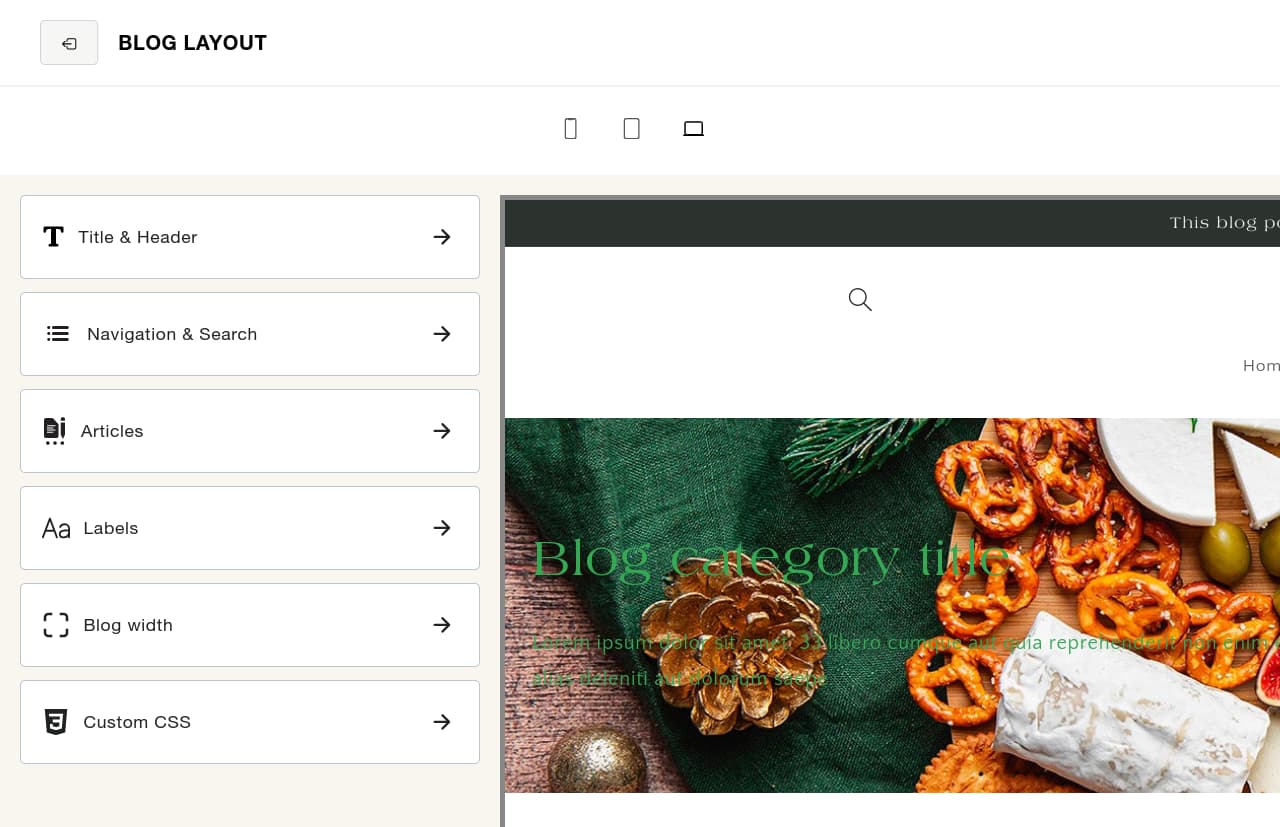
Once you’re satisfied with the layout, click Save. Alternatively, click Save & Publish from the drop-down menu to go live with the changes.
Note: To change the layout for multiple blog categories, you need to set the theme template for each blog on Shopify.
- From your Shopify dashboard, navigate to Sales channels > Online Store > Blog posts
- Click Manage blogs.
- Select the blog you wish to edit from the list.
- In the Theme template drop-down menu to the right, select Bloggle as the default template.
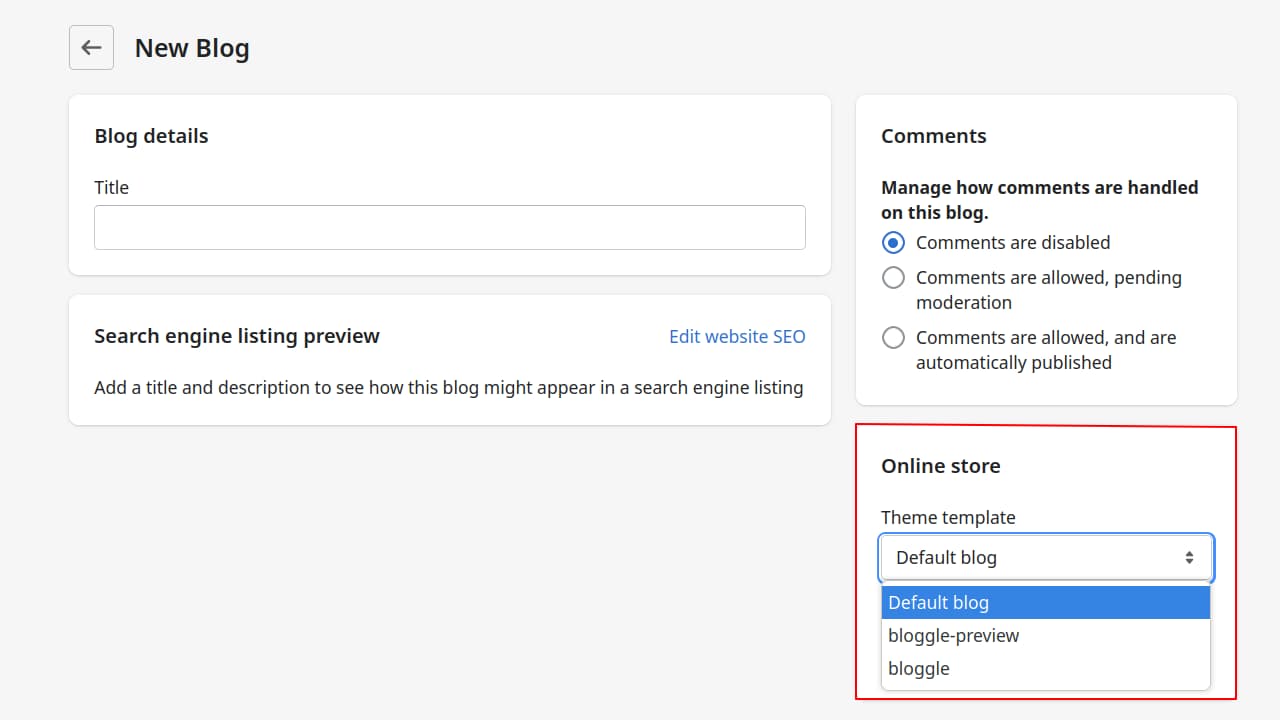
- Click Save.
Now, whenever you edit your layout with Bloggle, the changes will apply to each blog category that has Bloggle’s theme template enabled.
How to display all blogs with different categories
The short answer is: you can’t. Unlike WordPress, Shopify doesn’t support blog posts belonging to multiple blog categories. Once you’ve set a category for a post, it belongs to that blog. This precludes your blog from having a content feed that combines posts from different categories.
Let’s say you have two blog categories, News and Recipes. If you publish a new post under the Recipes category, it will only appear on the Recipes page. To have the same post appear on the News page, you’d have to duplicate it, which creates an extra load on resources and degrades SEO. This also means that customers would have to check both News and Recipes separately for content updates, instead of checking a unified content feed.
One way to work around this issue is to have a single category for all blog posts so they are available in one place. But this defeats the point of creating blog post categories.
Another way to coalesce posts from multiple blogs is with the tag system. For example, you can tag each post with an “all posts” tag or something similar. If a customer wants to browse posts from all categories in the order they were published, they can simply enter “all posts” in the search bar, and it will display everything with the “all posts” tag. This is not an ideal solution, but it’s one way to have multiple blog categories displayed on the same page.
Get started with Bloggle
Organizing your blog content is essential for managing Shopify blogs. Fortunately, Shopify provides the required functionality by allowing you to create multiple blogs. Each one is treated as a separate category, and you can assign individual blog posts to a single category. The feature has some limitations (i.e. blog posts can’t belong to multiple categories), so we have suggested a couple of workarounds in the last section. We have also described how to use the tagging system as an alternative means of categorizing blog posts.
Quick win checklist:
- Limit categories to 5–7 clear topics; avoid overlap.
- Give each blog (category) a unique title/meta + clean slug.
- Link categories in top navigation and show article counts.
- Add a ‘Popular in {Category}’ block with 3–5 cornerstone posts.
- Cross-link related posts to build topical clusters.
Structured categories and consistent internal links improve crawl efficiency and help search engines understand topical relevance, key ingredients for better rankings.
Use Bloggle’s Blog Layout to implement the category list, counts, and popular-post modules without theme edits.
If you want greater control over your Shopify blog, including expanded customization options, built-in SEO support, or the option to create blog post templates, we recommend using Bloggle. Sign up for a free 10-day trial and take your Shopify blog to the next level.


.svg)


.svg)
