
.svg)
Introduction
Bring out the best in your Shopify store with our guide to customizing blog and article template. As the creators of Bloggle, the revolutionary blog builder for Shopify, we have first hand knowledge about how to increase your online presence in the ecommerce world. Our step-by-step tutorial for blog pages shows how to make the complex process of template customization simple, and even those with basic coding knowledge can easily complete the process.
Why trust us
- We're the creators of Bloggle, a dynamic Shopify blog builder available on the Shopify App Store that fills the gaps in native Shopify blogging capabilities.
- We're a global force: 2000+ merchants across 60 countries have trusted us to amplify their voices.
- Your peers adore us: We have a stellar 4.9/5 rating on the app store.
- We've already empowered 55,000+ blogs written using our versatile app.
- Under our guidance, users have reported up to a 10x boost in Search Engine Optimization (SEO) traffic and revenue.
How to add Shopify blog template code to your Shopify Theme
It is not easy to create a personalized blog template for your Shopify store. It is actually among the most difficult tasks you can do on Shopify. You must have at least a basic understanding of coding.
That being said, there are numerous advantages that come with creating your own blog template if you have the necessary time and skills. Let’s dive into the how:
Adding a new Blog Template
Step 1
From your Shopify dashboard, go to to the Shopify theme you want to customize, and from the the drop-down menu, click on ‘Edit Code’

Step 2
Click on ‘Add a new template’. This will create template anew.

Step 3
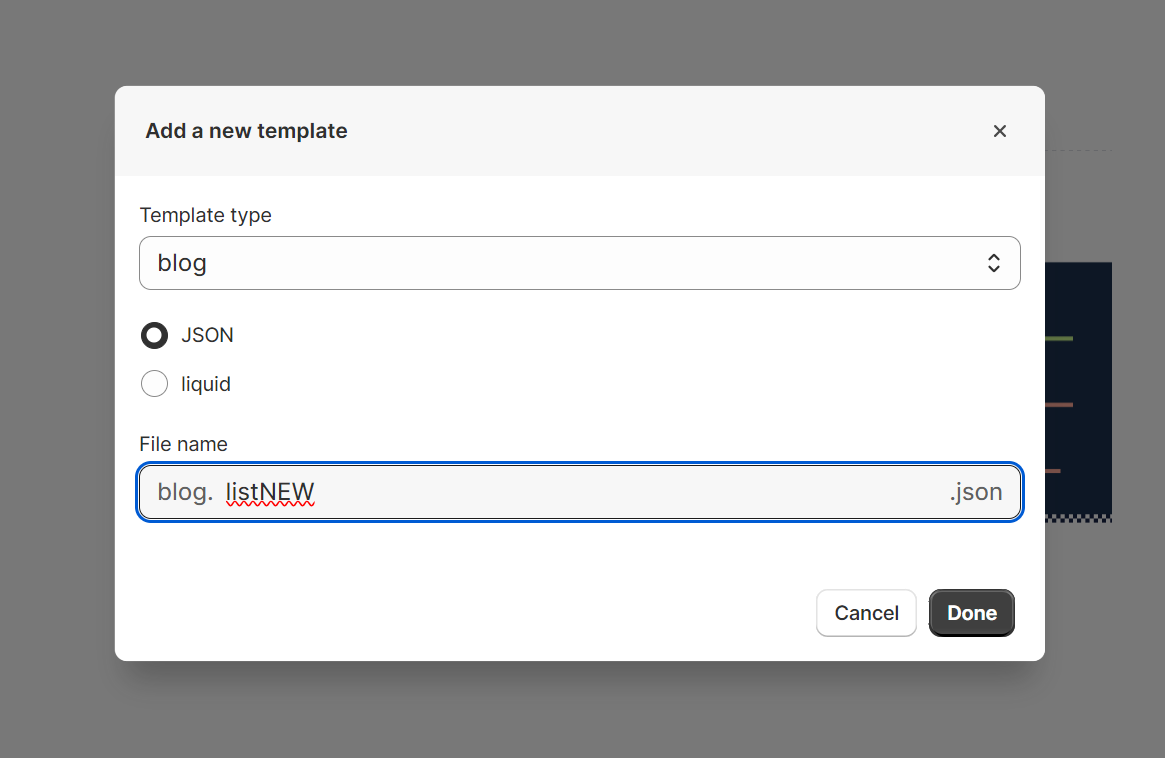
Select ‘blog’ from the ‘Template type’ dropdown and select the JSON radio button

Step 4
Name your new template in the ‘File name’ field. Let’s name our new Shopify blog template as ‘blog.listNew’. Hit Done
Step 5
Copy-paste the following code into the JSON file that opens up, and hit Save when done.
{
"sections": {
"blog": {
"type": "blog-list",
"settings": {
}
}
},
"order": [
"blog"
]
}
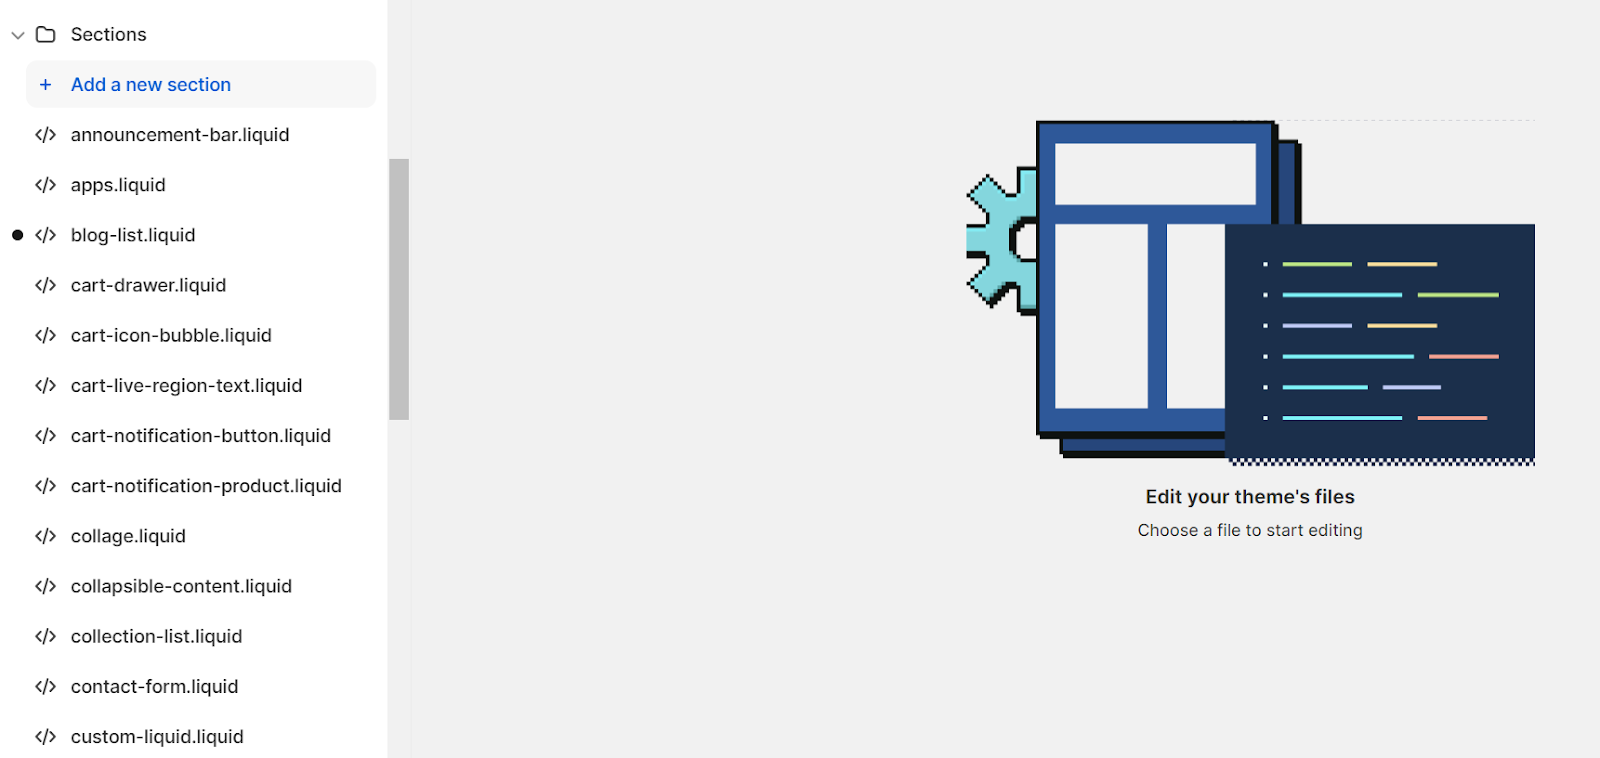
Adding a new Blog Section
Now, we add a new Liquid section to our Shopify theme. Here’s how:
Step 1
Click on ‘Add a new section’
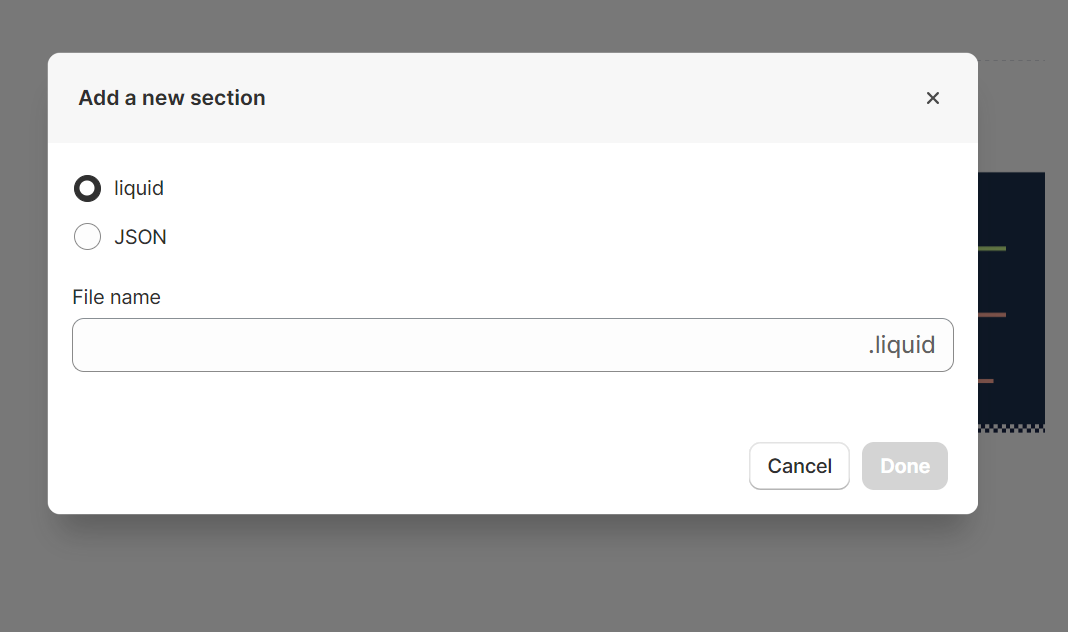
Step 2
Select the ‘liquid’ radio button
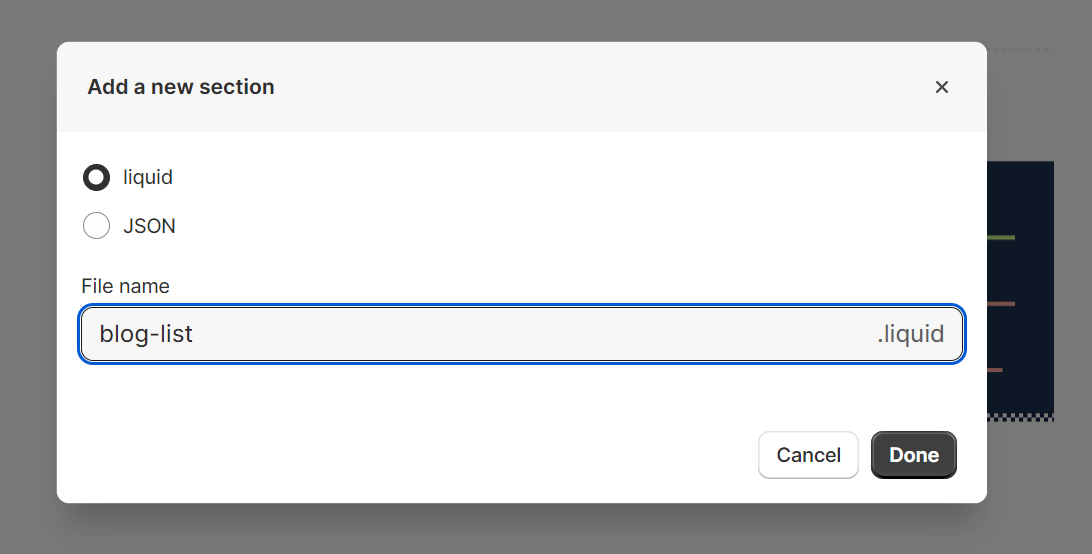
Step 3
Name your new liquid section in the ‘File name’ field. Let’s name our new Shopify section as ‘blog-list’. Hit Done
Step 4
Copy-paste the following code into the liquid file that opens up, and hit Save when done.
{%- paginate blog.articles by 12 -%}
<div class="main-blog">
<h1 class="title-blog">
{{ blog.title }}
</h1>
<div class="blog-articles">
{%- for article in blog.articles -%}
<div class="blog-articles__article article">
<a class="article-link" href="{{ article.url }}">
{% if article.image %}
<img class="article-image" src="{{ article.image | img_url:'700x' }}" alt="">
{% endif %}
<div class="article-text-container">
<p class="article-title">{{ article.title }}</p>
{% if article.excerpt.size != 0 %}
<p class="article-excerpt">{{ article.excerpt | truncatewords: 20 }}</p>
{% else %}
{% endif %}
<button class="article-button">Read More</button>
</div>
</a>
</div>
{%- endfor -%}
</div>
{%- if paginate.pages > 1 -%}
{%- render 'pagination', paginate: paginate -%}
{%- endif -%}
</div>
{%- endpaginate -%}
<style>
.main-blog {
max-width:1200px;
padding: 32px;
margin: 0 auto;
}
.main-blog .title-blog{
text-align:center;
}
.main-blog .blog-articles {
width: 100%;
display: grid;
grid-template-columns: repeat(3, 1fr);
grid-gap: 20px;
}
.main-blog .blog-articles__article {
display: flex;
flex-direction: column;
width: 100%;
}
.main-blog .article-image {
width: 100%;
height: auto;
object-fit: cover;
}
.main-blog .article-link{
display: flex;
flex-direction: column;
text-decoration:none;
cursor:pointer;
}
.main-blog .article-title{
margin-top:10px;
font-weight:700;
line-height:30px;
font-size:20px;
color: initial;
}
.main-blog button {
border: none;
padding: 12px 20px;
background: black;
color: white;
border:2px solid black;
}
.main-blog button:hover {
border: none;
padding: 12px 20px;
background: white;
color: black;
cursor:pointer;
border:2px solid black;
}
.main-blog .article-excerpt{
color: initial;
}
@media screen and (max-width:768px){
.main-blog .blog-articles {
grid-template-columns: repeat(1, 1fr);
}
}
</style>
Adding a new Article Template
Step 1
From your Shopify dashboard, go to to the Shopify theme you want to customize, and from the the drop-down menu, click on ‘Edit Code’
Step 2
Click on ‘Add a new template’
Step 3
Select ‘article’ from the ‘Template type’ dropdown and select the JSON radio button
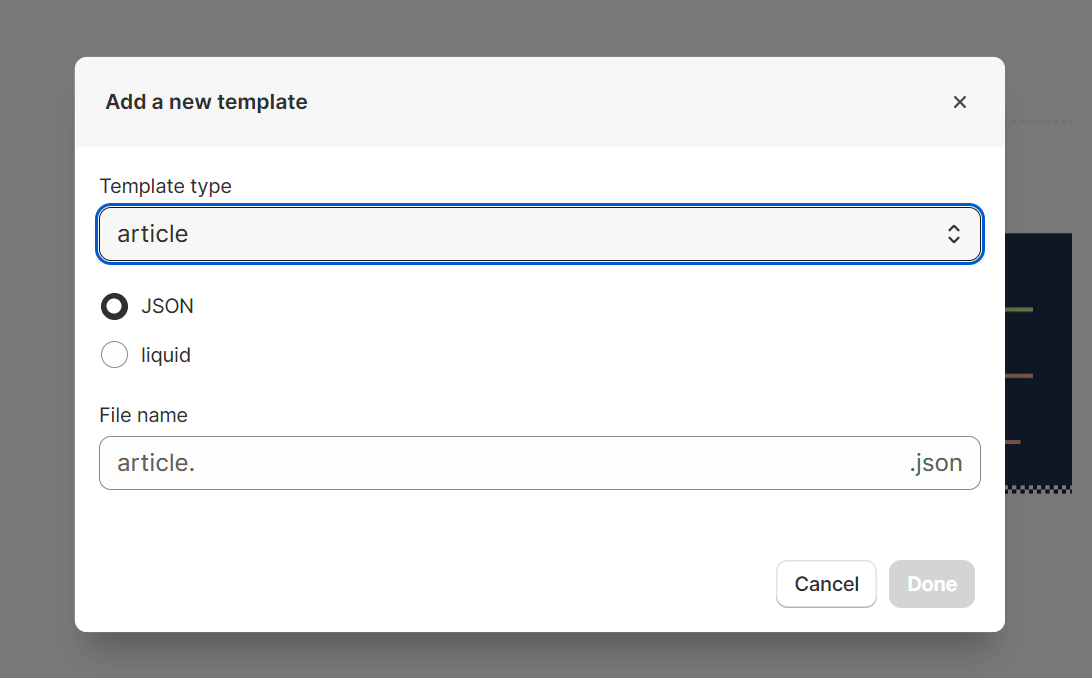
Step 4
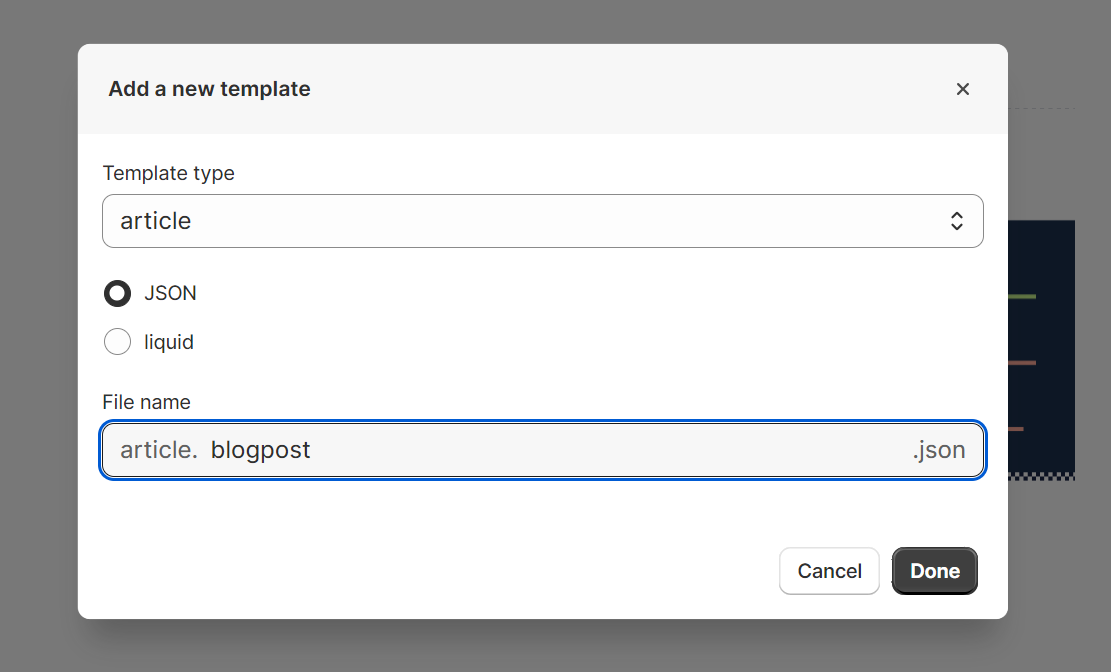
Name your new template in the ‘File name’ field. Let’s name our new Shopify article template as article.blog-post’. Hit Done
Step 5
Copy-paste the following code into the JSON file that opens up, and hit Save when done.
{
"sections": {
"blog": {
"type": "main-blog-post",
"settings": {
}
}
},
"order": [
"blog"
]
}
Adding a new Article Section
Now, we add a new Liquid section to our Shopify theme. Here’s how:
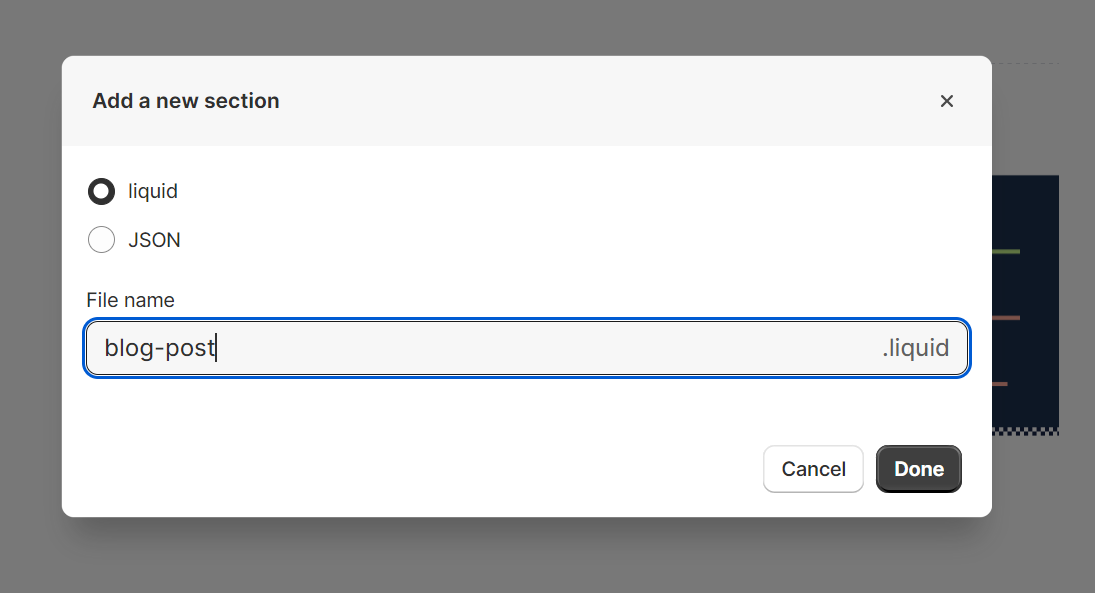
Step 1
Click on ‘Add a new section’
Step 2
Select the ‘liquid’ radio button
Step 3
Name your new liquid section in the ‘File name’ field. Let’s name our new Shopify section as ‘blog-post’. Hit Done
Step 4
Copy-paste the following code into the liquid file that opens up, and hit Save when done.
<div id="main-blog-post" >
{% if article.image %}
<img class="main-blog-post-image" src="{{ article.image | img_url:'1200x' }}" alt="" loading="lazy">
{% endif %}
<div id="blog-post-header">
<h1 id="blog-post-title">{{article.title }}</h1>
<div class="blog-post_header-info">
<p id="blog-post-author" >{{ article.author }}</p>
<p id="blog-post-published" >{{ article.published_at | time_tag: format: 'date'}}</p>
</div>
</div>
<div class="blog-post-content" id="bloggle_rte">
{{ article.content }}
</div>
</div>
<style>
#main-blog-post{
max-width:1200px;
padding: 32px;
margin: 0 auto;
}
.main-blog-post-image{
width:100%;
}
#blog-post-header{
display:flex;
flex-direction: column;
align-items:center;
justify-content:center;
text-align:center;
}
.blog-post_header-info{
display:flex;
flex-direction: column;
align-items:center;
justify-content:center;
text-align:center;
}
.blog-post_header-info p{
margin:0;
}
</style>
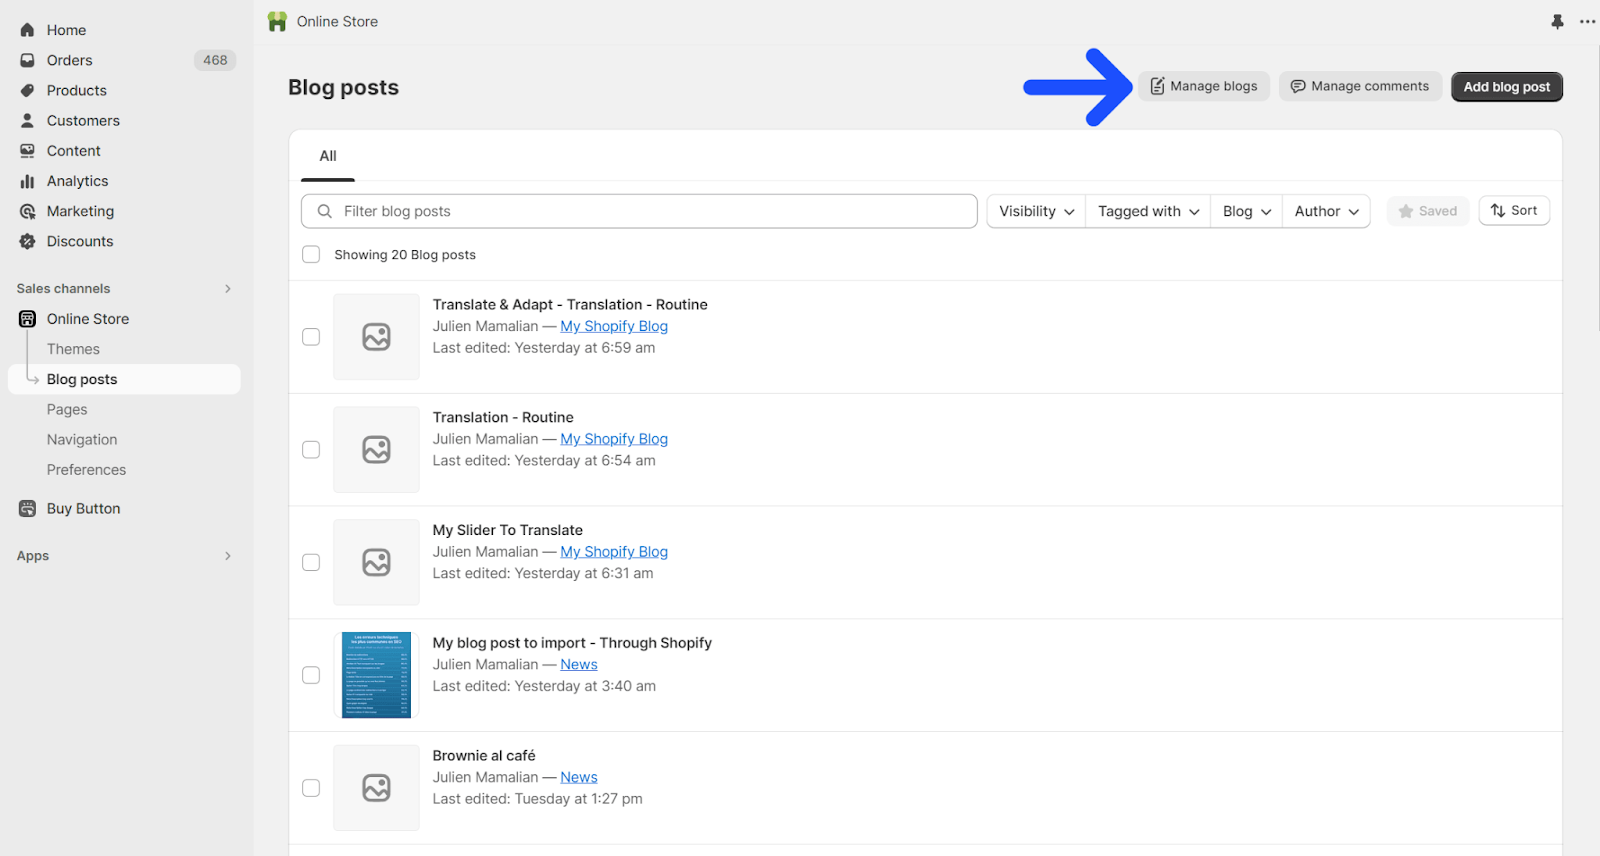
Applying the new blog template to your Shopify Theme
Step 1
Go to your Shopify store. Navigate to ‘Online Store > Blog posts’ and click on ‘Manage blogs’
Step 2
Select the blog whose template you want to change
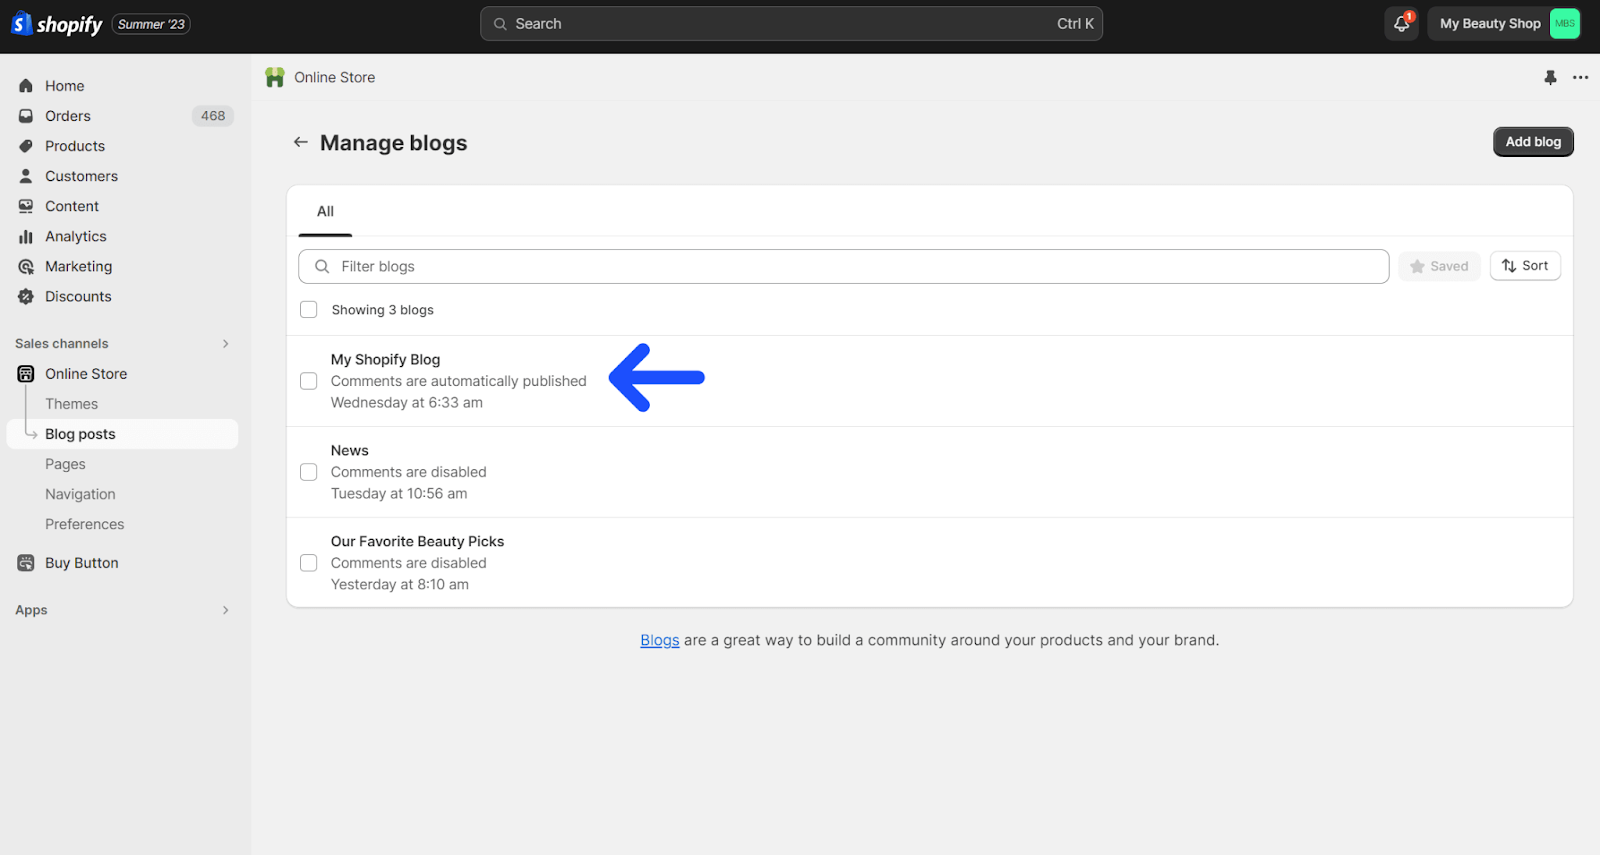
Step 3
In the Online store section on the right, select the blog template you just created (listNew) from the ‘Theme template’ dropdown

Step 4
Hit Save when done
Applying the new article template to your Shopify Theme
Step 1
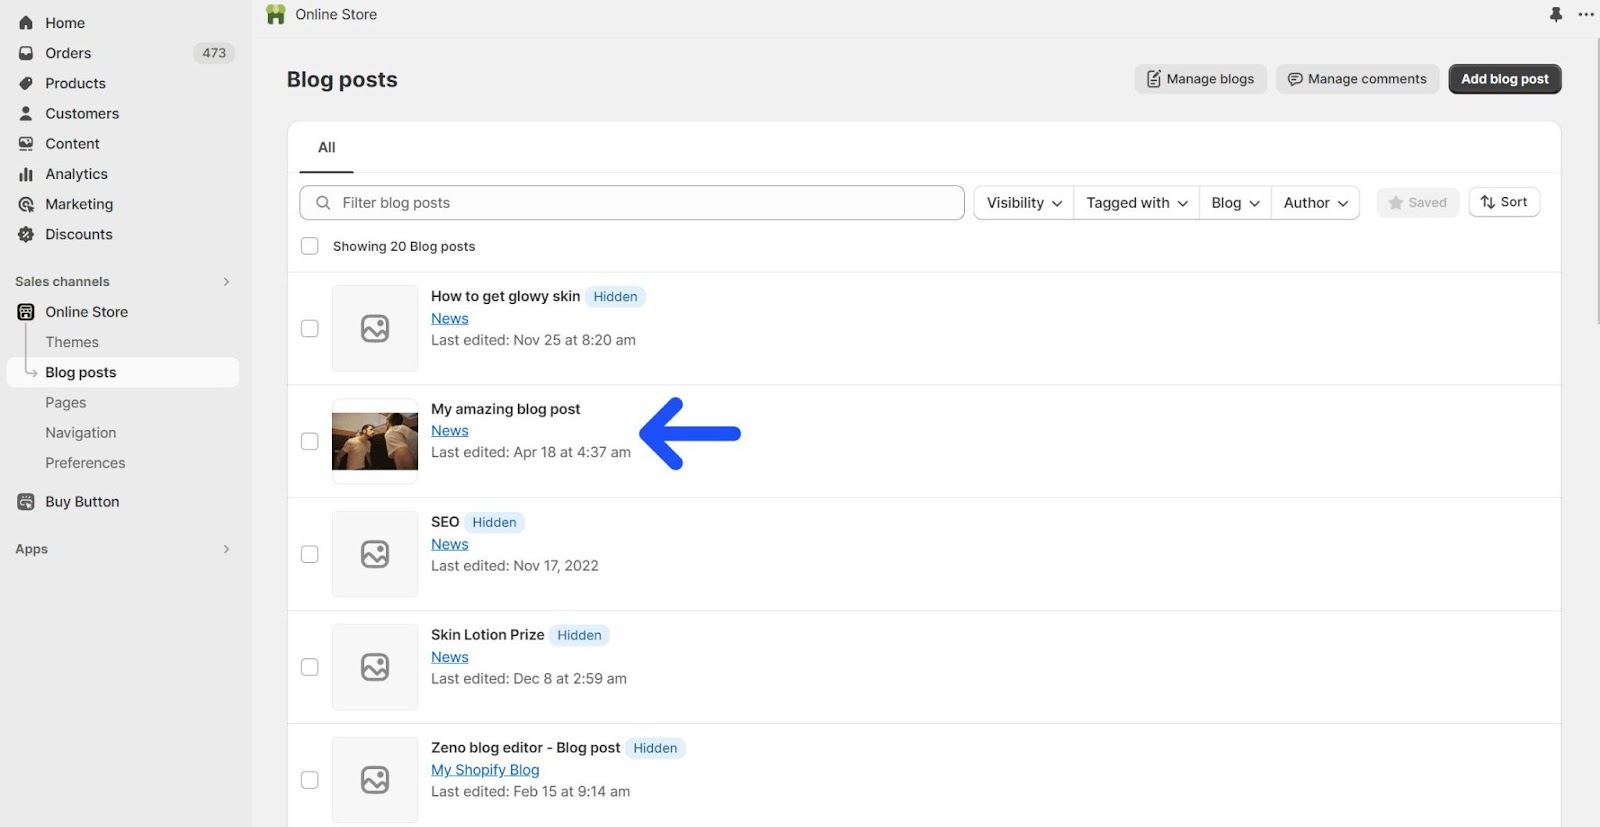
Go to your Shopify store. Navigate to ‘Online Store > Blog posts’
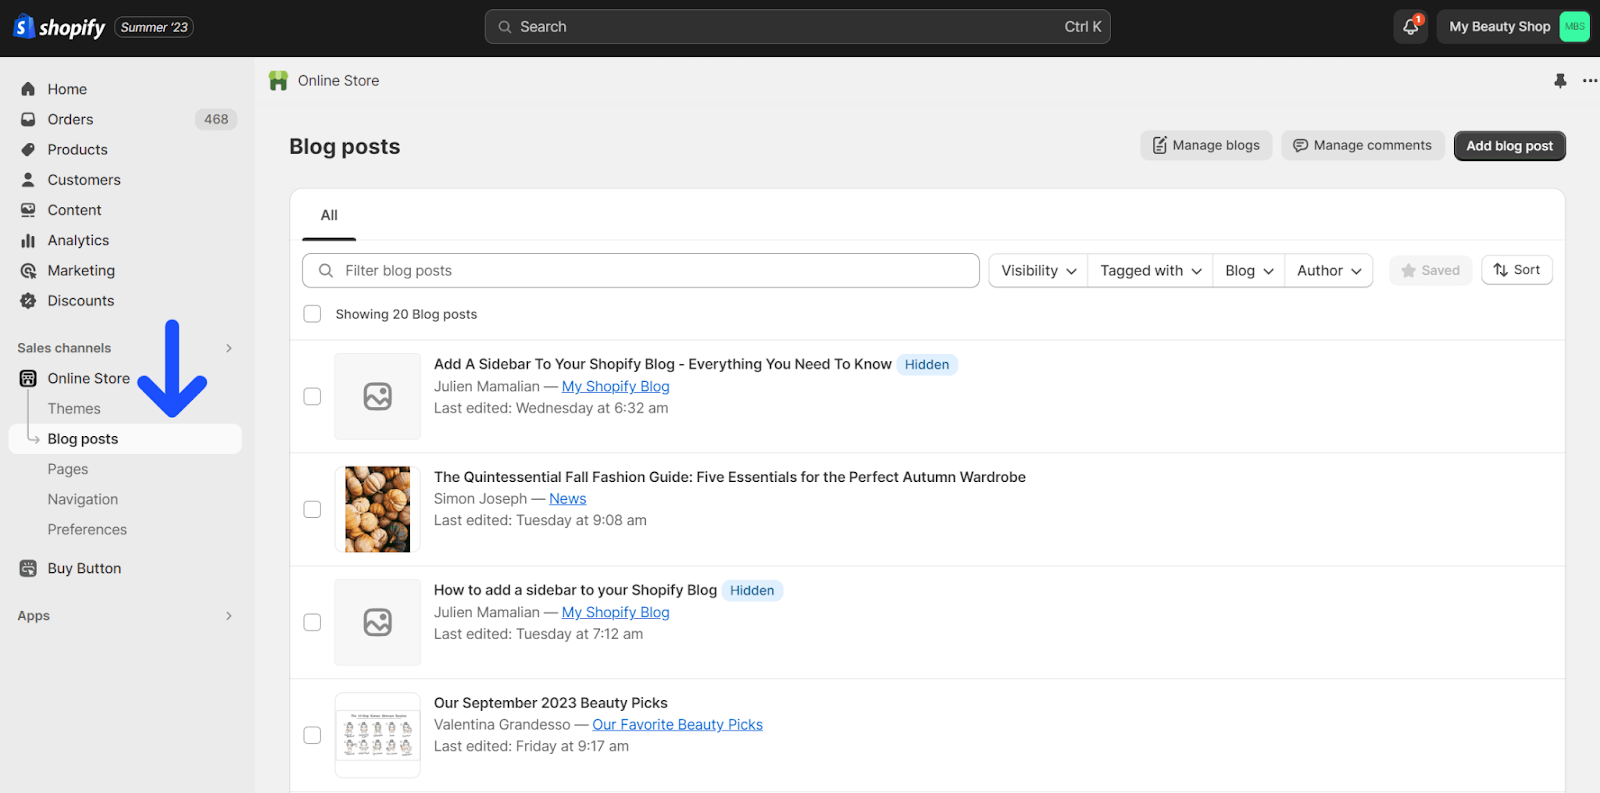
Step 2
Select the article whose template you want to change
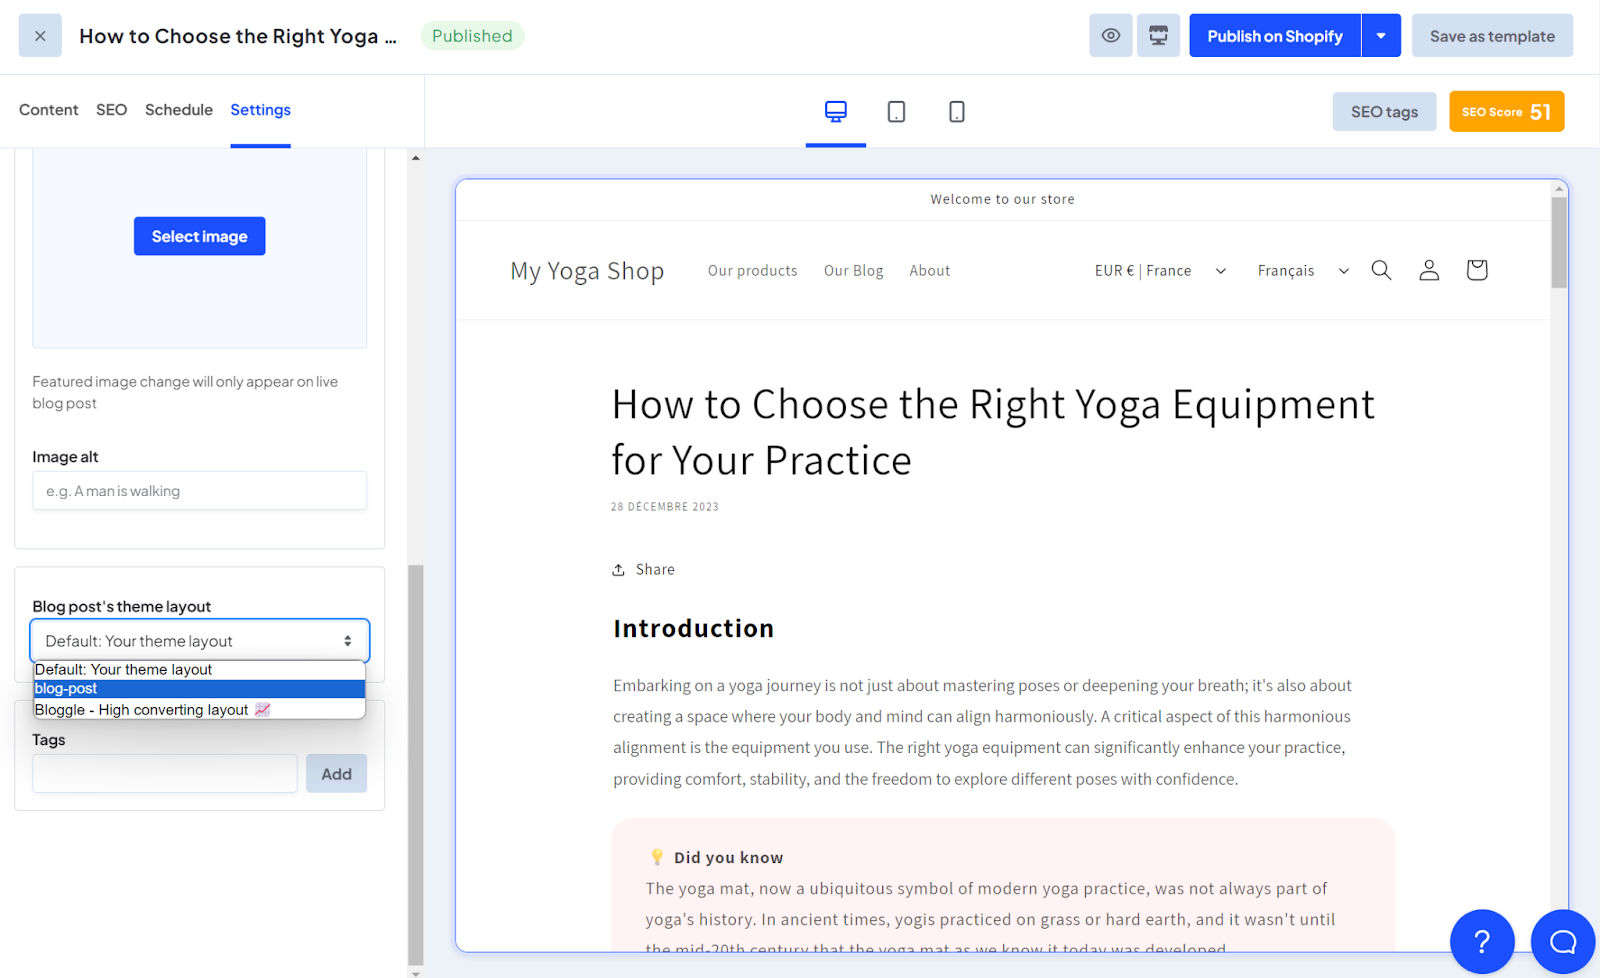
Step 3
In the Online store section on the right, select the article template you just created (blog-post) from the ‘Theme template’ dropdown

Step 4
Click Save when done
You can do this for all the articles whose template you want to update.
Applying the new article template to your Shopify Theme via Bloggle
You can also update your article template in Bloggle and make your articles beautiful and high-converting. Here’s how:
Step 1
From your Bloggle dashboard, select the article whose template you want to change

Step 2
Go to the ‘Settings’ tab and select the new article template from the ‘Blog post’s theme layout’ dropdown
Step 3
Hit Publish when done
Did You Know: Not just the Shopify blog template code, Bloggle lets you manage every small aspect of your Shopify blog. From adding products and inserting videos to adding a Table of Contents, sidebar, comments section, tags, social share buttons, and more, we have you covered.
Conclusion
If you customize your blog content and blog article templates, it will add a lot to both the appeal and effectiveness of your content marketing efforts. Today you learned how to make a user experience that is individual and relevant to your reader. Little changes really can make big differences in terms of SEO and customer engagement. Try out your blog, don't be shy. Describe the brand personality and its values to drive organic traffic. With these tips and tools at your disposal, take your Shopify store to the next level. Happy blogging!
FAQs


.svg)
