
.svg)
You created an e-commerce store by using WooCommerce plugin with WordPress?
But, after some time you realized your mistake — Shopify, as a native e-commerce platform, is certainly a better choice than using a plugin to make everything work.
Now you want to switch, but you can’t start over, since your store gained traffic and customers already. Don’t worry, we have a solution for you!
You can migrate everything from WooCommerce to Shopify, and in this article, we will guide you through the whole process, step-by-step.

Why trust us?
- We're the creators of Bloggle, a dynamic Shopify blog builder available on the Shopify App Store that fills the gaps in native Shopify blogging capabilities.
- We're a global force: 3000+ merchants across 60 countries have trusted us to amplify their voices.
- Your peers adore us: We have a stellar 4.9/5 rating on the app store.
Ways to migrate WooCommerce store to Shopify
There are several ways to handle your WooCommerce to Shopify migration, depending on your store size, technical skills, and budget.
Each method supports different types of data, so choosing the right one can save hours of manual work.
Pro tip: Third-party tools like Matrixify migrate more entities (including redirects, SEO fields, and blog content) ensuring a complete transfer of your WooCommerce store data.
If you want to do it manually, you will have to combine it with CSV, but be aware that some data can’t be imported this way. If you want to save time you can hire a Shopify expert, or use a third-party Shopify app. We recommend Matrixify for this task. In this guide, we will cover both Manual&CSV migration and migration via Matrixify.
If you are still having doubts migrating from WooCommerce to Shopify because it seems complicated, we got you. We will explain everything in detail, and remind you about the advantages of choosing Shopify over WooCommerce.
First and foremost, Shopify is the built-in solution for e-commerce, while WooCommerce is just a WordPress plugin that allows you to use it for e-commerce. Shopify has apps as well, that can enhance the capabilities of the platform.
One of the best and most essential Shopify apps is Bloggle, which can help your Shopify store look like the most beautiful WordPress website!
Since design and a better-looking website are the only major advantages of WooCommerce over Shopify, there is no reason to wait anymore, and we’re here to help you make the transition swift and painless!
Migrating data from WooCommerce to Shopify (Manual+CSV)
If you prefer to migrate manually or via CSV, be aware that some data types (Orders, Coupons, Reviews) can’t be imported this way and require an app.
Before uploading your product or customer CSVs, double-check a few key details:
- Shopify allows a maximum of three product options (e.g., Color, Size, Material). If your WooCommerce products have more, merge extra options into Option3 using the “|” separator.
- Clean your CSVs before import, remove empty cells, ensure SKU consistency, and confirm variant names match Shopify’s format.
- Skip Orders, Coupons, and Reviews during manual migration, use Matrixify or Yotpo instead.
This will prevent import errors and ensure your migrated data displays properly in Shopify’s product and customer dashboards.
Before starting, you need to decide which data you want to migrate from WooCommerce to Shopify. Typically, you would want to migrate these four categories:
- Products
- Customers
- Fulfilled orders
- Reviews
If you want to move all of these, it is best to start with product data.
1) Export product data from WooCommerce
Migrating product data from WooCommerce to Shopify requires several steps:
1. Go to your WooCommerce account, and from the Menu select “All products”
2. Click on “Products” and then “Export”
3. The Dialog box will open. Choose which columns, products, and product categories you want to migrate
4. Click “Generate CSV”
5. Name the file, for example, “WooProductMigration.csv”
2) Edit product export data
In order to make product export data work you must make sure to convert migrated WooCommerce type data to Shopify type data. Seems complicated, but you just need to follow the instructions from the table below:
3) Import product data to Shopify
After you complete the necessary edits to your CSV file, you can import the exported data to Shopify. Here are the steps you need to take:
1. In the Shopify admin, select “Products” from the menu
2. Click “Import”
3. Click “Add file” and then select the CSV file you previously edited
4. Deselect “Publish new products to all sales channels” and then click on “Upload and preview”
5. Click Import products
After you finish, you will receive a confirmation email from Shopify.
Verify and organize your products
During this migration, there are several things that can go wrong. If you opt to do this manually, you need to review the results after each step of the way.
Some common errors that can occur during importing data are:
- Products were imported successfully, but not published
- Missing details from imported products
- Product variants not imported
To solve these issues, you will need to make imported products available to your sales channels manually, fill in the missing information, and add the products that are missing variants manually as well.
After solving these issues, you need to organize your product data to suit your Shopify store.
Review product details, including description, meta, images, variants, and prices. Create product collections to organize products into categories. In the end, keep track of product inventory and transfers. Optionally, you can install some of the inventory apps from the Shopify app store if you think that’s needed.
4) Export customer data from WooCommerce
To export customer data first you need to install the Import/Export suite plugin for WooCommerce. After installing the plugin, follow these steps:
1. From the WooCommerce account, go to “Import Export Suite”
2. Click Export
3. Select User/Customer from the dropdown menu and then click “Select an export method”
4. Select the export method, and hidden fields you want to include and click “Advanced options/Batch export/Scheduling”
5. Select if you want to export guest users, name your export file, for example, WooCustomerData, choose CSV as the export format, and then choose “Delimiter”
6. Click “Export”
5) Edit customer data from WooCommerce
Similarly to the previous exporting process, you need to edit the CSV file again, since the data type from WooCommerce is not the same as the type of data from Shopify. In order to change the data type, follow the table below:
6) Import customer data to Shopify
After you have completed all the necessary edits to your CSV file, you can import it to Shopify. These are the steps you must take:
1. Go to “Customers” from your Shopify admin
2. Click “Import”
3. Click “Add file” and then select your CSV
4. Click “Import customers”
7) How to migrate order history and reviews from WooCommerce to Shopify
Migrating reviews and order history from WooCommerce to Shopify manually is not possible. However, you can use third-party software (Shopify apps) for that.
For importing reviews, we recommend Yotpo, while importing order history can be done with Matrixify. Before importing them, you need to export them with the Import Export WooCommerce plugin, and the process is completely the same as the process we described for customer data above.
WooCommerce to Shopify migration with Matrixify
Using Matrixify, you can migrate nearly every data entity from WooCommerce to Shopify through the API, no CSV editing required. The app automatically converts your WooCommerce data into Shopify-ready format.
Matrixify supports migration of:
- Products & Variants (including trash items as archived)
- Collections/Categories
- Customers, Orders, and Discounts (Coupons)
- Redirects (ensures your old URLs keep their SEO value)
- CMS Pages and Blogs (titles, content, and meta details)
This comprehensive coverage helps maintain your site’s SEO continuity by preserving meta titles, descriptions, and redirecting legacy URLs to new Shopify pages.
SEO Tip: Use Matrixify’s redirect feature to automatically generate 301 redirects from your old WooCommerce URLs, this helps protect rankings during migration.
Matrixify migration is simpler than manual but still requires some preparation. Matrixify prepared a step-by-step video on how to do it, but our updated guide will do an equally good job for you, so let's just dive in!
1) Generate WooCommerce API credentials
Matrixify app uses WooCommerce API to directly assess your shop data. To get the API, you need to follow these steps:
1. Go to your WordPress admin
2. Click on “WooCommerce”
3. Then “Settings”
4. After that, go to “Advanced”
5. Then “Rest API”
6. And finally, “Add Key”
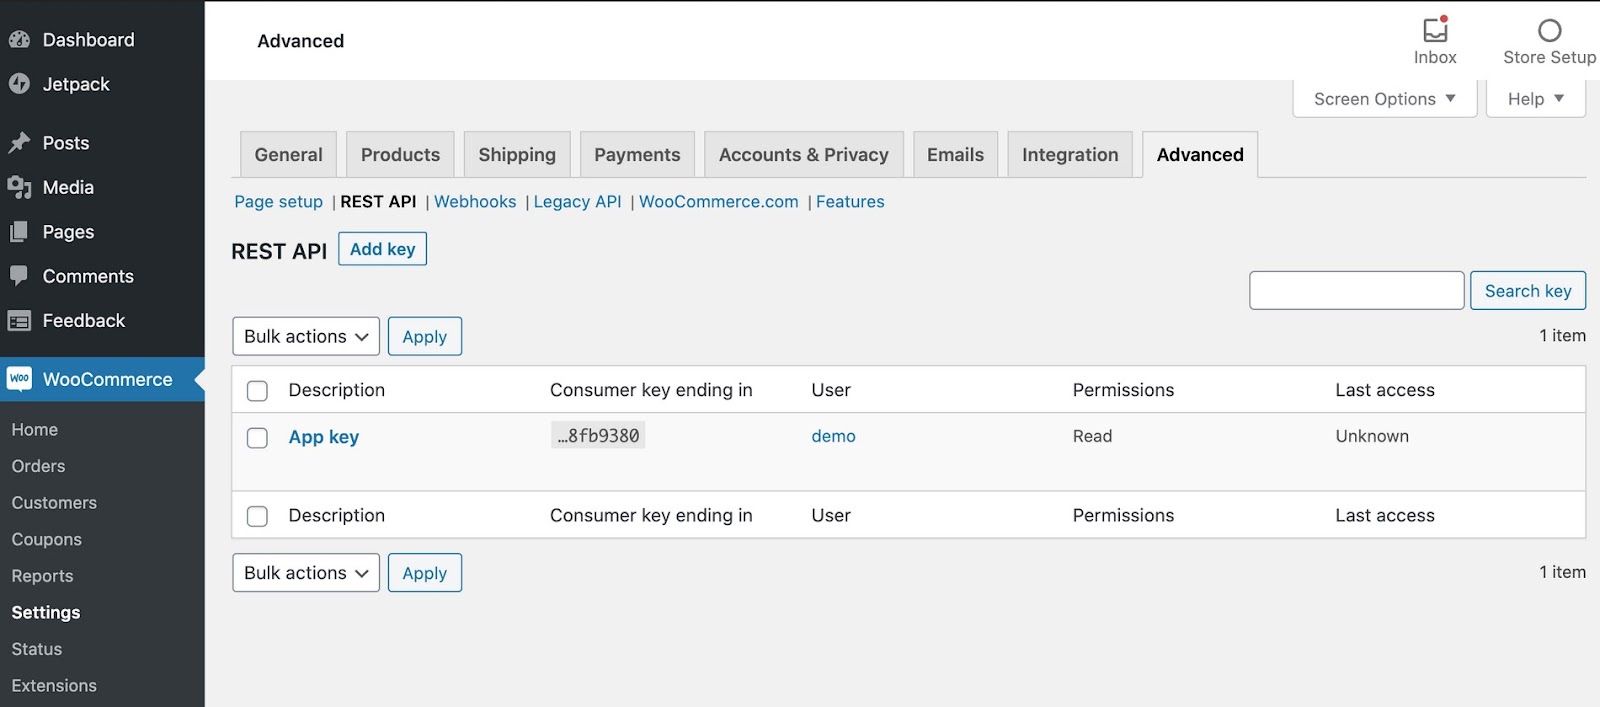
On the page that opened you need to generate new API credentials. There is three fields to fill:
- Description: Here you can enter a name for the credentials. It does not need to be a specific name, it is just for your own reference.
- User: Select the user through which the app will be accessing the API.
- Permissions: The app only needs to read the data from your store, so select “Read” permissions.
After all fields are filled, click on the “Generate API Key” button. You will now see your consumer key and consumer secret. Write them down, since we need them for the next step.
2) Construct the WooCommerce API URL with credentials
In this step, we go to the Matrixify app, to provide a URL with API credentials needed to migrate WooCommerce shop data.
The URL will consist of the following credentials:
- Consumer Key
- Consumer Secret
- Server
How to limit migrated data
Matrixify lets you filter data during migration using URL parameters — perfect for large stores or partial updates.
Here’s how you can use filters:
- Filter by data type: Add
?only=products,customers,ordersto migrate specific entities.
- Filter by status: Use
order_statusvalues likepending,processing,on-hold,completed,cancelled,refunded,failed, ortrash.
- Filter by date: Combine date and type filters to migrate recent updates only:
?only=orders&orders_created_since=2024-01-01T00:00:00&orders_created_before=2026-01-01T00:00:00&order_status=completed
To update only modified data (great for incremental syncs):
?products_updated_since=2024-01-01T00:00:00&orders_updated_since=2024-10-01T00:00:00&customers_updated_since=2024-10-01T00:00:00
This helps speed up migrations and ensures you’re only importing fresh data without duplicates.
Matriify allows one neat thing: using additional URL parameters to limit the data you are migrating from the WooCommerce store to the Shopify store. Here is the list of specific things you can migrate by using his option:
- Entities
- Orders
- Customers
- Products
Migrate specific entries
To migrate specific entries only, you should add "?only=" at the end of h URL to specify what you wish to migrate. For example, if you want to migrate only customers and orders, you should add "?only=customers,orders" at the end of your URL. The available entities you can migrate this way are:
- Products
- Categories
- Customers
- Orders
- Coupons
Migrate specific orders
For Orders, you can also add the following parameters:
- order_status – can be set to the following values as supported by WooCommerce API:some text
- pending
- processing
- on-hold
- completed
- canceled
- refunded
- failed
- trash
- orders_created_since – on or after (>=) specific date and time
- orders_created_before – before (<) specific date and time
- orders_updated_since – on or after (>=) specific date and time
- orders_updated_before – before (<) specific date and time
Date attributes need to be in ISO8601 format, in your WooCommerce store time zone.
For example, you can set parameters like this:
“?only=orders&orders_created_since=2023-01-26T00:00:00&orders_created_before=2024-01-29T00:00:00&order_status=completed”
This export will migrate only completed Orders, created at or after 2023-01-01 00:00 and before 2024-01-01 00:00.
You can also include other entities in the same constructed URL, but only Orders will be filtered with these order parameters.
Migrate specific customers
For migrating specific customers, you can filter them by their role and created or updated dates with the following parameters:
- customer_role – possible values (if you do not have this parameter specified the app will assume the role as all):some text
- all
- administrator
- editor
- author
- contributor
- subscriber
- customer
- shop_manager
- customers_created_since – on or after (>=) specific date and time
- customers_created_before – before (<) specific date and time
- customers_updated_since – on or after (>=) specific date and time
- customers_updated_before – before (<) specific date and time
Date attributes need to be in ISO8601 format, in your WooCommerce store time zone.
For example, you can set parameters like this:
“?only=customers&customer_role=subscriber&customers_updated_since=20243-01-01T00:00:00”
In this example, you would migrate only customers that have roles set as subscribers and have been updated since the start of 2024.
Migrate specific products
As with orders and customers, you can also use various filters for products to limit what products are migrated.
By using these filters you can migrate only some products and you need to ensure to exclude products that you do not wish to migrate.
- product_status – possible values (you can also list multiple statuses separated by a comma):some text
- draft
- pending
- private
- publish
- products_created_since – on or after (>=) specific date and time
- products_created_before – before (<) specific date and time
- products_updated_since – on or after (>=) specific date and time
- products_updated_before – before (<) specific date and time
Date attributes need to be in ISO8601 format, in your WooCommerce store time zone.
Let’s give another example:
“?only=products&product_status=pending,publish&products_updated_since=2024-01-27T00:00:00”
This example would migrate only products with pending or publish status that have been last updated since the start of 2024.
Combining URL attributes
Up till now, we covered URL parameters that are used separately to migrate only specific data, but you can also combine them and migrate different types of data. This is important if you either do not need to migrate old data from the store or have already done the whole migration previously but now need to migrate over the rest of the data that was changed in WooCommerce after the big migration.
The simplest way to achieve this in both cases is to add updated “since” URL parameters:
“?products_updated_since=2024-1-28T00:00:00&orders_updated_since=2023-10-28T00:00:00&customers_updated_since=2024-1-28T00:00:00”
In this example, the app would migrate all entities – products, customers, orders, categories, and coupons, but only recently updated (since 2024, January) products, customers, and orders will be migrated over thus limiting the amount of data migrated.
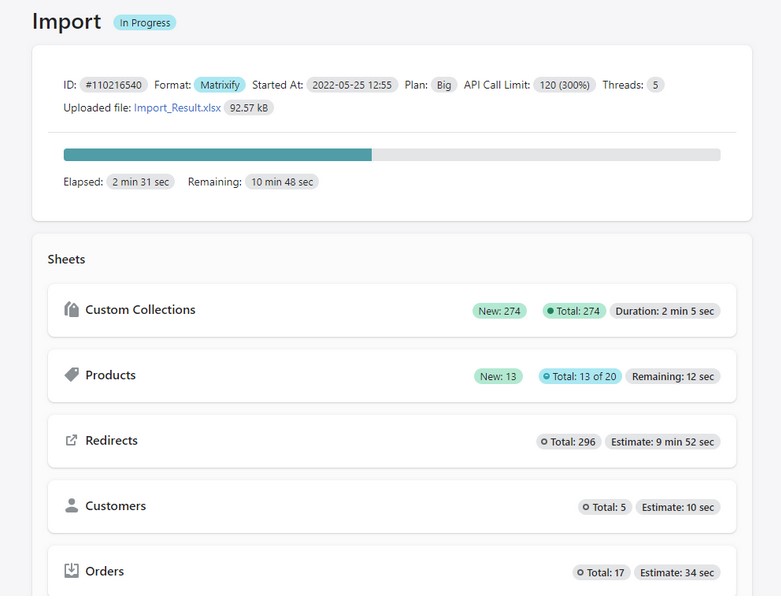
Start importing to Shopify
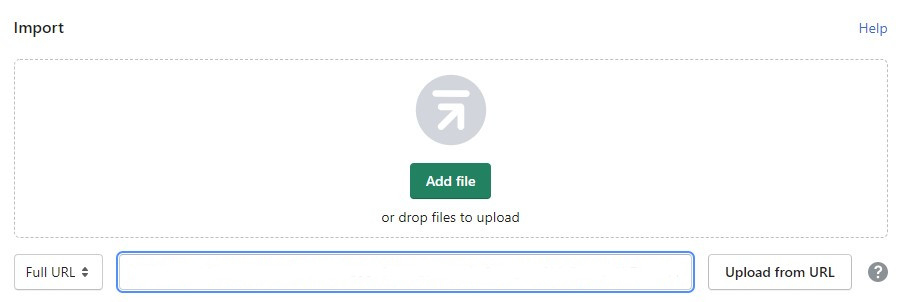
After we finish constructing URLs, we can start importing things to Shopify. Go to Matrixify app, and in the Import section, paste your URL and press the “Upload from URL” button.
This will open a new import page. You should check if everything looks good, and then press the “Add file” button.
After that, you can start importing your data, but Matrixify is giving you another option to check if everything is fine. That’s a “Dry run” option, in which you can simulate the import and check for possible errors.
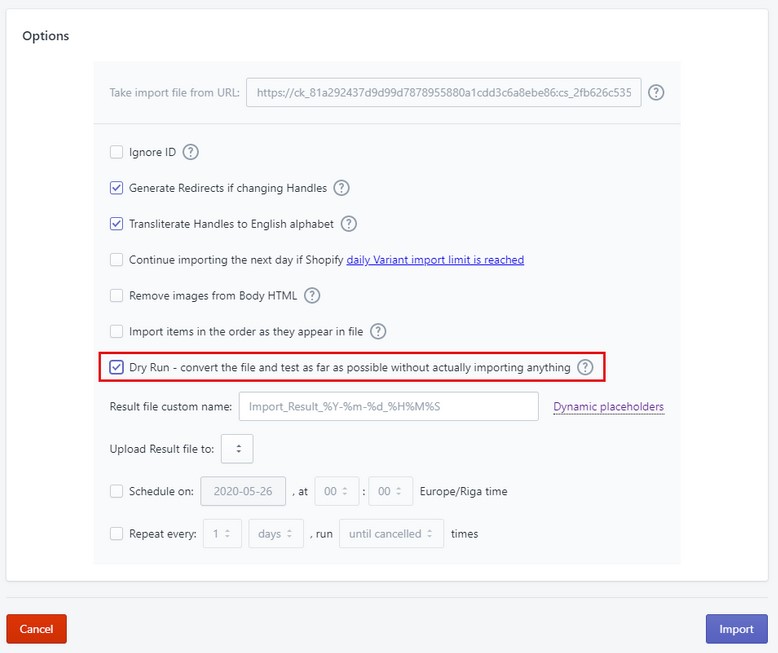
This is optional, but completely recommended. Dry run is reasonably fast and it will detect problems if there are any. It is better to catch them now, instead of chasing it in the imported data. After selecting the “Dry run” option, you can proceed to the next step and click on the “Import” button.
Download and unzip the generated file
Once your Matrixify import finishes, download the generated ZIP file and open it. You’ll find:
- An Images folder, containing any images embedded in product or collection descriptions.
- An Import_Result.xlsx file, listing all imported data entities.
Keep in mind:
- Product gallery and featured images are not in the folder, Shopify automatically pulls them from the links inside your Excel file.
- If your products included images inside descriptions, those must be uploaded to Shopify Files (Admin → Content → Files → Upload).
- After uploading, verify a few random product and collection pages to ensure all images display correctly.
Once the import is finished, you can download the result. Matrixify will generate a zip file that will look like this:
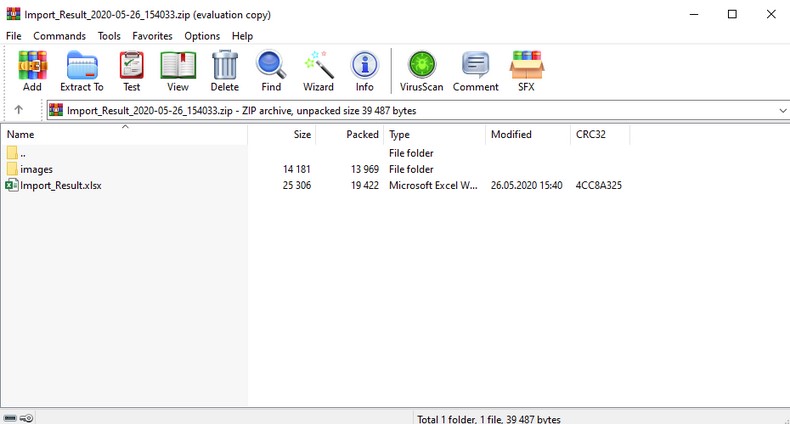
In the “Images” folder Matrixify will create images as actual files that are listed in the Product or Collection Body HTML code. In many migrations, there might not be images within the HTML code. If that’s the case, you won’t have the “Images” folder.
In that case, Product images and Collection featured images will be downloaded by Shopify from the image links listed in the Excel file.
Now, you need to upload the images to your Shopify admin. You will do that by going to Shopify Admin -> Content -> Files and by pressing the “Upload” button.
After you are done uploading, check out the Matrixify-generated Excel file with your WooCommerce data in it. This is your last chance to check everything once again, before finalizing import.
Import the final Excel file to Matrixify
After that final check, you are now ready to import your data. Go to Matrixify app once again, and import the final Excel file to the import section. The format of the data should now be “Matrixify”. There is no need for another dry run, you can proceed to real import right away.
After the import is done, check if you can see your files in the Shopify admin. If you’ve done everything right, you should see your data migrated to Shopify and you can start the next phase of your e-commerce journey with the dedicated e-commerce platform!
FAQs
How long does it take to migrate from WooCommerce to Shopify?
The duration of migration can vary based on the size of your store and the method used. Manual migrations will always take longer, while third-party apps like Matrixify can speed up the process.
Can I migrate my customer reviews from WooCommerce to Shopify?
Yes, you can migrate customer reviews using third-party apps like Yotpo. If you use this app all your reviews will be transferred and displayed on your new Shopify store.
Is it possible to migrate orders and order history from WooCommerce to Shopify?
Yes, you can migrate order history using apps like Matrixify. Manual migration of orders and history is not possible, but Matrixify makes the process straightforward and efficient.
Can I migrate my WordPress Pages and Blog posts?
Yes. Tools like Matrixify support CMS Pages and Blogs, including titles, content, featured images, and SEO metadata. Your WordPress blogs can appear directly in your Shopify store’s Blog section.
Will my SEO be preserved after migration?
Yes, during migration, you can generate 301 redirects that send search engines and visitors from your old WooCommerce URLs to the correct Shopify URLs. Matrixify can also carry over Meta Titles and Meta Descriptions, minimizing ranking loss.
Can I migrate reviews and coupons?
Yes. Use Yotpo or similar apps for migrating customer reviews, and Matrixify for transferring coupons or discount codes with full details.
What about images inside product descriptions?
Images embedded in your product or collection descriptions can be exported separately and hosted on Shopify Files. This prevents broken images once your old WooCommerce site is deactivated.
Summing all up
Migrating your e-commerce store from WooCommerce to Shopify may seem daunting, but it can be a smooth process with the right approach and tools.
By following this guide and using apps like Matrixify, you can transfer your products, customers, and other crucial data efficiently.
Shopify’s specialized platform accompanied by countless apps from the Shopify app store, including tools like Bloggle, offers a superior e-commerce experience that can significantly enhance your store's functionality and design.
Transitioning to Shopify is a step forward in your e-commerce career.


.svg)
