
.svg)
If you are new to Google Ads and paid marketing in general, you may not be aware of the importance of tracking the results of your marketing efforts.
It is completely logical that you should pay attention to details and track the results of your marketing campaigns, but that can be a daunting task.
But you shouldn’t worry, because you came to the right place. The Bloggle team is ready to help you with Shopify Google Ads conversion tracking.
In this guide, we will explain what is Google Ads conversion tracking, how to set it up and explain possible reasons for Shopify Google Ads conversion tracking not working.
Why trust us?
- We're the creators of Bloggle, a drag-and-drop Shopify blog builder available on the Shopify App Store that fills the gaps in native Shopify blogging capabilities.
- We're a global force: 3000+ merchants across 60 countries have trusted us to amplify their voices.
- Your peers adore us: We have a stellar 4.9/5 rating on the app store.
What is Google Ads conversion tracking?
Shopify Google Ads conversion tracking can be explained rather simply — the very name of the operation should explain what it does.
Basically, it is a tool that shows and tracks the actions customers take after interacting with your ads. First, you need to set up a conversion event in your Google Analytics account. Conversion events can be anything you want to track — app installs, subscriptions, clicking on the ad, and so on.
After defining these events, Google will provide a tracking code that tracks user behavior related to the specific event you defined. For example, Google will record when someone clicks on the ad, and then send this data back. It will become accessible in your Google Analytics account.
Why do you need Shopify Google Ads conversion tracking?
By analyzing the data you collect, you should be able to optimize the ads further and make more effective campaigns. This is particularly important for e-commerce businesses that run their stores on Shopify.
You should go above and beyond to find a way to get the most out of your website traffic and your ad campaigns. By implementing conversion events for different actions your visitors can take, you can get a complete picture of your business, seen through the eyes of potential customers. Here is where Bloggle and its benefits come into play:
- Allows easy customization and design of blog posts with an intuitive drag-and-drop interface
- Improves the overall look and feel of your store pages, compared to default Shopify options
- Enables testing of different CTAs, design elements, and link placements, which allows easier conversion data tracking
- Optimizes blog posts for better search engine rankings
Installing Bloggle instead of relying on Shopify's default blog option will allow you to optimize your ad campaigns further, and track conversion events with more precision.
How to set up Shopify Google Ads conversion tracking (Step-by-step)?
There are two main methods of setting up Shopify conversion tracking — Input the code (Google Tag) on your Shopify store manually, or Use the Google & YouTube Shopify app. We will explain both methods step-by-step.
Set up Google Ads conversion tracking manually with Google tag
The first method we will cover is setting up the tracking manually with Google tag. This is certainly a harder method, but we will still recommend it because it is more consistent and if you do it right, you shouldn’t receive any errors during or after the process. To complete it successfully, you need to take three major steps:
- Create a conversion action in Google Ads
- Add Google Tag to your Shopify store
- Add the event snippet to Shopify
To complete each of these major actions, you will need to take several smaller steps.
Create a conversion action in Google Ads
1. Go to your Google Ads account
2. Click on “Goals” and then “Conversions”
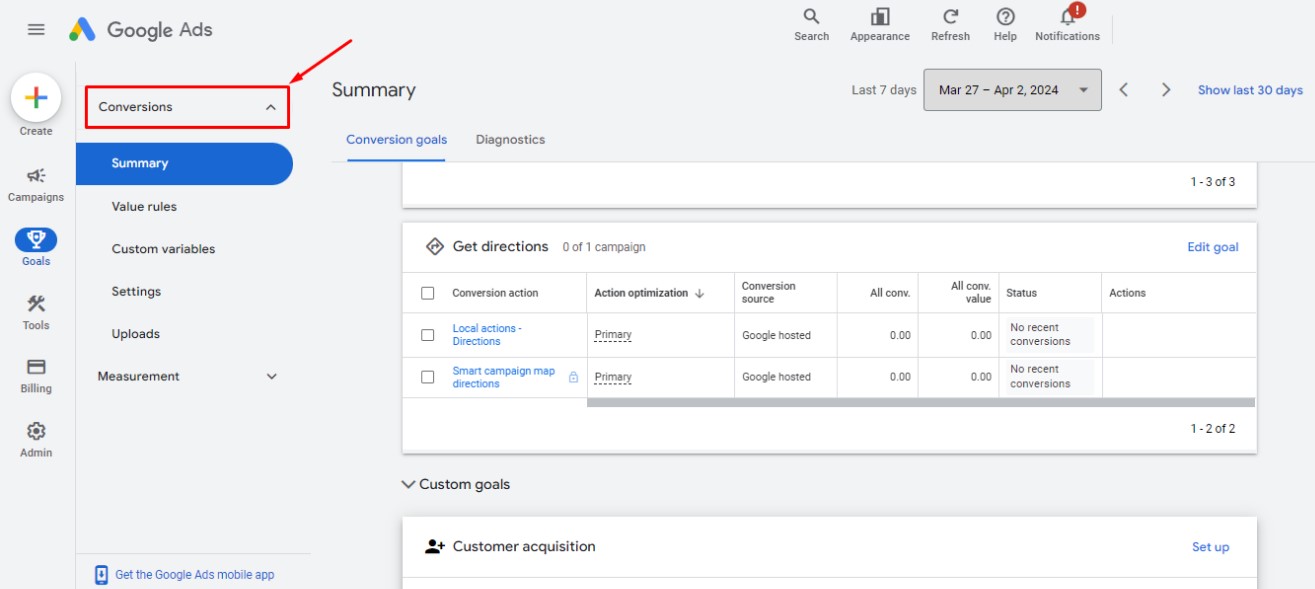
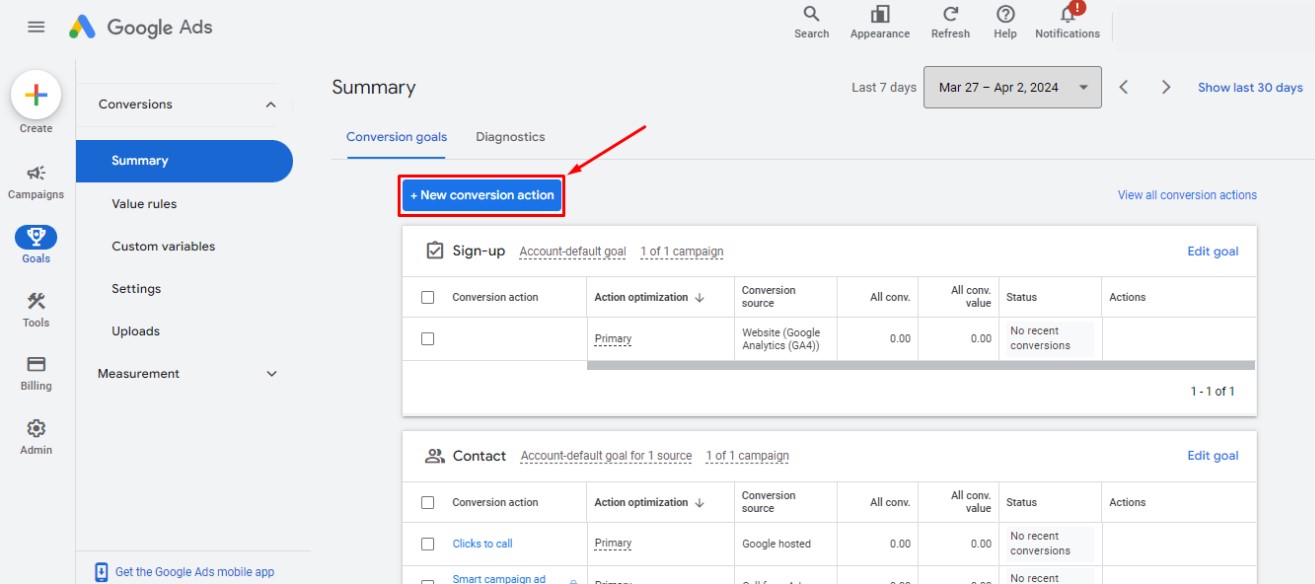
3. Press “New conversion action” at the top of the page
4. Among the displayed options, choose “Website”
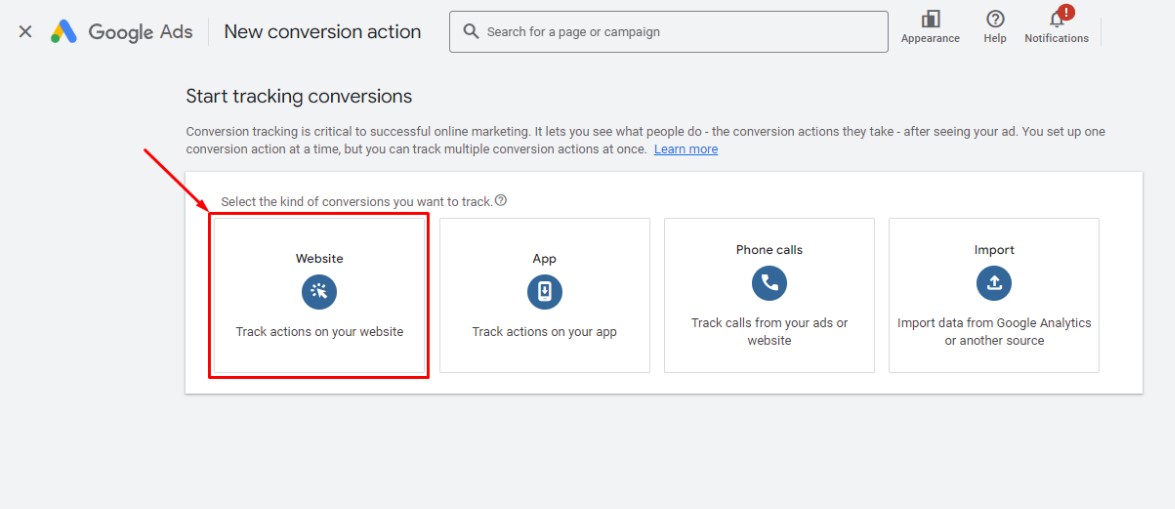
5. Write your website URL into the box
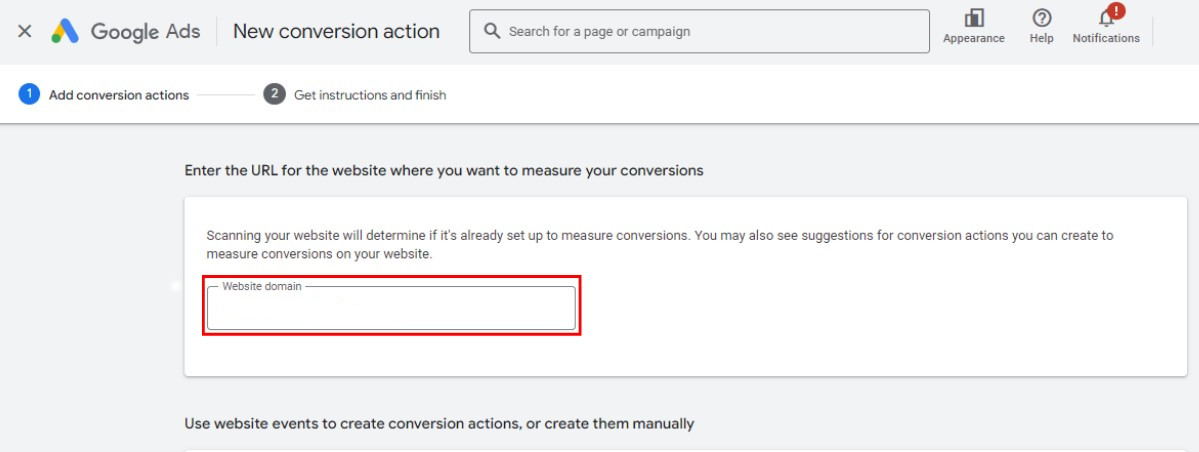
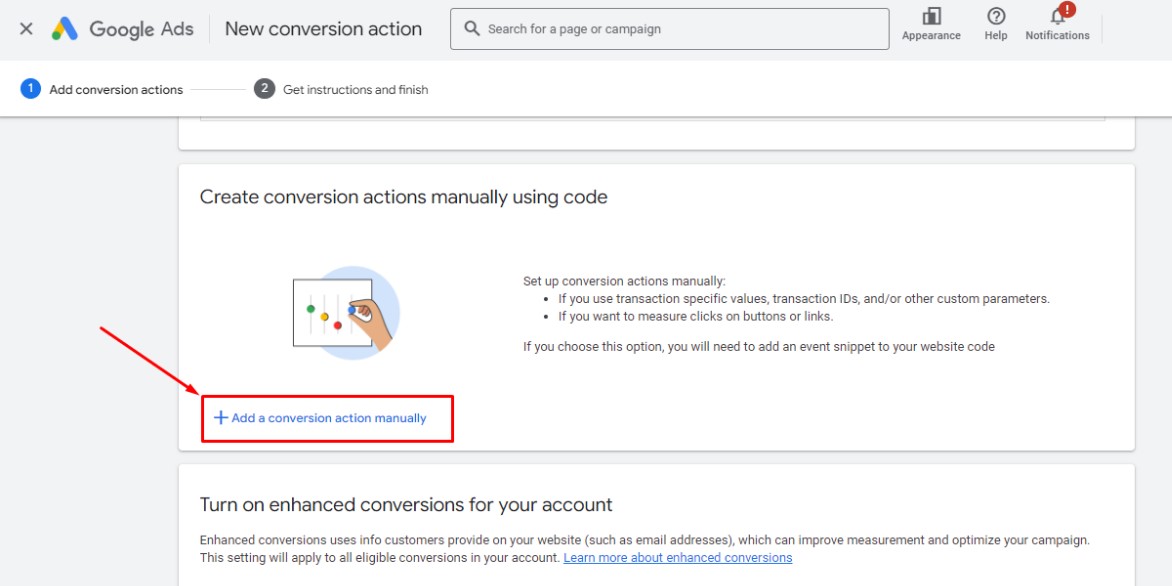
6. Scroll down until you see “Create conversion actions manually using code” and then click on “Add a conversion action manually”
7. Choose “Purchase” from the drop-down menu, fill in other details and don’t forget to use different values for each conversion option for “Value” to include more products you are selling
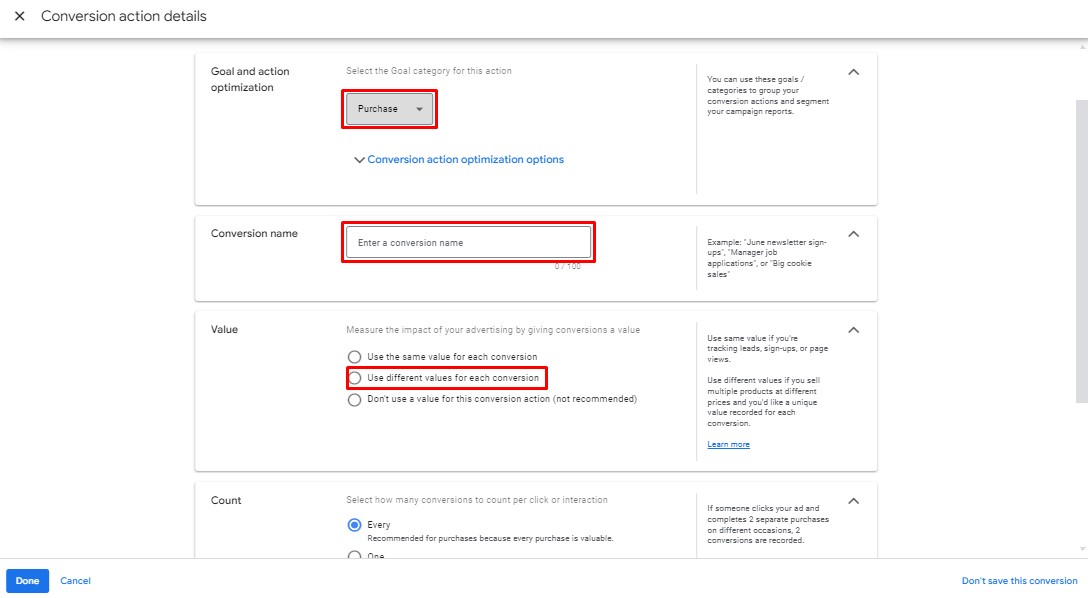
8. Click “Done” to save your conversion action
Add Google Tag to your Shopify store
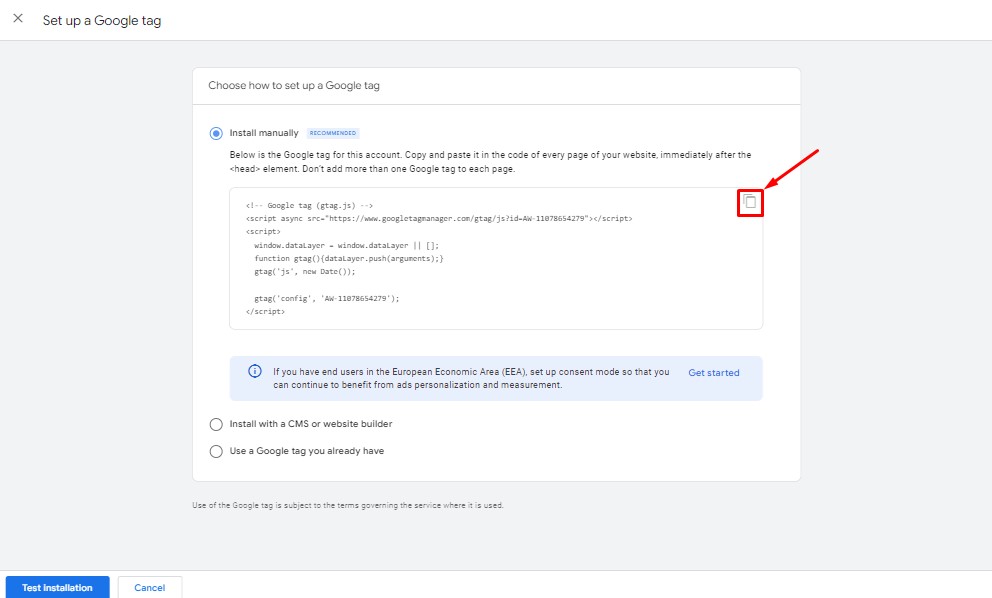
If you successfully finish the first major step, an event snippet for the conversion action should be available.
1. Click on “Set up” to install Google Tag on your Shopify website
2. Go back to the Shopify store
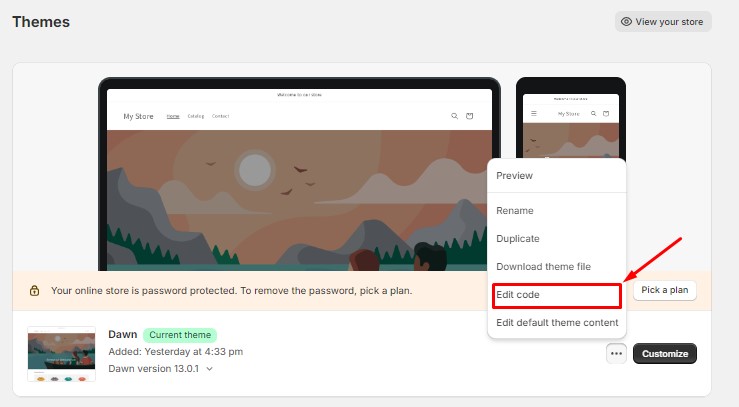
3. Click on “Online Store” then “Themes”, and then “Edit code”
4. Go to the left-hand side menu, click on “Layout” and open theme.liquid file, and then add Google Tag code after the <head> element
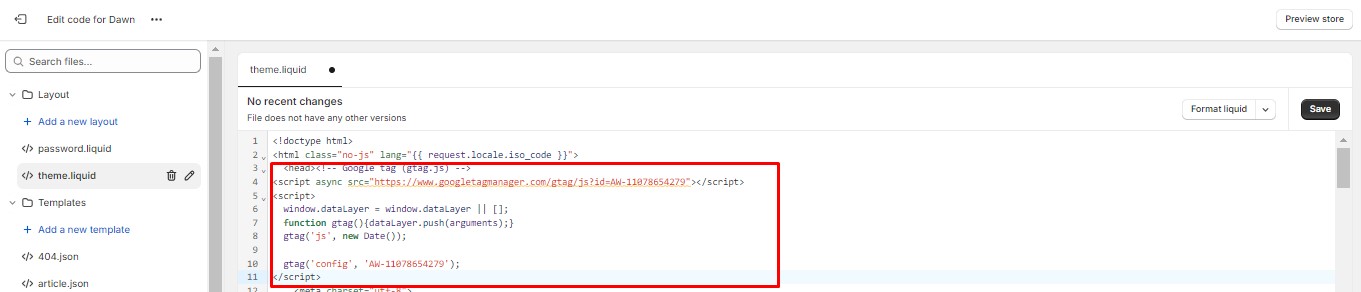
5. Click “Save”
Add the event snippet to Shopify
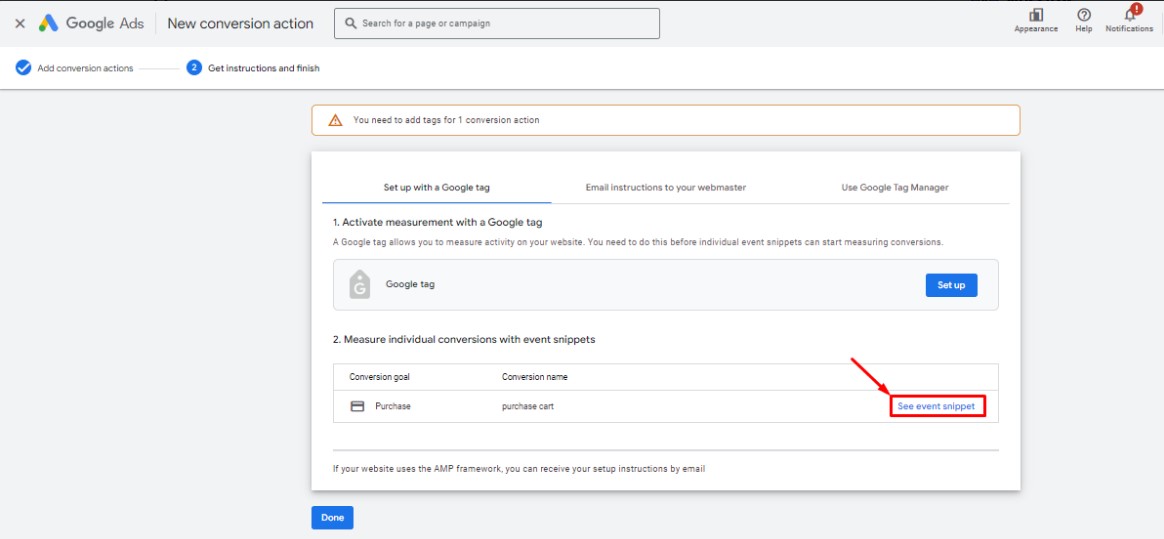
1. Go back to Google Ads Manager
2. On the “Get instructions and finish” page, click on “See event snippet”
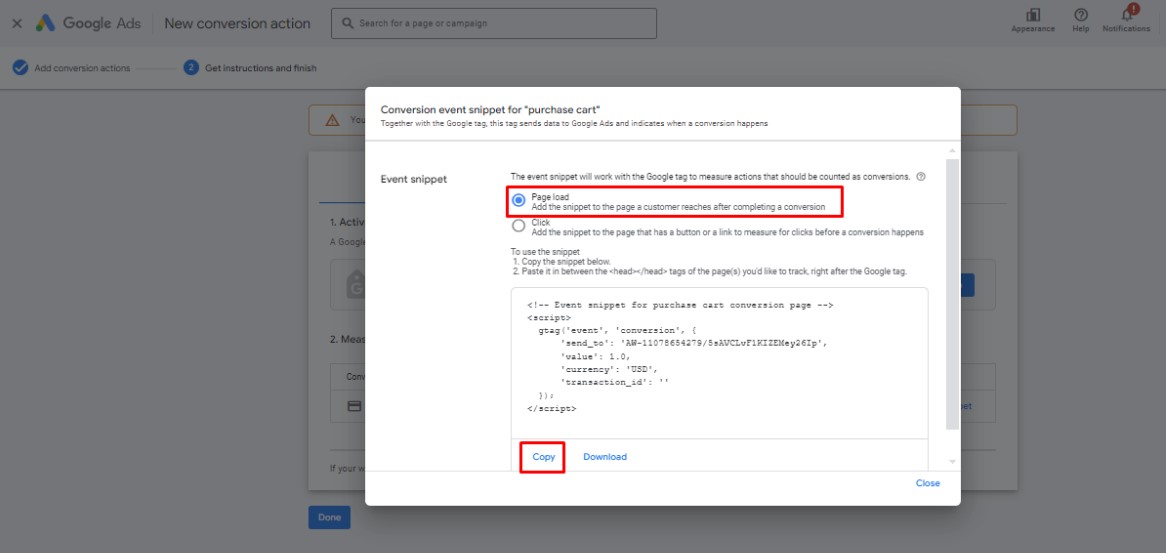
3. Select “Page load option” and copy your event snippet
4. Go to the Shopify admin page, and click on “Settings”
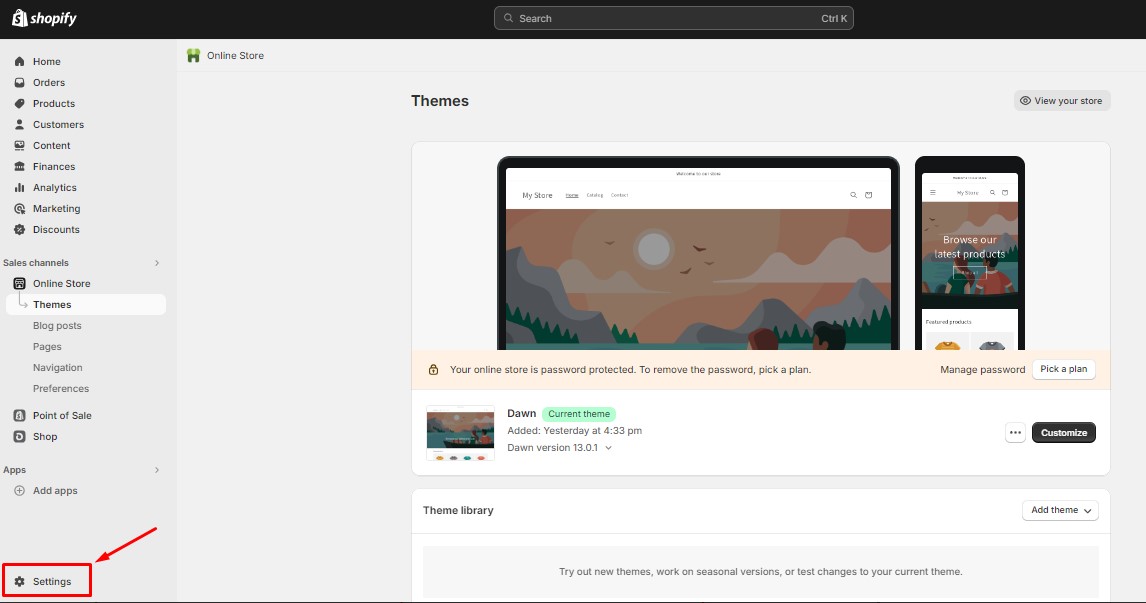
5. Click “Checkout”, scroll down to “Order status page”, and paste the Google Tag code in the “Additional scripts” box
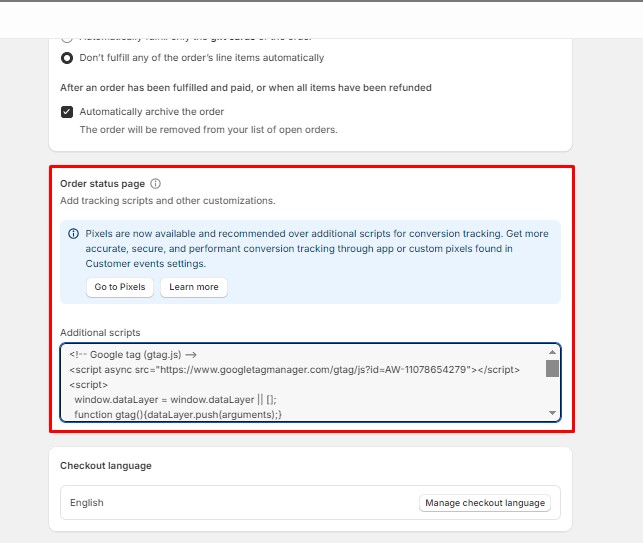
6. Paste the event snippet code after the Google Tag code
And you are finally done! Although this process is long and technical, it is better to go through all this and avoid potential mistakes. Even if mistakes happen, you should be able to spot and solve them more easily compared to the other method.
However, if you want more straightforward and easier Google Ads conversion tracking setup, you can use the Google & YouTube Shopify app as well.
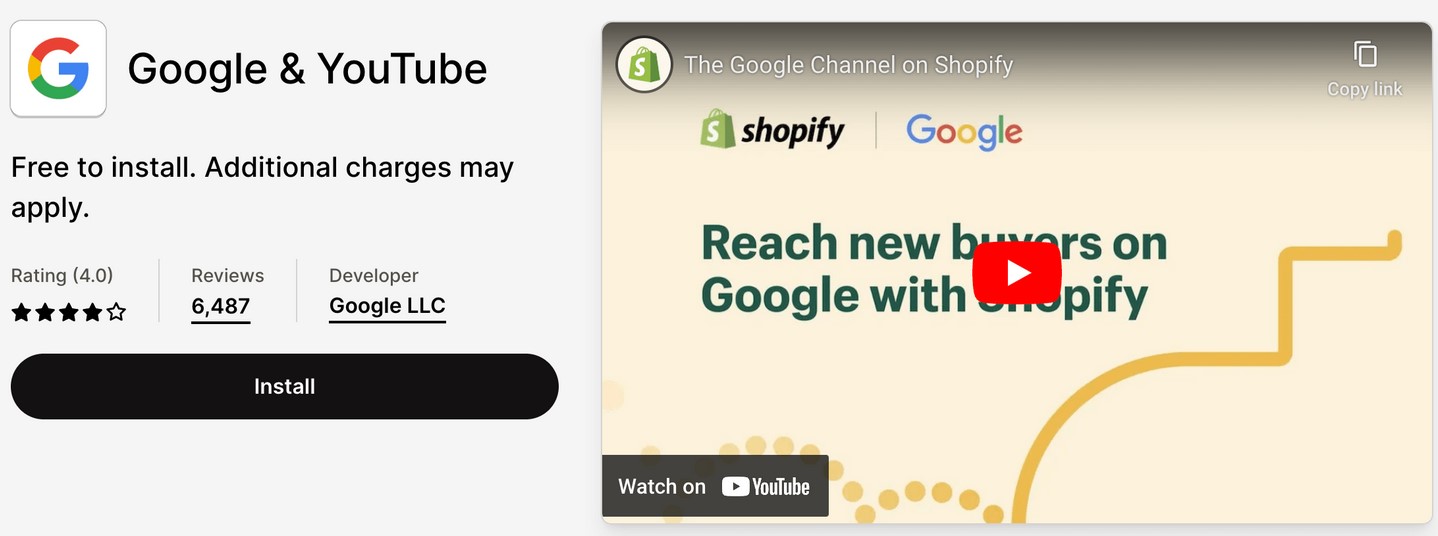
Download the Google & YouTube Shopify app
Google & YouTube Shopify app is another addon to the default Shopify installation which can make your life easier. The biggest benefit of this app is that installing it automatically adds conversion tracking to your Google Ads account. This means that you can save a lot of time by using this app, compared to doing everything manually.
However, there is one condition for you to fulfill before using this Shopify app. You also must have a Google Merchant Center account. The process of creating it is straightforward and free.
Then you need to check if you are qualifying for the Shopify requirements to use Google and YouTube channel. After you satisfy these two conditions, you can start with the process. Here are the steps you need to take:
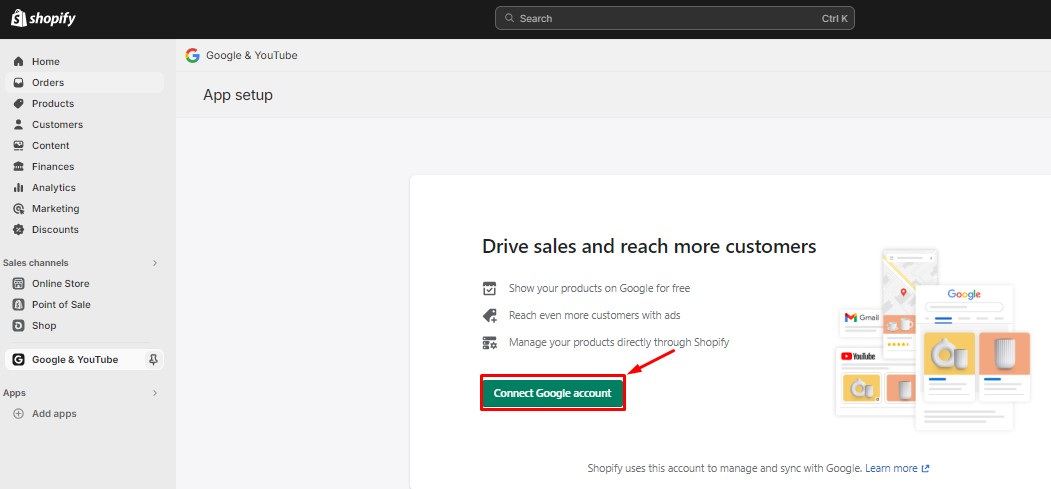
1. Find and install Google & YouTube app from the Shopify app store
2. Click „Connect Google Account“, and choose the right account from the list if you have more than one option
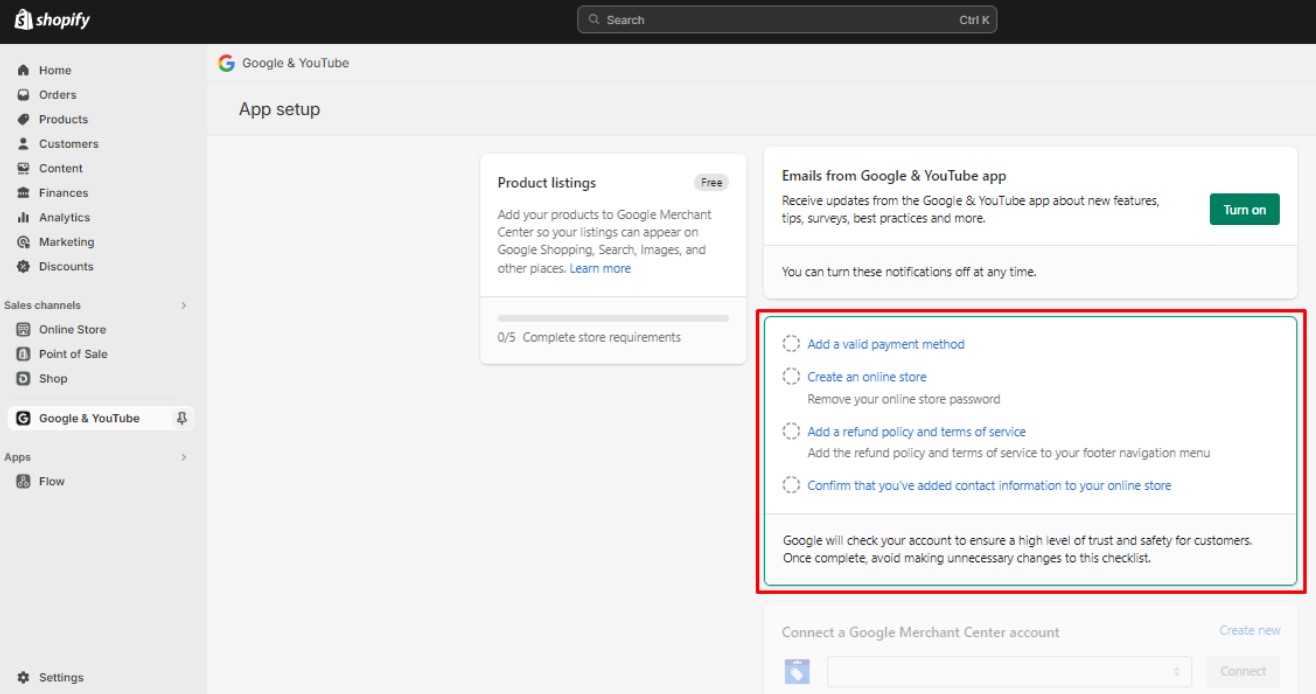
3. If you still haven’t finished the actions from above, you will see a checkbox listing them before you can proceed
4. Connect your store to your Google Merchant Account by clicking on the „Connect“ button

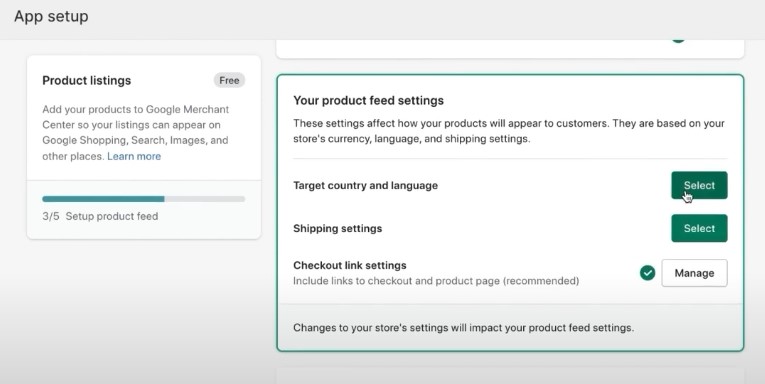
5. Select your target country, language, and shipping settings
6. Accept the terms and conditions
And you are done! As we can see, this process is much shorter and easier than manually setting up the Shopify Google Ads conversion tracking. However, you might have to wait for a few hours before everything is connected.
Shopify Google Ads conversion tracking is not working
Even if you think that Shopify Google Ads conversion tracking was done properly, you may encounter difficulties such as incomplete data or tracking completely not working. Here we will cover the most common problems with conversion tracking.
No conversion data
If there is no conversion data, it is probable that something went wrong during the setup. Usually, it will be either problems with the tracking code you haven’t copied in full, or haven’t pasted properly or lack of synchronization between Shopify and Google Ads conversion tracking.
One of the common problems with the tracking code is that the monetary value is expected to be only numeric, so if you see any currency unit within the code, deleting it may fix the issue.
Incorrect conversion data
You are seeing conversion data, but it looks funky to you. It may be incorrect and again it might be the issue from the setup, incorrect code, or even the third-party software you used. Currency issues are very common here again, because of Shopify’s multi-currency feature.
Shopify allows users to pay in their local currency. If you only set up „USD“ as the currency value, there is a big chance that some of the purchases will be inaccurately recorded.
Counting duplicate or excessive conversions
If you didn’t pay attention to the purchase click ID during the setup, it is possible that you are now tracking duplicate conversions.
Sometimes, users will make multiple purchases from a single click ID, and you should decide whether will you track them as individual purchases or as a single conversion.
It is better to track them as one conversion per ID. It’s great if your customer made multiple purchases of course, but not attributing all those purchases to the single user will cause problems in statistical analysis of the data.
In the same time, tracking too many conversion events might draw your attention from the events that are really important.
This is especially true for non-monetary events, such as document downloads or sign-ups that don’t contribute to your revenue. It is not bad to track these events as well, but counting them as conversions is not the best approach.
How to test if the tracking is working and fix the potential errors?
After you finish the conversion tracking setup, it is crucial to check if you did everything right. If you spot a mistake, this process can solve it as well. The simplest way to do that is by using the Google Tag Assistant.
Tag Assistant is a tool that will help you verify conversions on your Shopify store. It is integrated with Google Ads, which means it can be launched directly from your Google account. This is a primary reason why this tool is so convenient.
How to set up Google Tag Assistant
Google Tag Assistant can be set up in five easy steps:
1. Go to your conversion summary table
2. Launch Google Tag Assistant for conversion actions in the „Unverified“ or „Tag inactive“ state
3. Connect to your website
4. Test the conversion by triggering it on the website
5. Close the Tag Assistant and refresh the page to see the status
This debugging process can be repeated for each conversion event you set up tracking for. After approximately 30 minutes you should see all conversion actions verified in this debug session within your Google Ads account.
FAQs
How can I ensure the accuracy of my Google Ads conversion tracking in Shopify?
Double-check your tracking code for errors and use Google Tag Assistant to verify conversions.
What should I do if my Google Ads conversion tracking shows no data?
First, check if the tracking code is correctly placed and then see if it is synchronized between Shopify and Google Ads.
Can I track non-monetary events with Google Ads conversion tracking in Shopify?
Yes, but you need to track these events separately from monetary conversions to avoid problems when analyzing the data.
Summing things up
Setting up Google Ads conversion tracking in Shopify is very important for tracking the results of your marketing campaigns.
It is not easy to set it up perfectly, but if you follow the steps from this guide, you should be able to do it and get your Shopify Google Ads conversion tracking today!


.svg)
