
.svg)
Google Analytics 4 is essential for measuring the performance of your Shopify store. It is a free and most commonly used analytics tool in general.
You probably know all that, and you are here because setting it up is not as simple as it seems.
But don’t worry, you came to the right place! The Bloggle team has more than five years of marketing and technical experience with Shopify, and we will guide you through the Shopify Google Analytics 4 install process.
If you follow our tips, you will add Google Analytics to Shopify in no time!
Why trust us?
- We're the creators of Bloggle, a dynamic Shopify blog builder available on the Shopify App Store that fills the gaps in native Shopify blogging capabilities.
- We're a global force: 3000+ merchants across 60 countries have trusted us to amplify their voices.
- Your peers adore us: We have a stellar 4.8/5 rating on the app store.
- We've already empowered 55,000+ blogs written using our versatile app.
- Under our guidance, users have reported up to a 10x boost in Search Engine Optimization (SEO) traffic and revenue.
The best way to implement GA4 on Shopify
There are several ways to implement Google Analytics 4 on Shopify, and two of them are very popular:
- Installing GA4 with Google & YouTube Shopify app
- Installing GA4 with Google Tag Manager
Before jumping into adding GA4 to Shopify, you need to create GA4 property first, and we will explain how to do it in detail in the upcoming section. If you already have a Google Analytics 4 account, you can skip the next section entirely.
Create a Google Analytics 4 property
1. First, you need to go to analytics.google.com and click on “Start measurement”. Give the name of the account you will use.
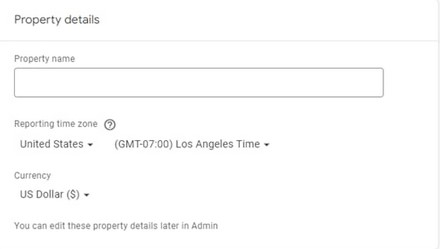
2. Next, you will need to name the property. The property name can be whatever you want, but it is best to name it after your brand or website.
3. After that, choose the country in which your company is located, the reporting time zone, and the main currency in which your company operates.
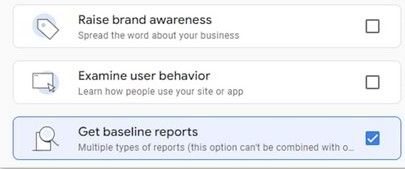
4. After clicking the “Next” button, you will see several simple questions you need to answer, and after that, you should select your business objectives. Be careful at this step, because the reports you will have in the interface will also change. If you never tracked data in this business before, we recommend selecting “Get baseline reports”.
5. After that, click “Create”.
6. Next, you will have to choose a platform for your data source. There is three available:
- Web
- Android app
- iOS app
Since you are running a Shopify store, you should select “Web”.
7. Then, you must enter the URL of your website, and then the name of your website.
8. When you do that, you can opt for enabling Enhanced Measurement. Enhanced Measurement was created to help the owners get as many events in the report as possible. We recommend using it.
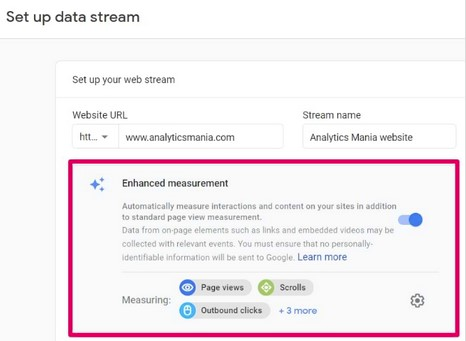
Enhanced Measurement tracks these events if enabled by default:
- Page view (event name: page_view)
- Scroll (event name: scroll)
- Outbound link click (event name: click with the parameter outbound: true)
- Site search (event name: view_search_results)
- Video Engagement (events: video_start, video_progress, video_complete)
- File Download (event name: file_download)
- Form events (form_start, form_submit)
Optionally, you can disable and enable events manually by clicking the cogwheel icon in the bottom right of the Enhanced Measurement card and clicking the toggle buttons.
9. After you select everything you want, press the “Create Stream” button.
Integrating GA4 property with your Shopify store
We already mentioned that you could choose two paths for Shopify GA4 integration.
If you want the simplest possible Shopify GA4 setup, you should opt for the Google & YouTube Shopify app, which can automatize most of the process and it will work completely fine for users that need only the basic tracking options.
However, if you need more extensive and detailed tracking, you should opt for Google Tag Manager.
Adding Google Analytics to Shopify with Google Tag Manager is harder and requires more technical skills, but it is a recommended way of doing it.
In the next part of the article, you will be able to see a step-by-step guide on Google Tag Manager which will be enough for you to set it up yourself.
Of course, if you are feeling overwhelmed, you can always pay a specialist to do it for you.
1. Integrating GA4 to Shopify with Google & YouTube Shopify app
The easiest way to add Google Analytics 4 to Shopify is with Google & YouTube Shopify app. This method is proven and tested by dozens of Shopify merchants we had as clients of our Shopify agency. It worked well for the majority of users.
To connect GA4 with Shopify, first, of course, you need to install the app. You can just Google it (or click our link above), or install it through your Shopify admin.
After you install the app, you can set it up in several simple steps:
1. Connect Google Account
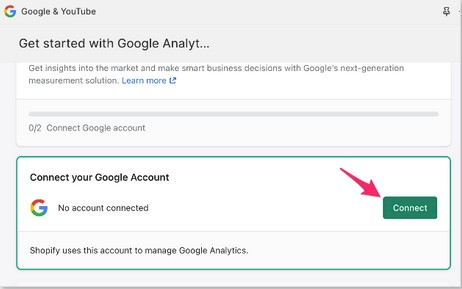
2. Connect your GA property
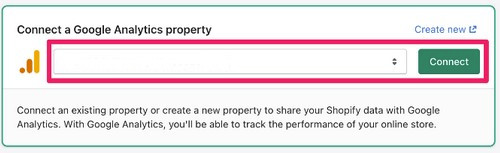
You should see your unique code in this field, and click “Connect”. And that’s it! Much simpler than Google Tag Manager, but also much less customizable. This Shopify app tracks these events by default:
- page_view
- scroll
- click
- view_search_results
- video_start, video_progress, video_complete
- file_download
- form_start, form_submit
- view_item
- add_to_cart
- begin_checkout
- add_payment_info
- purchase
This is enough for most users, but if you want to customize, add more events, and set up even deeper tracking, then manual configuration of Google Tag Manager is the way to go.
If you head over to GA4 Realtime reports right after you finish the installation and see nothing, do not worry. It takes from a few hours up to a full day to see data coming in GA4.
2. Integrating GA4 to Shopify with Google Tag Manager
If you still don’t have a Google Tag Manager account, you obviously need to create it. And if you are not sure why is it needed, it can be super beneficial for your store:
- Create a custom trigger like a cookie banner for GDPR and control the moment you add the GA4 code
- Control the push of the default Shopify events (cart added, sale, etc) to GA4
However, these options are super technical and it usually takes a developer to handle it. Nevertheless, it is worth paying a professional to implement it, because they will certainly pay off. There are other options as well, Elevar, as a strong conversion tracking software, and Analyzify, which is a data-analytics app. Both tools will handle manual installation for merchants.
If you want to continue with the manual integration of GA4 to Shopify with Google Tag Manager, this is how you’ll do it:
1. Head over to tagmanager.google.com and create a new account.
2. Name it, and select “Web”, like you did when you were creating a GA4 account.
3. After that, your GTM is ready, and in the next step you will see something similar to this:
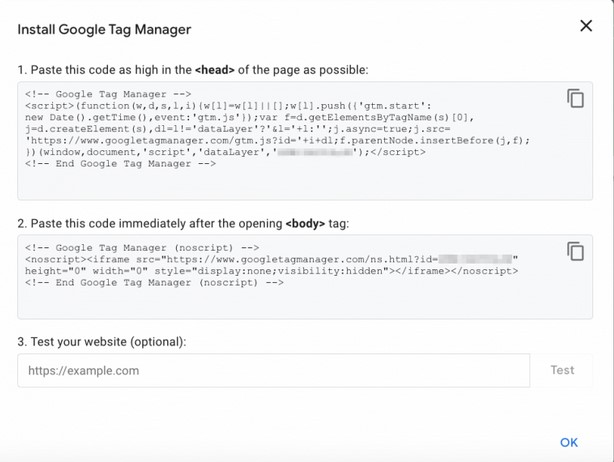
Now you can add this code to your Shopify store.
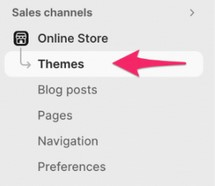
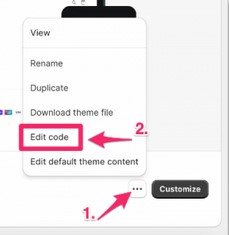
4. Go to Shopify admin, select “Online store”, and then “Themes”
5. After that, click on the “Customize button”, and then “Edit code”
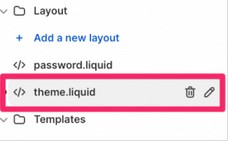
6. Click on the “theme.liquid
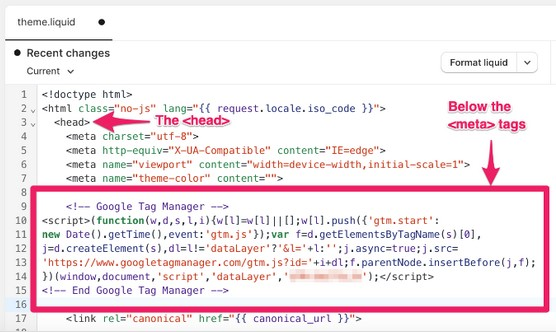
7. Copy the first tracking code from your GTM, and paste it into the <head> section of theme.liquid, right below the meta tags:
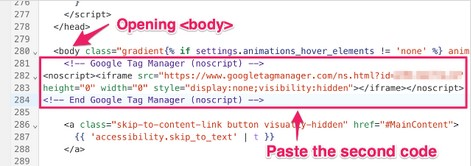
8. Go back to your GTM again, and now copy the second code. At the theme.liquid file find a <body> tag, and paste this code right after it:
Click save and you finished this part of the setup. Now, we need to connect Google Analytics to Google Tag Manager.
1. Get back to the GTM container, go to “Tags” and then click “New”
2. Select “Google Tag”
3. Put the measurement ID from Admin > Data Streams > Your data stream here
4. Add a “trigger” from the triggering section, and select “Initialization – All Pages” as the trigger
5. Name your Google Tag and click “Save”.
And, you successfully implemented the Google Tag. Now, you will start seeing GA4’s automatically collected events.
Important GA4 integrations
GA4 is a versatile and free tool, that is deemed essential for every Shopify merchant. However, some of the analytics you have access to are possibly lacking depth and you need more data presented by your tools in order to run a profitable business.
Several Shopify apps can integrate with GA4 and give you even more clarity and depth than Google Analytics itself:
- Analyzify — the best data analytics app specialized for Shopify
- Blyp — AI-powered conversion rate optimization tool for Shopify
- AD Google Analytics 4 — Customer journey analysis tool
- Magic Google Analytics 4 — Enhanced marketing analysis tool
- Little data — Revenue tracking tool.
By integrating some of these tools with your GA4, you will get even more than just using this free tool provided by Google as is. More experienced merchants and website owners know that in the past Google tools were almost enough to run your business, without the necessity of installing premium, upgraded versions of these free tools, but now the options within GA4 are more limited than before, and if you should opt for integrating some of the above-mentioned premium tools with it.
Why it’s crucial for you to use GA4 for your Shopify store
Google Analytics 4 is like a starter pack for analyzing your business efforts through the Shopify store.
Amplifying it with other tools we mentioned is needed for getting the most out of your store statistics.
However, it is not the fact that GA4 is free which makes it crucial. If you never used any analytics software, after installing GA4 you should see a massive change in running your business.
First of all, you will have your full website history in the palm of your hand. If you start running ads, you will be able to implement the data from your store history to create the target audiences you need to target, in order to scale up your business.
GA4 is also the only platform that you can use to get conversions for Google Shopping and Google Ads platforms so this is a must-have for any merchant.
FAQs
How can I verify that Google Analytics is correctly set up on my Shopify store?
After integrating, you can verify the setup by visiting your website and checking the Real-Time report in Google Analytics to see if your visit is recorded. Additionally, use Google Tag Assistant to ensure the tracking code is firing correctly.
What version of Google Analytics should I use for Shopify in 2024?
In 2024, it is recommended to use Google Analytics 4 (GA4) for better tracking and enhanced features. GA4 offers more advanced data collection and analysis capabilities compared to the older Universal Analytics.
Why is it important to use Google Analytics on my Shopify store?
Using Google Analytics helps you understand your store's traffic, customer behavior, and sales performance. This data can guide your marketing strategies and improve your store's overall effectiveness.
Summing all up
GA4 integration with Shopify is essential for growing your e-commerce business. With so many tracking options available and the fact it is free, GA4 is a great option, especially for new business owners.
Integration via Google Tag Manager is recommended by the Bloggle team because it allows flexibility and more precise tracking, but if you just need the basic package, integrating GA4 with Shopify through the Google & YouTube Shopify app is perfectly fine as well.


.svg)
