
.svg)
Tags play a significant role in organizing your online store's content, making it easier for both customers and search engines to navigate your website. They are essentially keywords that can be attached to various elements of your Shopify store, including products, blog posts, and customers. By effectively using tags, you can create a more organized and user-friendly blogging experience for your customers.
In the context of your Shopify blog, tags help categorize and group your blog articles by topic or theme, making it simpler for readers to find relevant content. Additionally, proper use of tags can enhance your website's search engine optimization (SEO), improving your visibility and rankings on search engines like Google.
.png)
How to Add and Manage Tags in Shopify Admin
To make the most of the tags in your Shopify blog, it's essential to understand how to add and manage them. Follow the steps below to effectively utilize tags in your Shopify admin:
Adding Tags to Blog Posts:
1. Log in to your Shopify admin dashboard.
2. Navigate to "Online Store" and then click on "Blog Posts."

3. Choose an existing blog post or create a new one by clicking "Add blog post."
4. In the "Tags" section, located on the right-hand side of the page, start typing your desired tag name.
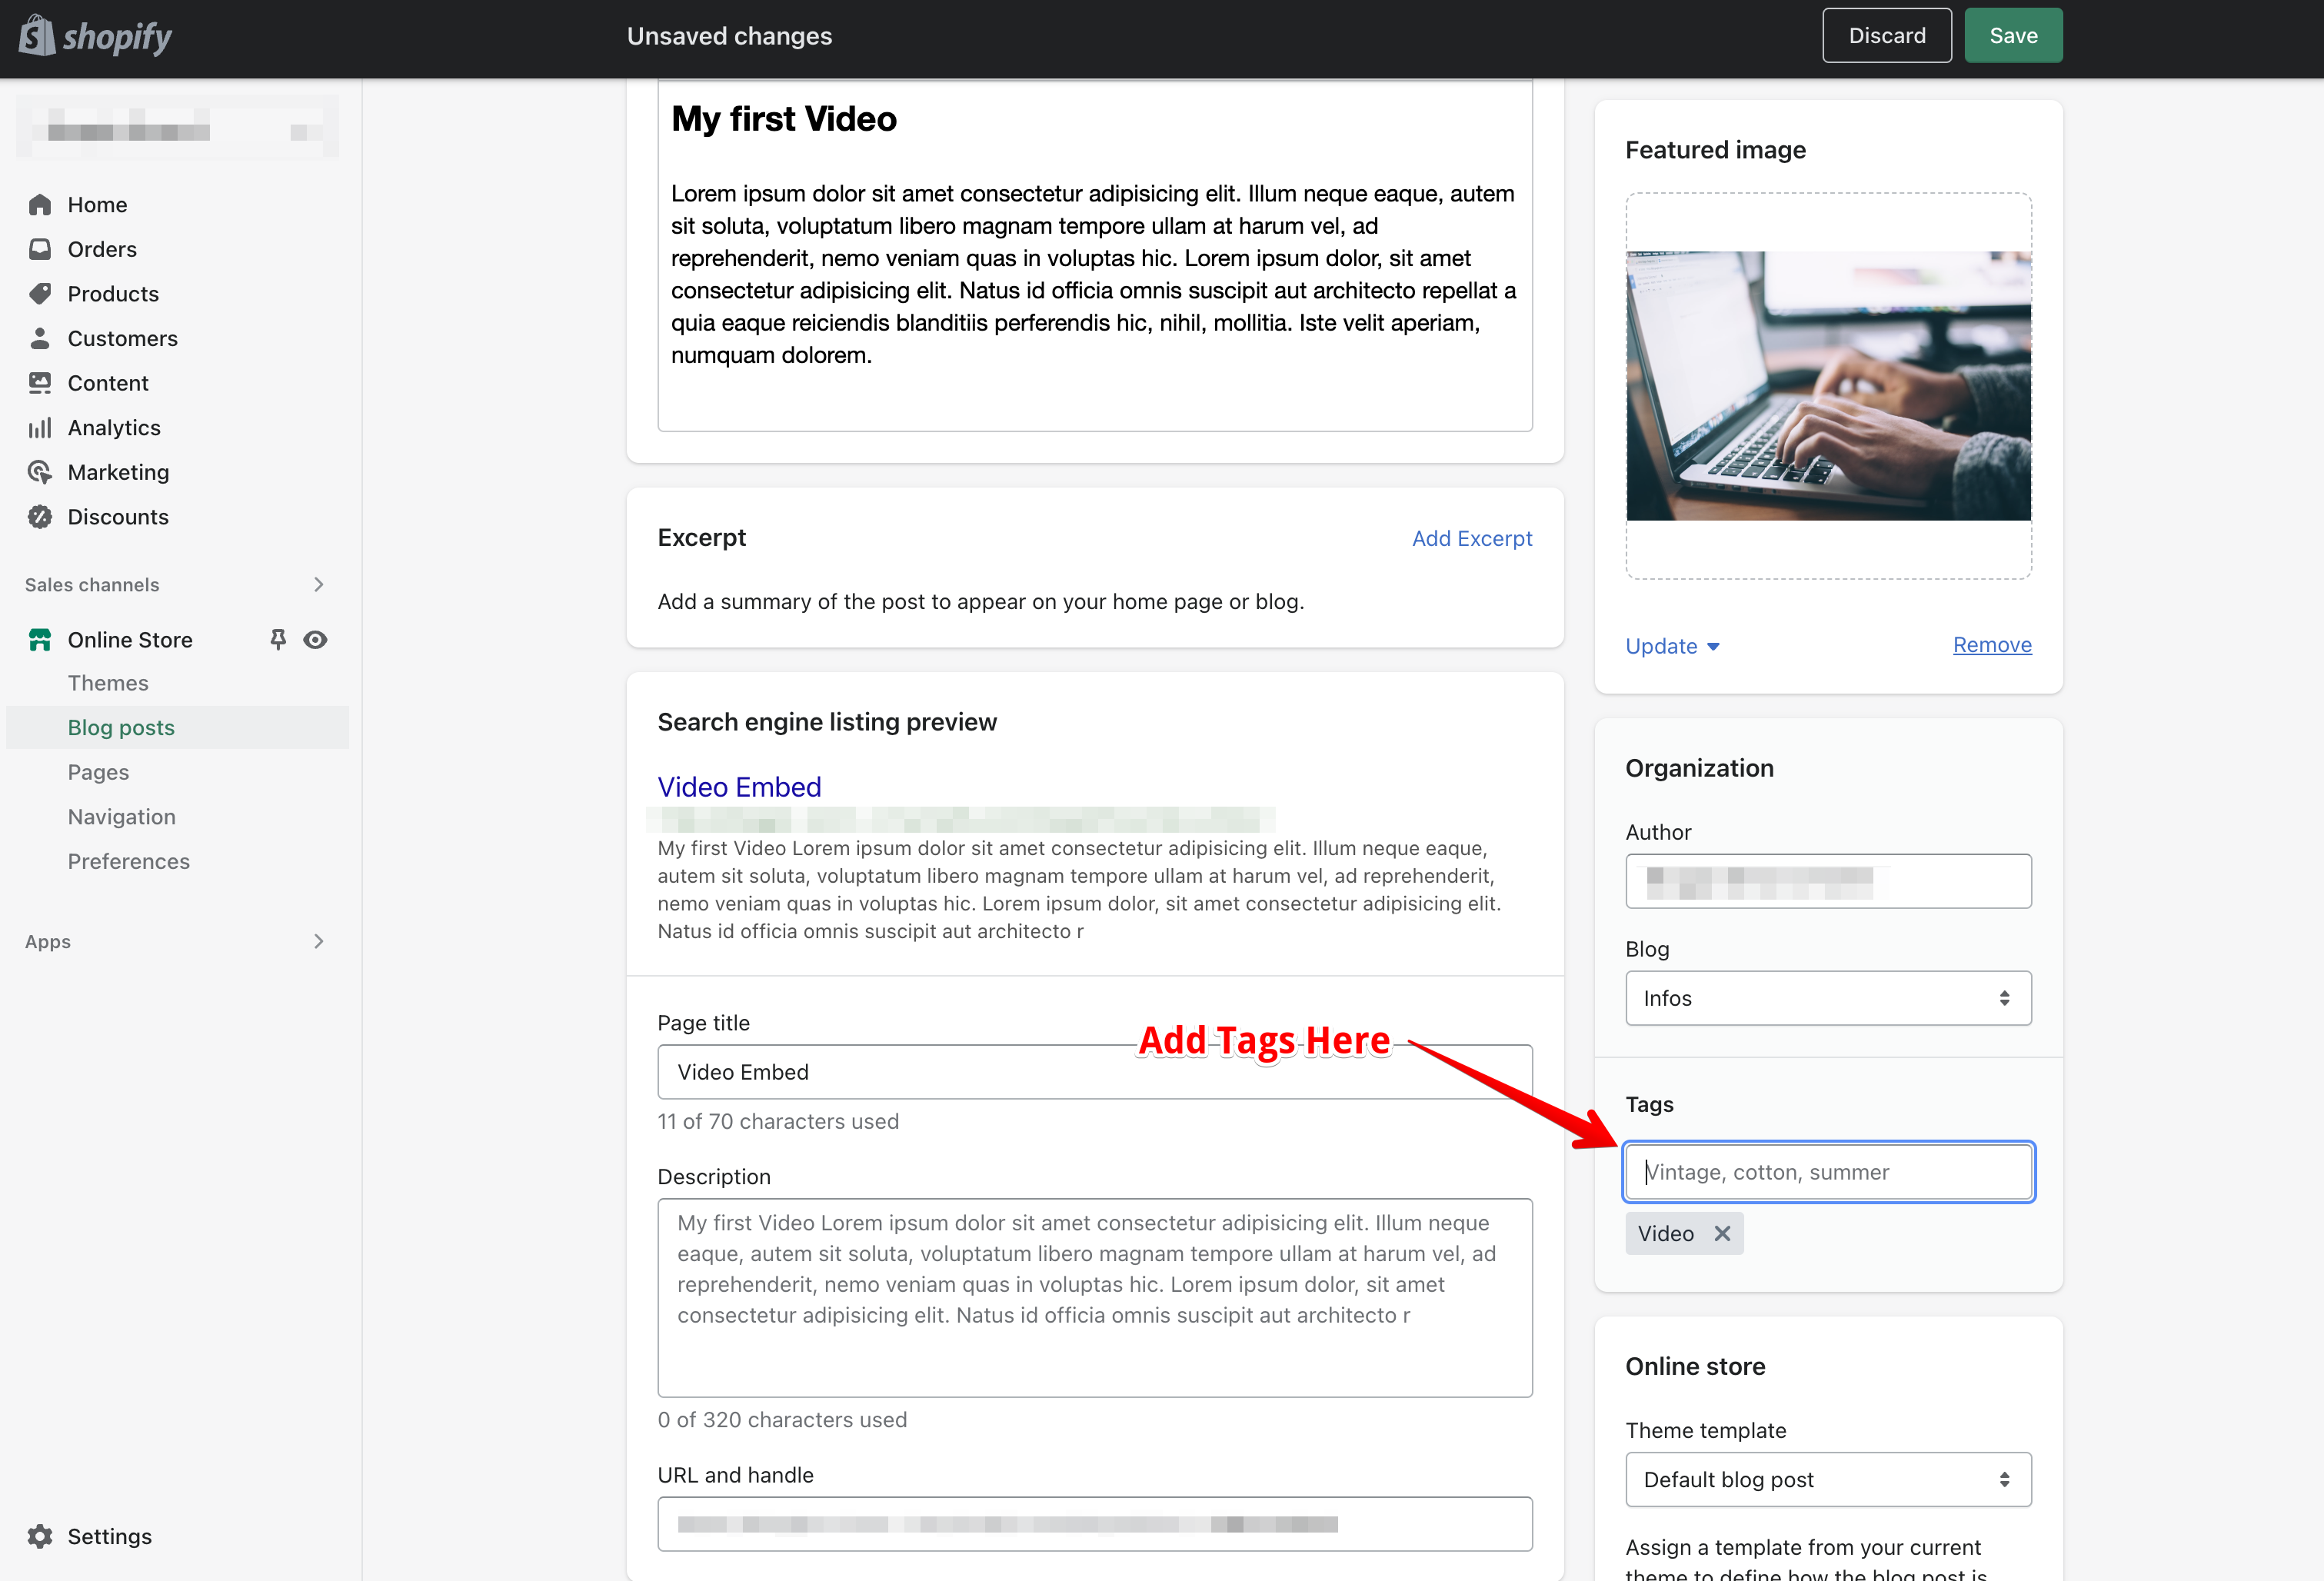
5. Press Enter or comma after each tag to separate them.
6. Save your blog post to apply the changes.
Alternative ways to manage tags:
Beyond the Shopify admin, you can also use blog management apps like Magefan Blog or similar tools to create and edit tags more efficiently. These allow you to:
- Enable or disable specific tags for better control.
- Set a unique URL handle and meta description for each tag page.
- Adjust meta robots settings to decide whether a tag page should be indexed by Google.
You can also enable a tag cloud in your blog sidebar. This feature visually displays all your tags, helping readers and search engines navigate related topics more effectively.
Managing Tags:
1. In your Shopify admin, go to the "Blog Posts" page.
2. Click on "Tagged with."
3. Type the tag name you want to manage and press Enter.
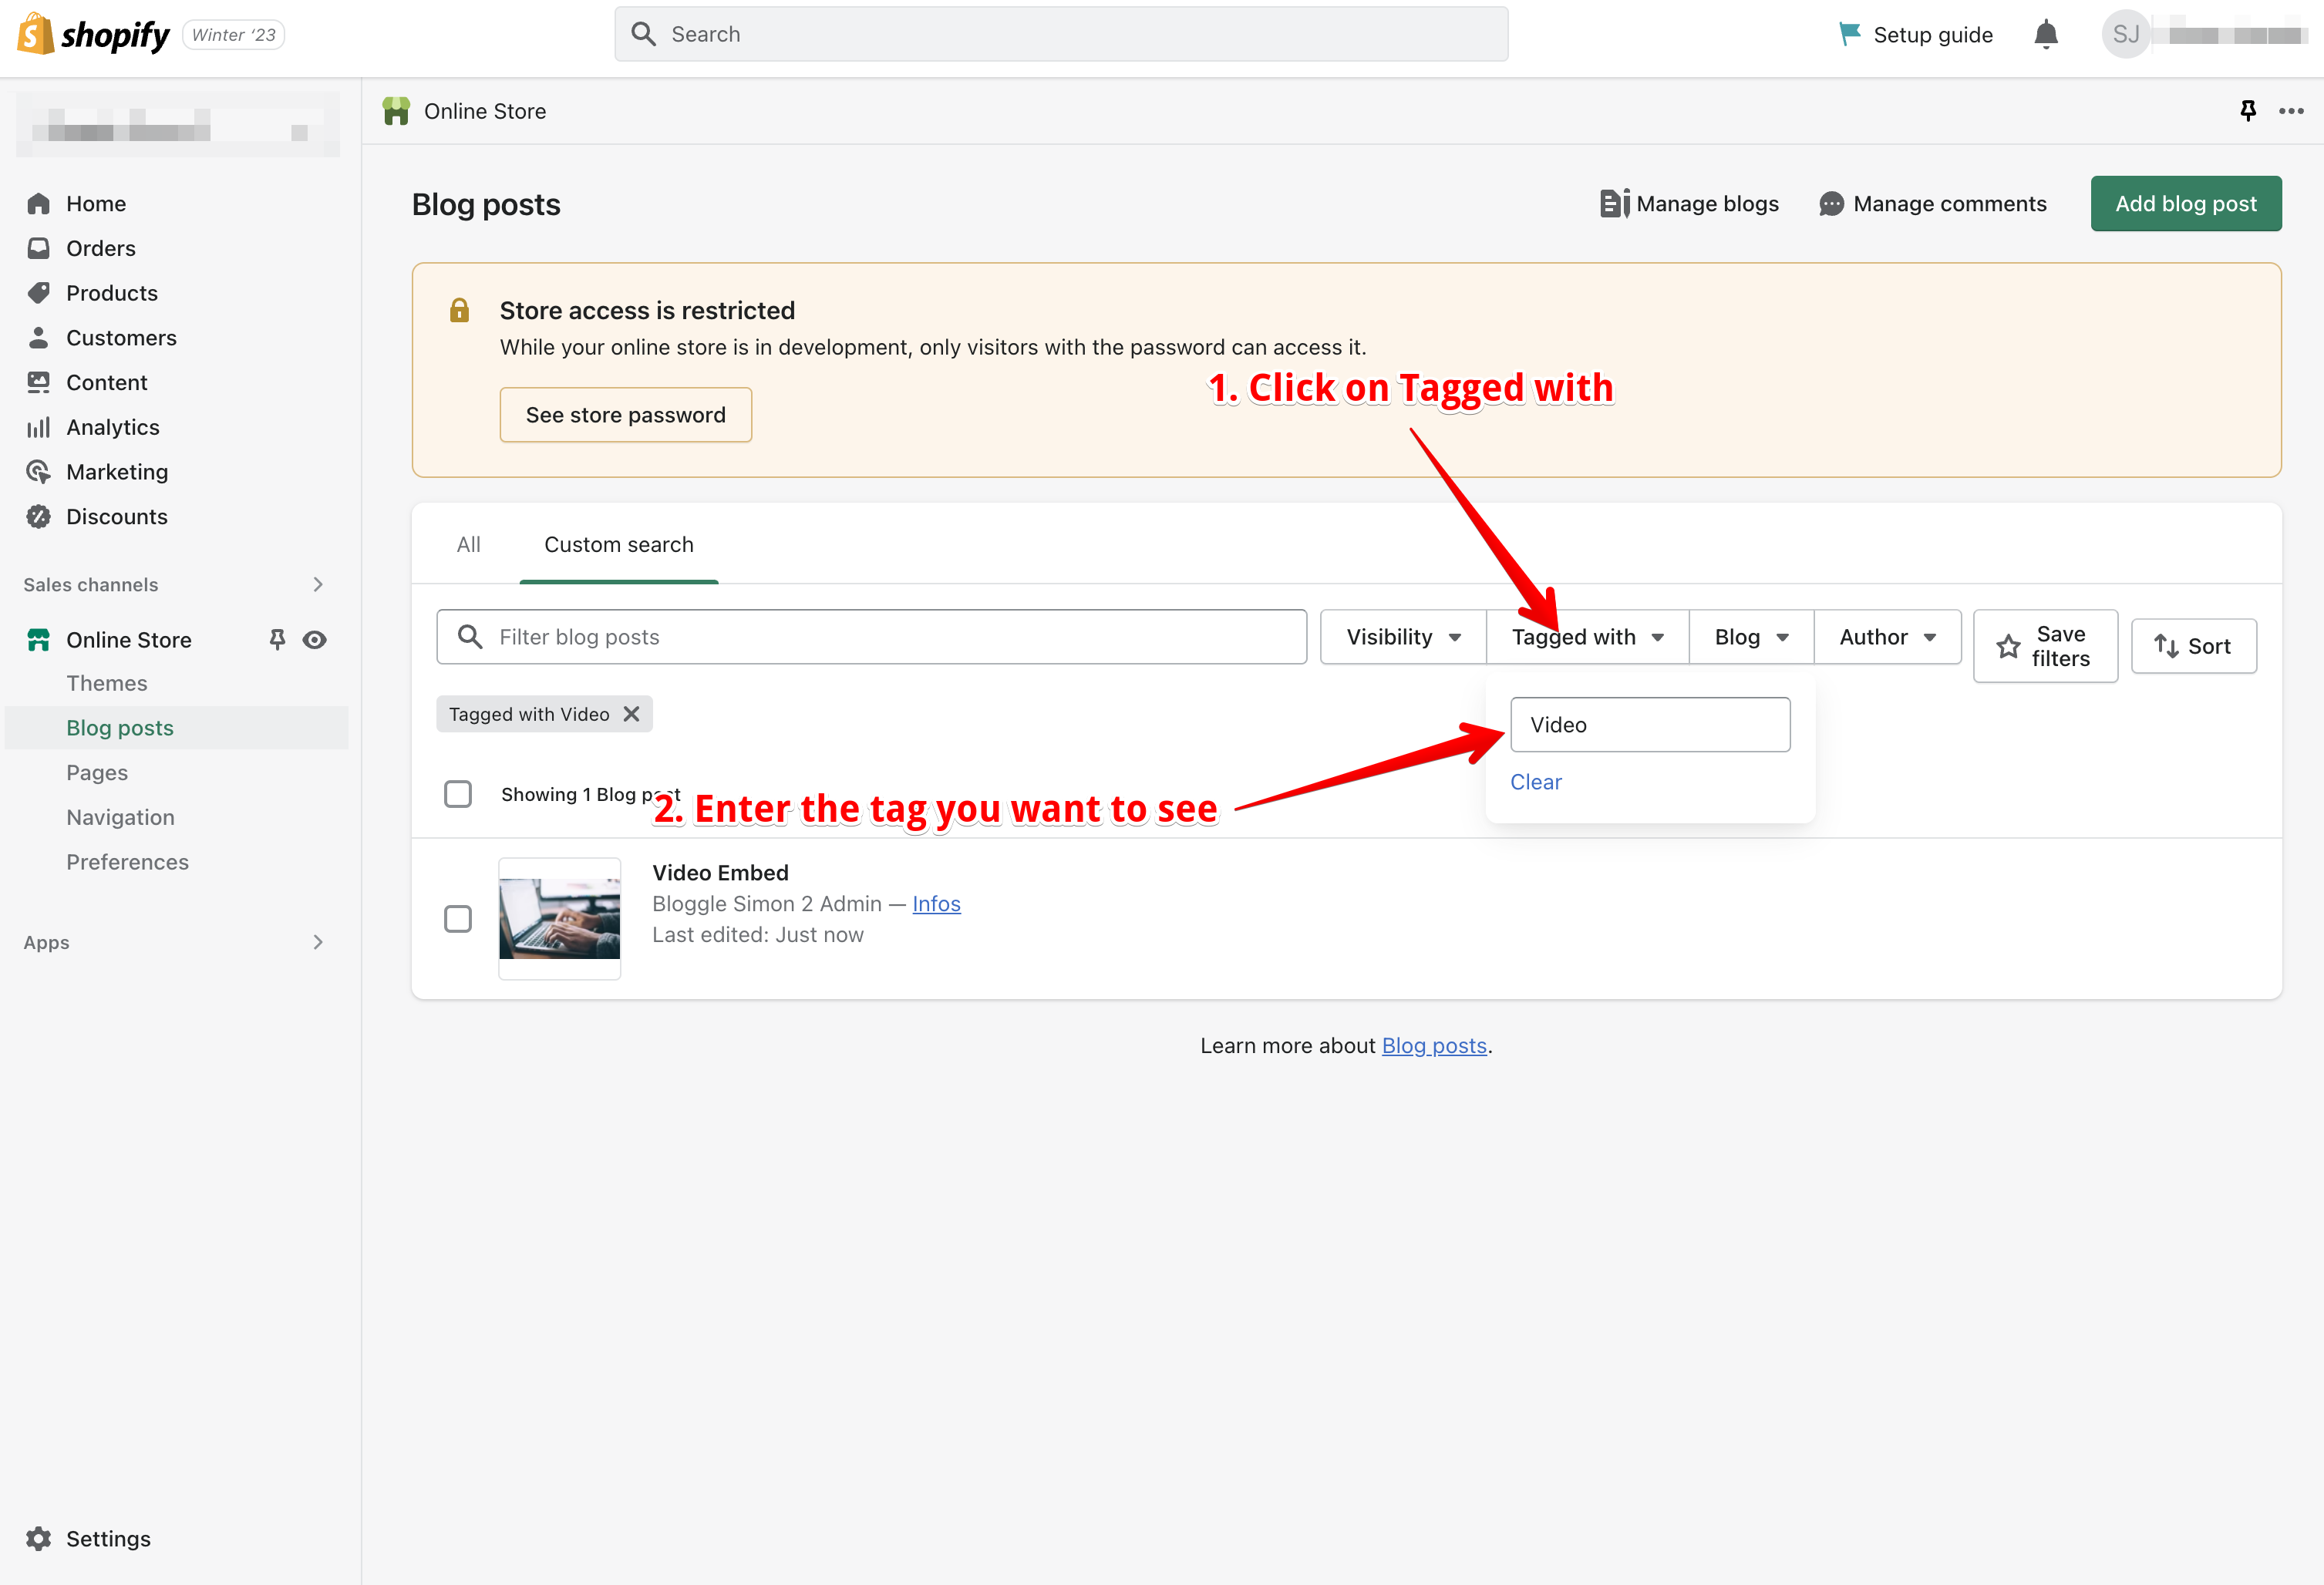
4. You'll now see a list of blog posts that have the specified tag.
5. To edit a tag, click on the blog post, and update the "Tags" section as needed.
6. The Importance of SEO and Using Tags for Optimization
Search engine optimization is crucial for driving organic traffic to your e-commerce store, improving your conversion rate, and enhancing customer experience. By effectively using tags in your Shopify blog, you can optimize your content for search engines and make it easier for potential customers to find your website.
The Importance of SEO and Using Tags for Optimization
Search engine optimization is crucial for driving organic traffic to your e-commerce store, improving your conversion rate, and enhancing customer experience. By effectively using tags in your Shopify blog, you can optimize your content for search engines and make it easier for potential customers to find your website.
Optimize your tag pages for SEO visibility
Each Shopify blog tag automatically generates a unique tag URL (for example: /blogs/news/tag-name). To make the most of it:
- Use short, keyword-rich tag names that describe the topic clearly.
- Exclude low-value or duplicate tags from your XML sitemap to prevent index bloat and wasted crawl budget.
- Ensure important tag pages are linked from within articles and your blog sidebar to help Google discover them.
According to Google’s John Mueller, well-structured tag and category pages can help improve site discoverability, especially when they’re optimized and internally linked like standard landing pages.

Here are some ways to optimize your tags for SEO:
1. Utilize Relevant Keywords: Choose tags that include your targeted SEO keywords. These keywords should be relevant to your content and reflect what your target audience is likely to search for.
2. Create Meta Descriptions and Page Titles: Optimize your blog posts by adding meta descriptions and page titles that include your primary keywords. This helps search engines understand the content of your page and improves your search rankings.
3. Optimize Blog Post Content: Ensure your blog articles contain the keywords you want to rank for, without over-stuffing them. This will help search engines index your content appropriately and boost your rankings.
Best Practices for Tagging Blog Posts and Products
To make the most of the tags in your Shopify store, follow these best practices for tagging blog posts and products:
Be Consistent: Use a consistent naming convention for your tags to make it easier for customers and search engines to understand your content. For instance, if you use "winter collection" for one blog post, stick to the same format for similar articles.
Use Specific Tags: Choose tags that accurately describe the content of your blog post or product. Specific tags like "clothing" "discount" "pants" and "new collection" will help customers find what they're looking for more quickly.
Avoid Over-tagging: While it's important to use relevant tags, avoid adding too many to a single blog post or product. Over-tagging can lead to confusion for both customers and search engines. Aim for a balance between providing enough information and maintaining a clean, organized structure.
Tag consistency and organization:
- Maintain a clear, consistent structure for your tags to ensure they add value to both users and search engines:
- Limit each blog post to 5–10 relevant tags, enough to capture related topics without causing overlap or confusion.
- Follow a consistent format (e.g., use lowercase and hyphens like
winter-fashioninstead ofWinter Fashion). - Internally link key tag pages from your blog sidebar or article footers to strengthen your internal link graph and help search engines understand topic clusters.
Create Automated Collections: Use tags to create automated collections in your Shopify store. These collections automatically group blog post with specific tags, making it easier for customers to browse and find relevant blog post.
Update Tags Regularly: As your store evolves, it's essential to keep your tags up-to-date. Regularly review and update your tags to ensure they accurately represent your content and maintain optimal search engine rankings.
Boosting Your SEO With Tagging
By implementing strategic tagging in your Shopify blog and store, you can significantly improve your visibility on search engines and enhance your customer experience. Here are some tips to maximize the benefits of tagging:
Utilize Shopify Apps: Take advantage of Shopify apps designed to help with tag management and optimization. These apps can automate the tagging process, provide insights on trending tags, and improve your overall tagging strategy.
Monitor Search Engine Rankings: Regularly check your search engine rankings to determine the effectiveness of your tagging strategy. Use tools like Google Analytics to track your progress and make adjustments as needed.
Adapt to Customer Searches: Pay attention to the terms your customers are using to find your products or blog articles. Use this information to optimize your tags and better cater to your audience's needs.
Collaborate with Shopify Plus Experts: If you're using Shopify Plus, consider working with Shopify Plus experts who can provide advanced support and guidance on optimizing your tags and overall SEO strategy.
Perform A/B Testing: Experiment with different tag names, formats, and combinations to see what works best for your store. Monitor the results and make data-driven decisions to refine your tagging strategy.
Track and refine your tag performance: Once your tag system is in place, treat it like any other SEO asset.
- Use Google Search Console to monitor impressions, clicks, and average position for each tag URL.
- Identify tags that attract no traffic or cause duplicate pages — and merge or remove them to maintain content quality.
- According to Ahrefs (2024), pruning redundant or low-performing tags can reduce crawl waste by up to 30%, helping your key pages get indexed faster.
Over time, optimizing your tags based on performance data helps maintain a cleaner site structure and stronger search rankings.
In conclusion, using tags effectively in your Shopify blog can significantly improve your store's search engine rankings, making it easier for potential customers to discover your website through organic search. By understanding the importance of tags, learning how to add and manage them in Shopify admin, and implementing best practices for tagging blog posts and products, you can optimize your e-commerce store's visibility and drive more organic traffic.
Remember to monitor your search engine rankings, adapt to customer searches, and perform A/B testing to continually refine your tagging strategy and enhance your online store's success.


.svg)
