
.svg)
Every advanced Shopify user knows that Shopify image size is often painful to optimize. It is even harder if you use one of the provided free themes within the Shopify App.
But don’t worry, Bloggle team have everything you need to solve this problem once and for all.
In this complete guide we will cover every single image size you can find, from Shopify product image size, Shopify banner image size,and Shopify blog image size as the most prominent ones, to Shopify collection image size,Shopify slideshow image size and all the others that are not used that frequently.
We’ll also show you how all the pictures look in the Dawn Shopify theme, the most commonly used free theme in Shopify.
.png)
Why trust us
- We're the creators of Bloggle, a dynamic Shopify blog builder available on the Shopify App Store that fills the gaps in native Shopify blogging capabilities.
- We're a global force: 2000+ merchants across 60 countries have trusted us to amplify their voices.
- Your peers adore us: We have a stellar 4.9/5 rating on the app store.
- We've already empowered 55,000+ blogs written using our versatile app.
- Under our guidance, users have reported up to a 10x boost in Search Engine Optimization (SEO) traffic and revenue.
The Importance of Shopify Image Optimization
Shopify image optimization is too daunting and you can’t bother doing that anymore? We share the pain, but we can’t stress how important Shopify image optimization is.
Online shopping is getting more prominent with each year passing by, which is likely one of the reasons why you became a Shopify seller.
On the other hand, as a seller (and maybe a buyer, too!), you know the risks of online shopping. Until you try things on,it’s hard to tell whether the item you ordered is likely to meet your expectations.
For that reason, you shouldn’t be surprised to hear that over 80% of shoppers rely on pictures before clicking that “Buy” button. Because of that, quality pictures on your shop can be one of the most important keys to your success.
Most sellers struggle a lot with how to fit pictures into different parts of their store, as well as how to optimize and resize them. The good news? After this guide, you’ll find it easy. But first,let’s learn the terminology.
.png)
Shopify Image Size Terminology
If you know the terminology already, that’s amazing! You can proceed to the next section of the guide, but if you don’t, don’t worry, everything you need to know is below:
- Pixels: Pixels are tiny dots that make up a digital image. The more pixels the image has, the more detail and quality it will have.
- DPI (Dots Per Inch): DPI indicates the density of pixels in the picture. Same as with the pixels, higher DPI means finer details and more quality.
- Resolution: This refers to the clarity and detail present in an image, measured by the pixel dimensions of its width and height. For instance, a resolution of 1920 x 1080 pixels denotes Full HD quality. A higher resolution equates to a denser pixel count, yielding images that are crisp and rich in detail.
- File size: Represented in bytes, kilobytes (KB), megabytes (MB), or gigabytes (GB), the file size of an image depends on its complexity and the degree of compression used.
- File format: The digital format of an image, such as JPEG, PNG, or WEBP, affects its use and quality. More on this topic is discussed later in the article.
- Dimensions: These refer to the physical width and height of an image, typically measured in pixels for digital formats and inches or centimeters for prints. It denotes the pixel count across the horizontal and vertical planes of an image.
- Aspect ratio: This term describes the proportional relationship between an image's width and height, common ratios being 4:3, 1:1, and 16:9. For example, an image measuring 1000 pixels wide by 1000 pixels high has a 1:1 aspect ratio. The aspect ratio is crucial for determining an image or video's shape, influencing how content is framed, composed, and viewed across different media platforms.
.png)
Required Size for EVERY Image Type on Shopify Stores
Why Choosing the Correct Image Size on Shopify is Important
You know how they say — “A picture is worth a thousand words”. As a Shopify seller, you should be aware of the importance of each picture in your marketing efforts. If a product has a quality and descriptive picture attached, it will definitely boost sales.
Here are the most prominent reasons why choosing and optimizing the correct Shopify image size is crucial:
Improved Page Load Speed
Better optimized pictures will load faster, which means your whole page will load faster as well. That is also a significant factor both for search engines and users visiting your shop.
With attention spans and patience getting shorter and shorter, nobody will wait for 30 seconds for your website to load, they will just click the “X” and search for similar products elsewhere. Having a fast-loading website is one of the biggest factors in retaining visitors and improving engagement, which will ultimately lead to more conversions.
Better User Experience
We need fast-loading images, but that doesn’t mean we can just put bad-quality pictures that will load instantly. We must choose a meaningful, descriptive image that gives value to our potential customers.
If your pictures are blurry or unrelated to the items you are selling, you won’t convert anybody! Therefore, your task is to lower the size of the images, without losing quality. Later in the article, we will show you some tools capable of doing that.
Social Media Sharing
Having beautiful and meaningful pictures is great for your social media marketing. Sharing photos of your products that are worthy of big brands will engage the audience and activate more selling channels for you.
Quality pictures can be part of a brand awareness campaign as well and help your shop stay relevant in the long run.
The Problems with Listed Shopify Image Sizes
When uploading images to Shopify, you have to be careful, because the recommended sizes won’t work every time. How the images look and if they fit into the layout depends on the theme you are using as well. Knowing the theme you are using and the layout of your shop is key to saving time and avoiding reuploading images. Also, you will avoid the guess work, if you follow the Bloggle expert tip we are about to show you.
Shopify image size actually comes in two types — intrinsic and rendered.
Intrinsic size is the size of the original image. So, if you follow the guidelines and upload 2560x1400 background image, its intrinsic size is exactly 2560x1400.
Rendered size is the size of the picture as it appears after Shopify displays it to users. It can be the same as the intrinsic size, but it can be displayed in different sizes, depending on the circumstance.
We will show you a couple of examples to better explain what is happening when you upload an image to Shopify.
The following featured image has an intrinsic size of 1920x1080 (16:9 ratio).

We also added the image to the post as a Product image (480px) from the Image size drop-down menu.

We can now check the rendered size of both images by right-clicking on them and choosing the Inspect element from the menu.
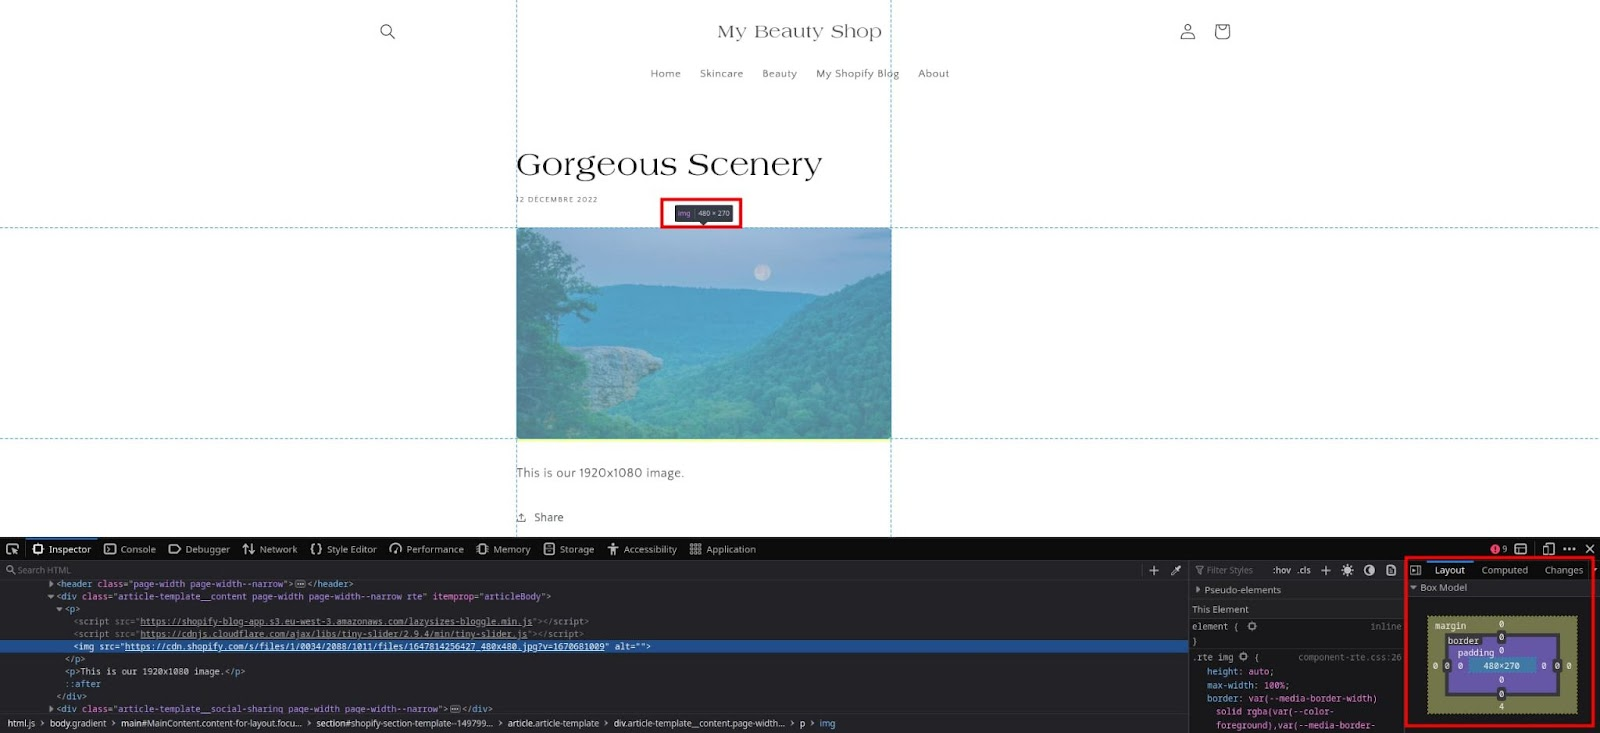
As we can see, the Product image has a rendered size of 480x270, which is matching with the intrinsic size and our recommended size for that type of picture.
However, if we check how featured images are rendered, we will see this:

Most of the Shopify themes render blog posts as a grid of cards. Each card includes a featured image, a title, and an excerpt. The most recent post image is shown as a double-size compared to earlier posts.
Here, the top image has a rendered size of 1098x550 pixels, while the bottom two images have a rendered size of 538x307 pixels.
Shopify automatically adjusted the size of our original Featured image (1920x1080) depending on the placement within the page.
Shopify didn’t even keep a 16:9 ratio, as it is slightly different in all rendered pictures. You will avoid messing up your grid if you follow Bloggle’s Expert Tip:
The Best Shopify Image Formats and How to Optimize Them
There are several most commonly used image formats overall — JPG/JPEG, PNG, and GIF. Shopify is no exception since these three formats are most commonly used on Shopify as well. They allow other image formats, such as TIFF or HEIC, but they are not widely used and you don’t need anything else apart from the top three we listed above.
- JPG/JPEG: One of the most widely used picture formats, thanks to keeping a good quality while being very small in size. This format is recommended for Shopify product photos.
- PNG: PNG is great for logos and graphics, especially if you need transparency. However, most of the things can be covered by JPG as well, so we don’t recommend using this image type too often, especially because the file size can be very large.
- GIF: GIF is a popular way of adding animated pictures to your website. If you have a need for animated pictures, GIF is definitely the best idea. Also, Shopify image format makes GIFs that can be massive smaller by compressing them and reducing them to only 256 colors.
You can resize and scale images using a variety of tools. The simplest one and the one we recommend is GIMP, while for compressing images you don’t have to download anything, just use TinyPNG from your browser.
.png)
Shopify Background Image Size
Shopify background image size of 2560 x 1400 pixels for desktop (16:9 ratio), is optimal for getting your Shopify store a captivating visual identity.
This size ensures that your background image is displayed in high resolution, providing an engaging backdrop to your content. The 16:9 ratio makes this image easy to convert for every screen size and elevates shopping experience for your customers.
Shopify Hero Image Size
Shopify hero image size of 1280 x 720 pixels (which is also 16:9 aspect ratio) allow you to get an impactful first impression of your shop. You should utilize it to the fullest by choosing the correct picture for this section.
The widescreen format can showcase high-resolution visuals that will help you with branding, or putting your best-selling products to the front of the store. In general, Hero and Background images have a similar role.
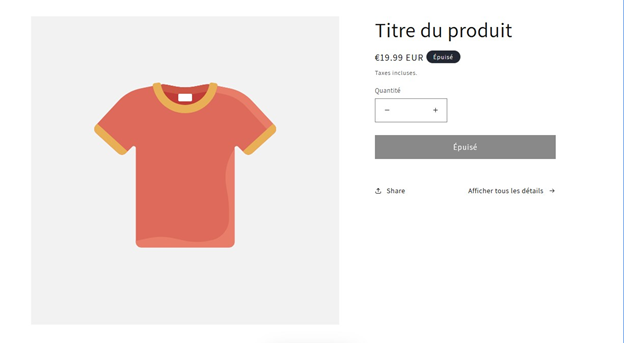
Shopify Product Image Size
Shopify product image size is 2048 x 2048 pixels ideally, adhering to a 1:1 square ratio. Optimizing images to lower dimensions is possible, but you should always have in mind 1:1 ratio. Depending on the theme these pictures can render differently, and here is how it looks in the most popular Dawn theme:
Shopify Banner Image Size
Shopify image banner size of 1200 x 400 pixels, sporting a 3:1 aspect ratio, is the golden standard for creating striking banners that capture customer attention upon entering your Shopify store. These dimensions allow for a panoramic display, ideal for showcasing brand stories, highlighting promotions, or announcing new collections.
Shopify banner dimensions of this size ensure that your banners are visually compelling without overshadowing your site's content, maintaining an appealing balance for the potential customer.
By adopting these specific Shopify image banner size guidelines, you can achieve consistent appearance across different viewing devices, enhancing the aesthetic and functional appeal of your online shop.
Shopify Blog Image Size
Shopify blog image size is 1200 x 800 pixels, which means 3:2 aspect ratio is recommended. This dimension is great for complementing the written content, but that doesn’t mean pictures won’t stand out.
Still, depending on the theme and the layout you are using, these pictures can be rendered to a different, smaller size.
Paying attention to the aspect ratio and providing quality images will ensure everything looking good, even when Shopify renders your images to a smaller size. Here is how it will look in the Dawn theme, in the layout with three posts in a row:

Shopify Logo Image Size
Shopify logo image size depends on the type of logo displayed. The square logo is 100 x 100 pixels, with 1:1 aspect ratio, while the rectangle logo is 400 x 100 pixels, with 4:1 ratio.
Square logos offer a compact and versatile option, ideal for consistency across various platforms, while rectangular logos provide a wider format that's perfect for incorporating longer brand names or intricate designs.
Both sizes ensure your brand’s logo is displayed clearly and prominently on your site, contributing to brand recognition and a professional appearance.
Shopify Favicon Image Size
Shopify Favicon image size is ideally 16 x 16 pixels. The most important thing is keeping 1:1 aspect ratio. The small, square dimension is ideal for favicons, because that tiny icon is displayed in browser tabs and bookmarks, as a representation of your website.
Despite being so small, Favicon can help with your branding immensely. If you manage to create an impactful logo which will transfer to Favicon, your website will be recognized and boost your brand.
Shopify Lightbox Image Size
Shopify Lightbox image size is ideally 1920 x 1080 pixels. The image can be resized depending on the theme and the layout, but it should keep 16:9 aspect ratio. This is fairly big for Shopify which is not surprising.
You should utilize this option to showcase your best products and can really make your whole shop shine and differ from your competition.
Shopify Mega Menu Image Size
Shopify Mega Menu image size is 510 x 234 pixels, which translates to 17:8 aspect ratio. This is one of the trickiest image sizes on Shopify, and it can vary greatly depending on the theme and layout you are using.
If you are using Dawn theme, try to optimize your image size close to these ones, so even if Shopify renders it smaller, you won’t lose much quality in your mega menu image.
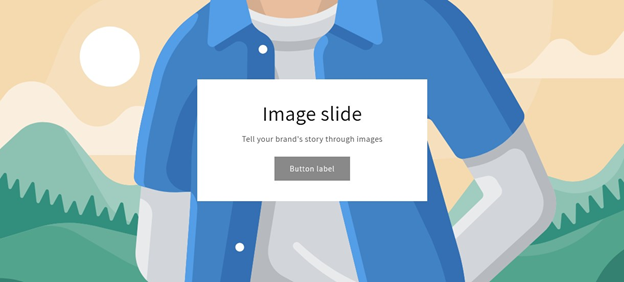
Shopify Slideshow Image Size
Shopify Slideshow image size is 1920 x 1080 pixels, 16:9 ratio on the Dawn theme. It is very important to get a photo of a great quality in this position, because it can be very important for your conversion.
This is a widescreen format, so if a potential customer is visiting your shop from the desktop computer, it will cover almost their full screen, and provide an impactful user experience. Here is how it looks:
Shopify Collection Image Size
Shopify collection image size is 800 x 800 pixels, with 1:1 aspect ratio. In different themes, even in the Dawn that recommends this dimension, collection images can be rendered to smaller size.
Since these pictures are among the most commonly used, you should pay extra attention to the quality and display. Make sure that you upload images with the correct aspect ratio so even if they are smaller on the website everything is clear on them, and they are not cut in a weird way.
Ensuring quality and using resize software such as GIMP we recommended before will allow you to stand out from your competitors.
Shopify Video Placeholder Image Size
Shopify video placeholder image size is 1600 x 900 pixels, which puts this image in a group of Shopify images with the 16:9 aspect ratio. Everything we said previously about the wide-screen image format is correct for this one as well.
Placeholder image should fit perfectly in the video player, and the transition from the picture to the video should be smooth.
Shopify Testimonials Image
Shopify Testimonials image is 225 x 225 pixels, which means it has a 1:1 aspect ratio.
With this aspect ratio, it is easy to make good square images, so even if they are rendered, they won’t lose much quality, nor they’ll be cropped in a weird way, causing you to lose something that you wanted to represent on them.
Conclusion
Shopify image size can be very hard to determine for different types of images used in the shop.
The image size depends on the layout and the theme you are using, and even if you use the size recommended by Shopify itself, the pictures can still be rendered to smaller sizes, lose quality, and become unrepresentative for your shop.
Therefore, you should always use quality image resize and conversion software, and pay attention to aspect ratios first, not only dimensions in pixels, because that can be incorrect, while aspect ratio should always be correct for each image size.


.svg)
